23 Best Exercise for Iliotibial Band Syndrome
Introduction:
Exercise for iliotibial band syndrome, along with pain medication and physical therapy, is an important element of your entire treatment plan.
Iliotibial Band Syndrome (ITBS) is a common overuse injury, particularly among runners, cyclists, and other athletes involved in repetitive lower limb activities. The iliotibial band (IT band) is a thick band of connective tissue that runs along the outside of the thigh, from the hip to the shin.
When this band becomes tight or inflamed, it can cause pain and discomfort, typically around the outer knee. Proper exercise and stretching routines are crucial in managing ITBS, as they help to alleviate tension in the IT band, strengthen supporting muscles, and improve overall biomechanics to prevent future injury.
Long-distance running, cycling, weightlifting, and military training are the activities most frequently linked to iliotibial band syndrome. a severe knee injury that sportsmen frequently suffer. This ailment manifests as a weakening of the hip abductor muscles. You may have iliotibial band syndrome if you get pain on the outside of your knee, particularly if you run.
Examining what additional considerations should be made before performing a specific exercise is a good place to start when talking about Exercises for iliotibial band syndrome (IT band syndrome). We will go over the things to consider while creating an exercise program for iliotibial band recovery in this post, along with suggestions for exercises based on your objectives and the current state of the condition.
Causes of Iliotibial Band Syndrome:
Iliotibial band syndrome is caused by excessive friction from the iliotibial band pressing on the bone as a result of its high tightness. The main cause of the injury is overuse from repetitive motions. iliotibial band syndrome impairs knee movement by causing pain, irritability, and friction. It appears to occur in a small number of individuals, while the causes are unknown.
Other factors;
- Bowlegs
- Flat feet
- Repetitive activities such as running and cycling
- Knee arthritis
Signs and symptoms:
Your hip’s greater trochanteric is constantly rubbed by your iliotibial band. The broadening of the bone toward the head of your femur is known as the larger trochanteric region. Hip pain and tendon irritation are put on by the friction. There may be a snapping noise.
- Redness and warmth
Your knee may appear inflamed on the outside and feel hot to the touch.
- Sensations of clicking
Something on the outside of your knee may pop, crack, or click.
- Pain in the knees
When you bend and extend your knee, your stretched iliotibial band rubs against your lateral epicondyle repeatedly. The friction causes your tendon to get inflamed and your knees to pain.
Exercise for Iliotibial Band Syndrome:
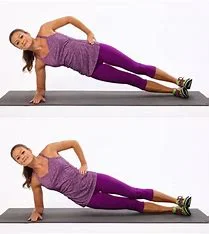
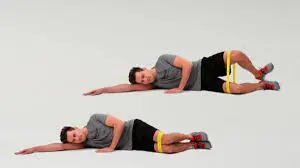
Side plank
- Take a plank position.
- Press into your left arm after moving your right arm.
- It is usual to place your right hip so that it points upwards.
- Make sure your hips are straight.
- To provide support, lift your ankles or droop your left leg.
- Place your right hand on your right hip or extend your arm toward the ceiling.
- Next, raise your right leg as high as you can.
- Hold this position for a few seconds.
- Then return to your neutral position.
- Then relax.
- Repeat this exercise five to ten times.
- After that, complete the other side.
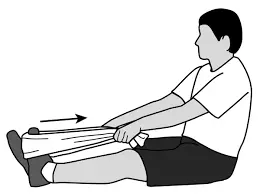
Towel stretch
- You may perform this easy stretch while sitting on the floor or in bed.
- Stretch your legs out in front of you while sitting on the floor or in bed.
- Place a rolled-up towel beneath each heel of your feet and grasp its ends.
- Move the towel slowly toward you while maintaining straight knees and a straight posture.
- Hold this position for a few seconds.
- Then return to your neutral position.
- Then relax.
- Repeat this exercise five to ten times.
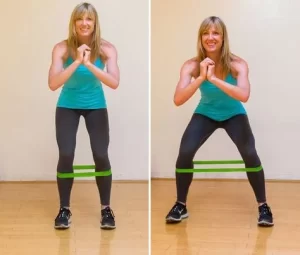
Lateral Band Walks
- Place the band slightly above each knee and wrap it around both legs, making sure it stays level and untwisted.
- Step with your feet shoulder-width apart.
- The band must be strong but not stressful.
- Lower your body into a half-squat position with your knees slightly bent to activate your gluteus medius.
- With your feet parallel to your shoulders and your body weight evenly distributed over both feet, face forward.
- Continue to flex your other leg out to the side and retain your half-squat stance.
- This leg should be moved sideways in and out five to ten times.
- Throughout the exercise, maintain your hips level.
- Then return to your neutral position.
- Then relax.
- Repeat this exercise five to ten times.
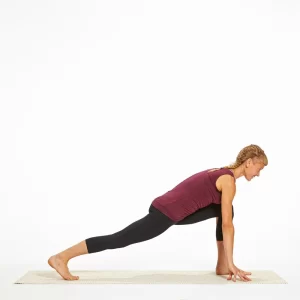
Low lunge
- To create a low lunge, place your left knee on the floor just below your hips and step your right foot ahead.
- Stretch your left arm to the right after placing your right hand onto your right thigh.
- Maintain an upright posture to prevent your hips from falling forward.
- The left outer hip is stretched.
- Hold this position for a few seconds.
- Then return to your neutral position.
- Then relax.
- Repeat this exercise five to ten times.
- Repeat with the other side.
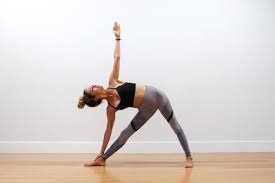
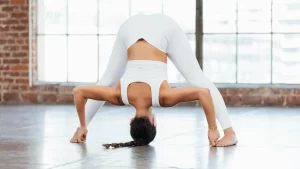
Wide-legged standing forward bend
- Step or leap from a standing position until your feet are broader than your shoulders.
- Tilt your toes in and bend your knees just a little bit.
- Lean forward slightly by bringing your hands to the floor and stretching your hips.
- Put your hands on the outside of your right leg to feel the stretch along the outside of your lower body.
- Slide your hands to the right after moving your upper body in that direction.
- If your hands are not able to reach the floor, use a block or chair for support.
- Hold this position for a few seconds.
- Then return to your neutral position.
- Then relax.
- Repeat this exercise five to ten times.
Standing Iliotibial Band Stretch
- Arrange your right leg so that it crosses your left leg when standing, and firmly plant both feet.
- Attempt to maintain a shoulder-width distance between your feet.
- Go as far to the right as your body will allow, drooping, and feel how your outer hip and knee stretch.
- Reach your left arm overhead to extend the stretch farther.
- For more support or resistance, press your left hand into a wall.
- Hold this position for a few seconds.
- Then return to your neutral position.
- Then relax.
- Repeat this exercise five to ten times.
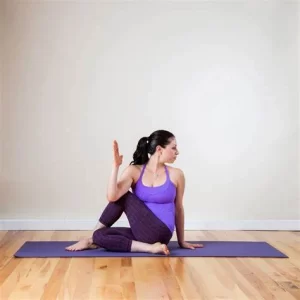
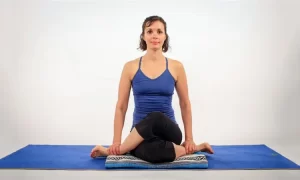
Seated Spinal Twist
- Bend your knees, place your hips on the floor, and sit with your feet flat on the floor.
- Bend your left knee such that the outside of your right buttocks is grounded and the front of your knee faces forward.
- Lift your right foot and plant it against the outside of your left leg, applying pressure with it.
- With your right fingertips behind you and your hands on the mat or a block, maintain a straight and straightened spine.
- Taking a breath, extend your heart and entire spine upward by pressing your hips down, then raise your left arm.
- When you release the air, push your left elbow out to the side of your right leg.
- With every inhalation, stretch your back and bend your neck more deeply.
- Hold this position for a few seconds.
- Then return to your neutral position.
- Then relax.
- Repeat this exercise five to ten times.
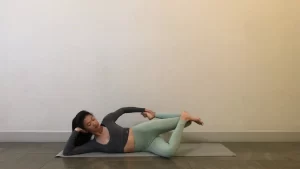
Clamshell Exercise With Band
- Place your forearm on the mat while lying on your side with your legs stacked on top of one another.
- Put a resistance band over each of your two thighs after that.
- Maintaining your feet together and your knees and hips arranged, bend your knees to a 45-degree angle.
- Lay your other hand on the mat in front of you and put your head on your palm for further support.
- Engage your core by pulling your belly button toward your spine and squeezing your abs.
- As you slowly raise your upper knee toward the highest point, maintain your lower leg on the mat.
- Hold this position for a few seconds.
- Then return to your neutral position.
- Then relax.
- Repeat this exercise five to ten times.
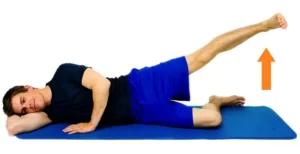
Side-lying hip abduction
- As you lie on your side, elevate your affected leg.
- Imagine that your toes are attempting to touch the front of your leg by straightening your upper leg and bringing them toward you.
- For balance, maintain your bottom leg slightly bent, your hips arranged in a and your abdominals contracted.
- Raise your rear leg slightly and slowly.
- Hold this position for a few seconds.
- Slowly down your leg.
- Then return to your neutral position.
- Then relax.
- Repeat this exercise five to ten times.
- Repeat the exercise on the opposite leg.
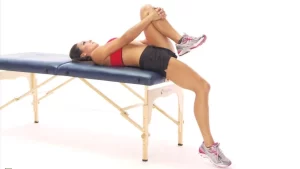
Thomas flexor stretch
- Place your mid-thigh in line with the edge of the table when you sit at its end.
- Press and retract your scapulae without arching your lower back after contracting your abdominal muscles to engage your spine.
- As you pull your left knee off the table and toward your chest, maintain your core contractions.
- Put your hands beneath your left leg without shifting your body.
- Lean backward a little more, maintaining your head in line with your spine and your abs firm.
- Stretch your right leg upward in order to raise your right thigh off the table.
- Start straightening out your back, one vertebra at a time, lowering it to the table.
- Holding on to your left thigh, keep your right knee pointing straight up toward the ceiling.
- To allow your lower leg to extend over the table and give your right hip flexor a stretch, as you drop your head into a supine (on your back) position, hold onto your left leg and lower your right thigh straight down to the table while keeping your knee bent.
- Hold this position for a few seconds.
- Then return to your neutral position.
- Then relax.
- Repeat this exercise five to ten times.
- Repeat the exercise on the opposite leg.
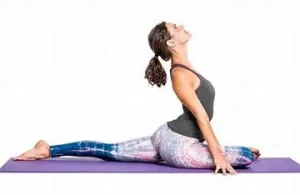
Pigeon Pose
- Standing, position your feet hip-width apart.
- You should position your arms by your sides.
- Make the front bend while standing.
- Lean at the hips and pull your body in the direction of your legs so you can do this.
- Keep your back straight when bending forward.
- Breathe in and extend your right leg while maintaining a straight left leg behind you.
- The right knee should be on the floor at this point.
- Attempt to maintain a raised left heel.
- Take a deep breath out and place your right shin on the mat.
- Your left hip and right heel should be in close contact.
- Legs up on the mat left knee down.
- Face the ceiling with your left foot.
- On the carpet in front of you, place your palms.
- Put your hands on your shins if you find it hard to keep them on the mat.
- Then, raise your chest and stretch your back.
- Maintain a calm gaze as you look forward.
- Hold this position for a few seconds.
- Then return to your neutral position.
- Then relax.
- Repeat this exercise five to ten times.
- Repeat the exercise on the opposite leg.
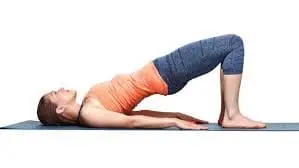
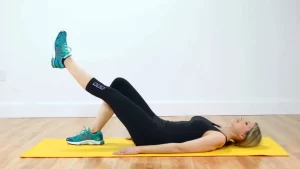
Bridging
- Lying flat on your back, bend both knees and place both feet flat on the floor.
- Arms should be kept by the sides and palms down.
- As you gradually raise your pelvis, raise your back.
- Ensure that your upper body and shoulders stay on the ground.
- Hold this position for a few seconds.
- Beginning at the top of the spine, slowly lower the pelvis and return toward the ground.
- Lower into the spine until the entire back is flat against the floor again.
- Then return to your neutral position.
- Then relax.
- Repeat this exercise five to ten times.
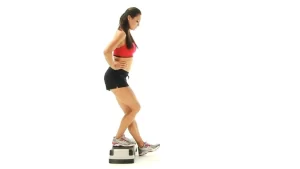
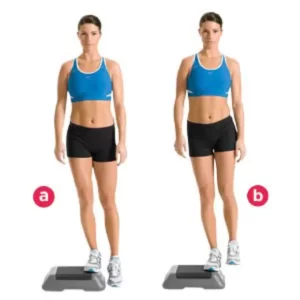
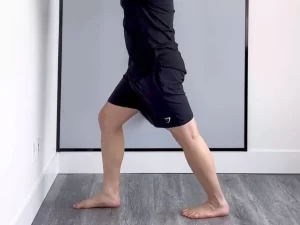
Single-leg heel drop
- Take a step in front of a wall or next to a railing for stability, then straighten your back while standing on the step.
- As you stand up onto the heel of your feet, maintain a straight knee.
- After that, elevate the leg behind you by shifting all of your weight onto the affected leg.
- Return your heel to the ground while maintaining slow, careful movement.
- To go back to the top of the exercise, put your other leg back on the step and push up through both.
- Then return to your neutral position.
- Then relax.
- Repeat this exercise five to ten times.
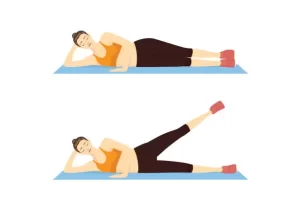
Side-lying leg raise
- You can sleep on your right side by lying on the floor or a yoga mat.
- Maintain an upright posture by keeping your legs raised and your feet placed on top of each other.
- Instead, use your arm to support yourself by holding it upright or with your elbow flexed, positioned below your head.
- Extend your left leg off the ground.
- Don’t raise your leg anymore until you feel the muscles contract.
- Hold this position for a few seconds.
- After inhaling deeply several times, pull the leg down until it contacts the right leg again.
- Then return to your neutral position.
- Then relax.
- Repeat this exercise five to ten times.
Hip hikes
- On a step, take a sideways stance with your left leg hanging over the edge.
- Maintain an upright posture with your shoulders and hips.
- Leg straightening on the right, elevate your left hip.
- Next, lower the left leg once more.
- Then return to your neutral position.
- Then relax.
- Repeat this exercise five to ten times.
- Next, work on the other side.
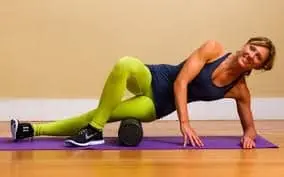
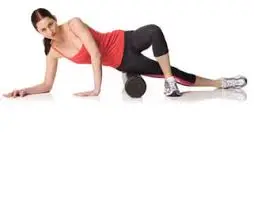
Foam-roll-stretch
- Press down with your thigh to position the foam roller on your right side.
- Keep your right leg straight and plant the sole of your left foot to take advantage of the floor’s support.
- Raise yourself to the right or place both hands on the ground for stability.
- After reaching the knee, the foam then goes back up to the hip.
- Look back over your shoulder.
- Change to the other side after maintaining the extended position for up to one minute.
- Then return to your neutral position.
- Then relax.
- Repeat this exercise five to ten times.
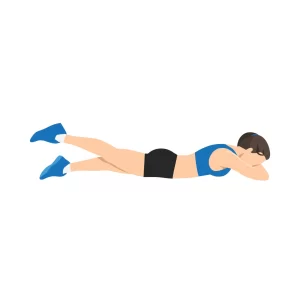
Prone leg raise
- Instead of using a hard surface for this workout, you can use a mat or a plinth to give yourself some support.
- You can first extend your legs behind you while lying on your stomach.
- You can rest your head on your arms if it is uncomfortable for you.
- For your left leg, extend your leg as high as it will go without hurting by contracting your gluteus and hamstring muscles.
- Before starting this activity, confirm with the physical therapist that your pelvic bones are stabilized.
- Hold this position for a few seconds.
- Then return to your neutral position.
- Then relax.
- Repeat this exercise five to ten times.
- Apply the same movement to the opposing leg.
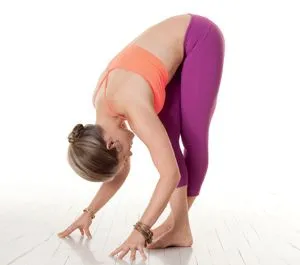
Forward fold with crossed legs
- Keep your feet hip-distance apart while standing.
- Align your pinkie toes as much as possible when you cross your left foot over your right.
- Stretch your arms above your head and release the breath.
- Bend forward from the hips, extending your spine, and release the breath.
- Extend the back of your neck and extend your hands toward the floor.
- Maintain a small bend in your knees.
- Hold this position for a few seconds.
- Then return to your neutral position.
- Then relax.
- Repeat this exercise five to ten times.
- Then proceed to the other side.
Cow face pose
By releasing deep tension in your thighs, hips, and glutes, this yoga pose increases your range of motion and flexibility. It also makes your knees and ankles longer.
- As you begin, take a seat and Your left knee should be bent to the center of your body.
- Slide the left foot into your hip.
- Raising your knees, fold your right over the left.
- Position your right ankle and heel outside of your left hip.
- Hold this position for a few seconds.
- To go deeper, bend your hands forward and step forward with them.
- Then return to your neutral position.
- Then relax.
- Repeat this exercise five to ten times.
Hamstring stretch
- Start with lying down on the ground in front of an open door.
- While on your back, extend your affected leg through the opening.
- When you feel a stretch at the back of your thigh, straighten your knee and elevate the affected leg up against the wall.
- Hold this position for a few seconds.
- Then return to your neutral position.
- Then relax.
- Repeat this exercise five to ten times.
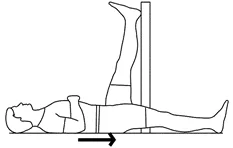
Straight leg raise
- Lay down on your back on the floor where you feel relaxed.
- With your foot planted firmly on the ground, bend one leg to a ninety-degree angle.
- Make sure your other leg is straight.
- To help improve the support of your straight leg, engage your quadriceps and raise it off the ground.
- Hold this position for a few seconds.
- Breathe out and slowly return your leg to the floor.
- Then return to your neutral position.
- Then relax.
- Repeat this exercise five to ten times.
Standing calf stretch
- Place your hands at approximately eye level against a wall while facing it.
- With the heel of each leg planted firmly on the ground, maintain one leg extended forward and the other back.
- As you gradually lean against the wall, turn your rear foot slightly inside until you feel a stretch in the back of your calf.
- Hold this position for a few seconds.
- Then return to your neutral position.
- Then relax.
- Repeat this exercise five to ten times.
Side-lying Iliotibial Band Stretch
- Lying on your side, your affected knee should be on top.
- Grip your bottom leg while bending your upper leg.
- Your quadriceps muscle should be feeling tense.
- Step back a little, keeping your bottom foot on the side of your upper knee.
- Extend the outer section of your top thigh by gently pulling the foot on your knee toward the floor.
- The area on the side of your leg where the iliotibial band joins the knee ought to be stretched.
- Hold this position for a few seconds.
- Then return to your neutral position.
- Then relax.
- Repeat this exercise five to ten times.
What safety precautions are required when working out?
- Try not to use any forceful or jerky movements when working out.
- When you exercise, maintain a straight posture.
- Stay away from challenging activities.
- Stretches should be performed before and after sets, along with the correct quantity of repetitions for each exercise, under the protocol.
- Take rest in between your physical activity sessions.
- For the most beneficial exercise experience likely, dress comfortably and loosely to encourage relaxation and full range of motion. Avoid wearing clothes that are too tight or stylish.
- Do gradual stretches and bends.
- Although it may be challenging, stretching the tense muscles in your joint is essential and usual. Exercise and stretching shouldn’t hurt or make you feel as though someone is stabbing you because doing so is unhealthy and worsens your illness.
- If the pain worsens, stop immediately.
When are you going to stop performing the exercises?
- Intense muscle burning.
- Swelling or pain in the joints.
- You feel unwell.
- Fever
- Headache
- If there’s any kind of pain or numbness.
Exercises to avoid:
Therefore, if you experience more pain and inflammation during any certain activity, we provide a list of things you should avoid doing. Until your physical therapist gives you the all-clear, generally limit the movements that first activate your condition. Running, cycling, squats, and push-ups are some of these exercises.
Find out from your physical therapist when and how you can safely pick up your favorite activities again if they are a regular part of your fitness regimen.
Summary:
People suffering from Iliotibial Band Syndrome can receive treatment from physical therapists for their stiffness and pain. These consist of manual therapy, stretches, strengthening exercises, and other techniques that help with pain management and proper alignment. The exercises that physical therapists modified to lessen the strain on the knees and hips were also included.
FAQ:
Can someone still run if they have Iliotibial Band Syndrome?
Experiencing Iliotibial Band Syndrome when running
Most of the time, running is still possible with iliotibial band syndrome; however, to lessen tissue inflammation, you will need to lower your training load. Stretching as part of a restorative exercise regimen and anti-inflammatory medicine are the best treatments for IT band syndrome.
Is yoga beneficial for Iliotibial Band Syndrome?
By stretching the surrounding muscles and your iliotibial band, a gentle yoga position helps to release tension and promote fluid mobility. The pressure that causes pain opposite the femur and iliotibial bursa can be reduced by relaxing those thick, fibrous iliotibial bands.
Is the Iliotibial Band Condition Permanent?
IT band syndrome often resolves on its own. The amount of time it takes for an injury to heal with proper medical attention and physical therapy will determine when the patient can resume normal activities. If treatment is initiated during the initial stages of the ailment, healing from this condition often occurs quickly.
Which exercises are beneficial for treating Iliotibial Band Syndrome?
Standing Iliotibial Band Stretch
Side-lying leg raises
Lateral Band Walks
Clamshell Exercise With Band
When I have iliotibial band syndrome, can I still exercise?
Try going shorter than usual distances whether cycling or running. Completely avoid these activities if you are still in pain. Swimming is one workout that can be necessary for you to do as it doesn’t aggravate your ITB.
What is the flexibility of the iliotibial band?
There’s a lengthy section of fascia, or connective tissue, lining the outside of your leg that extends from the hip to your knee and shinbone. The IT band aids in hip abduction, rotation, and extension functions. It also helps to move and stabilize the side of the knee while protecting the outside thigh.
For what kind of physical therapy is iliotibial band syndrome treated?
This could involve the physical therapist applying soft tissue techniques to relax tense or spasming muscles, extending the hip and knee muscles and joints, or helping the hip, knee, foot, Improve the range of motion in the ankles with specific joint mobilizations for certain activities.
The iliotibial band syndrome is caused by what?
While it can affect anyone, it typically only affects athletes, particularly distance runners. The movement is caused by the iliotibial band, which is located on the outside of the thigh: Having poor running form and using the incorrect running materials increases your chance of acquiring iliotibial band syndrome.
How should someone with IT band syndrome sleep?
By reducing the amount of stress you place on your body’s pressure points, sleeping on your back can help relieve IT band pain. Using a cushion to raise your legs while you sleep is one way to solve this problem. By doing this, you can lessen the strain and pressure in your hips, which can exacerbate your IT band pain.
References:
- September 5, 2023b; Prajapati, D The Best 22 Exercises for Iliotibial Band Syndrome (Samarpan). Samarpan Physical Therapy Clinic. The ideal exercises for iliotibial band syndrome can be found at https://samarpanphysioclinic.com.
- Australia (n.d.). Bauerfeind. Bauerfeind in Australia. Top 5 exercises for ITB syndrome: https://bauerfeind.com.au/blogs/news/top-5-exercises-for-itb-syndrome?srsltid=AfmBOooEhzbfntrA46x6VZ7VdmpOc71jR2OOj6RDn60NOnn7s8pWpGkO
- Syndrome of the Iliotibial Band. (2024, May 1). Cleveland Medical Center. ILBIOTibial Band Syndrome: https://my.clevelandclinic.org/health/diseases/21967
- Exercises for Iliotibial (IT) Band Syndrome in New York New York Idiotibial Band Syndrome. (As of now). Jaspal The website of Ricky Singh, M.D. provides information on iliotibial itband syndrome.
- (2013) OrthOpaedics. Iliotibial Band Syndrome Strengthening Exercises. It-band-exercises.pdf can be found at https://www.dartmouth-hitchcock.org/sites/default/files/2020-12.
- E. Cronkleton (2018) 18 August. Stretches for the IT Band, Strength Training, and More. www.healthline.com/health/it-band Healthline.
- Image 5, 2024b, July 24; Moves, A. Practice the Wide-Legged Forward Fold in Yoga as one of the Aloha Moves. Alo Swings. In yoga, the forward-facing fold with wide legs is a practical movement technique that everyone may learn.
- Image 13, The Sports Injury Clinic’s website. (December 13, 2011). Heel drops as a thigh exercise [Video]. YouTube. YJav8RVoh6I can be seen on YouTube.
- Image 16, Maggie. (2021, August 21). An effective stretch for Iliotibial Band Syndrome is the foam roller stretch. Dr. Malone Peggy. ILIOTibial Band Syndrome Foam Roller Stretch: https://drpeggymalone.com/
- Image 18, On December 11, 2015, Kyoung, L. H. Pinterest: Yoga Sequences. https://in.pinterest.com/pin/339599628131531446/