15 Best Exercise for Dancer’s Heel
Exercise for a dancer’s heel is an important part of your entire treatment plan, in addition to pain management, rest, and physical therapy.
Achilles tendinitis, also name as dancer’s heel, is a common ailment among sports and dancers. You must include certain activities in your program if you want to effectively treat this illness.
Introduction:
Achilles tendinitis, also referred to as a dancer’s heel, is a common injury among dancers, especially those who perform in ballet, jazz, and modern forms. The Achilles tendon, a strong band of tissue that connects the calf muscles to the heel bone, is irritated. Overuse, poor technique, incorrect footwear, or a sudden rise in physical activity are common causes of this injury.
Bone formation in the rear of the ankle causes compression of the ankle. A sprained ankle or tissue trapped between the ankle and the heel may be the cause of the pain. Compression of the soft tissue at the rear of the ankle causes inflammation and pain. Ballet dancers frequently suffer from back impingement syndrome.
Since the ankle is the joint that connects the foot to the foot and provides stability for the lower limb, it is important to comprehend it when discussing dance injuries. It is among the body parts that dancers get injuries to the most frequently.
In practically every dancing move, the Achilles tendon is essential, particularly when lifting onto the toes, leaping, or jumping. Repetitive strain and stress on the tendon over time can result in micro-tears, which can cause pain, inflammation, and decreased range of motion. A dancer’s heel can cause severe pain and potentially irreversible tendon damage if treatment is not received.
Causes:
Dancer’s heel is a term that refers to heel pain that dancers frequently feel as a result of overuse, repeated motion, or poor technique. It is frequently associated with heel spurs, plantar fasciitis, and Achilles tendinitis.
The primary causes of a dancer’s heel are listed below:
- Repetitive stress or overuse
High-impact motions like jumping, spinning, and toe-balancing are frequently performed by dancers. Inflammation or microtears in the tissues may result from repeatedly applying pressure on the heel without enough rest.
- Poor Footwear
Incorrect support from poorly fitting or worn-out dance shoes might increase the risk of heel pain.
- Incorrect Method or Position
Incorrect technique or poor alignment when dancing can put excessive strain on the heels, ankles, and feet.
- Overwhelming Pressure from Ballet Pointe Work
Ballet dancers who frequently perform on pointe, or their toes, may feel a great deal of strain on their heels, metatarsals, and toes.
- High Arches or Flat Feet
High arches or flat feet are examples of abnormal foot structures that might change how pressure is transferred during dancing moves.
- Excessive training or not enough sleep
Dancers frequently put their bodies through intense practice, sometimes without allowing enough time for relaxation and recovery.
Signs and symptoms:
Depending on the situation, pain is frequently felt at the rear or bottom of the heel.
- Redness or Swelling
When tissues like the plantar fascia or Achilles tendon get irritated, swelling may develop around the heel.
- Sensitivity to Touch
When pressure is exerted, such as when standing on tiptoe, pressing on the heel, or performing specific dancing steps, the heel may feel sensitive or sore. Plantar fasciitis or Achilles tendinitis are frequently linked to tenderness.
- Morning Stiffness
Stiffness in the heel, especially after waking up or after being off their feet for a long time, is one of the typical symptoms of Dancer’s heel. When you have plantar fasciitis, the tissues on the bottom of your foot tighten when you’re at rest.
- Restricted range of motion
Due to pain and tightness in the affected area, the ankle or foot’s range of motion may noticeably decrease.
- Having trouble walking or bearing weight
As it is difficult to place weight on the heel or foot in severe cases of a dancer’s heel, it might be difficult to walk or stand normally.
Benefits of Exercises:
Dancer’s heel exercises can be highly beneficial for both prevention and recovery.
The following are the primary advantages of engaging in exercises created especially for this condition:
- Decreased Inflammation and Pain
Pain and inflammation can be decreased by targeted activities that release tension in the muscles and tissues surrounding the heel, particularly stretching and strengthening.
- Improved Posture and Alignment
You can lessen unnecessary pressure on your heel by aligning your legs, ankles, and feet with strengthening and stretching activities.
- Preventing Further Injuries
Frequent workouts can lower the risk of other foot ailments and help prevent Dancer’s heel from returning.
- An increase in flexibility
Consistent stretching exercises help improve plantar fascia, Achilles tendon, and calves’ flexibility.
- Increased Strength
Strengthening activities increase foot and ankle stability, which helps better support the heel and lessen stress.
- Better Circulation of Blood
Exercises that require ankle and foot movement help improve blood flow to the affected area, speeding up the healing process and relieving stiffness.
- Healing and Rehabilitation
Exercise strengthens muscles and promotes tissue repair, making it a safe way to recover from an injury.
- Dancers’ Improved Endurance
In addition to strengthening the heel, strengthening exercises also improve foot endurance in general.
- Improvement of Balance and Coordination
Balance and coordination are also key components of many dancers’s Heel exercises, which help dancers prevent falls and other injuries.
Exercise for Dancer’s Heel:
The Achilles tendon can be strengthened, made more flexible, and allowed to heal with a few specific exercises. These exercises are particularly important to dancers recovering from the dancer’s heel and can be done daily.
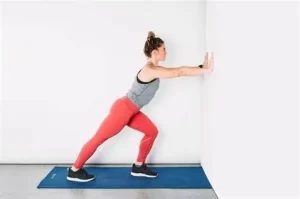
Calf Stretch
By increasing the Achilles tendon and calf muscle flexibility, this exercise lowers the chance of injury.
- Place your hands on the wall for support as you face it.
- With the front leg slightly bent at the knee and the back leg straight, place one foot behind the other.
- Both feet should remain flat on the ground with their toes pointed forward.
- Maintaining your rear heel on the floor, gently lean against the wall.
- Your back calf, or the leg behind you, should feel stretched.
- Hold this position for a few seconds.
- Then return to your neutral position.
- Then relax.
- Repeat this exercise 5 to 10 times.
- Repeat the stretch with the other leg.
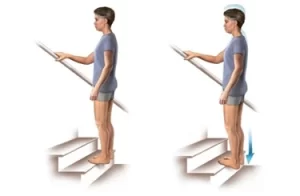
Eccentric Heel Drops
Achilles tendinitis can be effectively treated using eccentric workouts, which cause the muscle to extend under tension. The Achilles tendon and calf muscles are the targets of heel drops.
- Place your heels over the edge of a stair or other raised surface.
- For balance during this phase, you may grasp the wall or railing.
- To begin, use both legs to get up onto your toes.
- For balance during this phase, you may grasp the wall or railing.
- Control the action as you carefully lower your heels down below the step level.
- For best results, proceed carefully during this eccentric (lowering) phase; try for three to five seconds.
- If you are targeting a single leg, the lowering action should only be performed by the affected leg.
- After lowering your heel as much as is comfortable, raise yourself back up to the starting position using both legs.
- Then relax.
- Repeat this exercise 5 to 10 times.
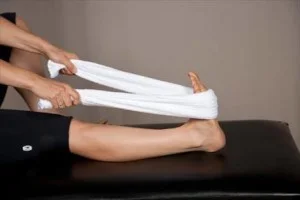
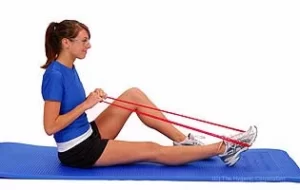
Towel Stretch
Ankle and Achilles tendon flexibility can be strengthened with a towel stretch.
- With your legs out in front of you, take a seat on the floor.
- Take a resistance band, towel, or belt and fold it in half.
- To stretch a leg, wrap the towel around the ball of one foot.
- Using both hands, grasp the towel’s ends.
- Maintaining a straight knee, carefully pull the towel in your direction.
- The Achilles tendon, calf, and rear of your lower leg should all feel stretched.
- Hold this position for a few seconds.
- Then return to your neutral position.
- Then relax.
- Repeat this exercise 5 to 10 times.
Standing Calf Raises
The Achilles tendon is supported and the calf muscles are strengthened by this easy exercise.
- Place your feet hip-width apart and stand upright.
- Hold onto a chair, railing, or wall for balance, or keep your arms at your sides.
- Elevate your heels as high off the ground as you can comfortably while slowly rising onto the balls of your feet.
- Instead of using your toes, concentrate on pressing through the heel of your feet.
- To fully activate your calf muscles, hold this position for a few seconds.
- Return to the starting posture by lowering your heels carefully and slowly, without jerking or moving too quickly.
- Then relax.
- Repeat this exercise 5 to 10 times.

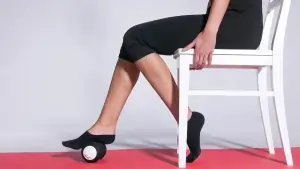
Foam Rolling
Recovery can be helped by foam rolling the calf muscles to reduce tension and increase blood flow.
- Place a lacrosse ball or a tiny, soft foam roller beneath your foot’s arch while you sit on the floor.
- Beginning at the heel and working your way toward the toes, gently roll the foam roller beneath your foot.
- Roll for one to two minutes while applying light to moderate pressure.
- Stop and apply pressure to a particularly tight area for 20 to 30 seconds.
- If necessary, you can also exert greater pressure with the other foot.
- Then return to your neutral position.
- Then relax.
- Repeat this exercise 5 to 10 times.
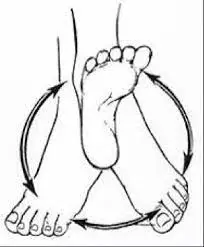
Ankle circles
- You can either lie down with your legs outstretched or sit comfortably in a chair with your feet flat on the floor.
- You can also stand and balance on one leg, but if you’re just starting, it’s easier to perform the exercise while seated.
- While maintaining a straight and relaxed leg, raise one foot off the ground.
- You can do this exercise without using your hands, but if you need assistance guiding the movement, you can use your hands to hold your foot.
- Beginning at the ankle joint, slowly begin to rotate your foot in a circular motion.
- Make the circle as big as you can without feeling uncomfortable by maintaining a smooth and controlled motion.
- Make ten to fifteen circles in one direction, then switch it up and do ten to fifteen circles in the other direction.
- Then return to your neutral position.
- Then relax.
- Repeat this exercise 5 to 10 times.
- Make sure to work both ankles by doing the same procedure with the opposite foot.
Single leg balance
- Keep your posture strong and upright by keeping your feet hip-width apart and standing tall.
- To improve stability, use your core muscles.
- Try to maintain an upright posture as you slowly raise one foot off the ground while raising your knee to your chest or out in front of you.
- Focus on balancing on your standing leg while keeping it slightly bent (not locked out).
- Hold this position for a few seconds.
- Keep your body still and avoid tilting or shaking.
- Avoid being inclined to one side and try to maintain a level hip position.
- Return to the beginning position by carefully lowering the raised leg back to the floor.
- Then relax.
- Repeat this exercise 5 to 10 times.
- Switch to your other leg and do the exercise.

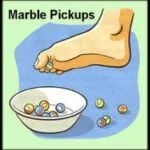
Marble pickup
- You can either sit on a chair with your feet flat on the floor or stand with your feet hip-width apart.
- You can also sit on the floor with your legs out in front of you for a more challenging position.
- Arrange small stones or small objects like pencils or paper clips on the floor in front of you.
- Depending on how skilled you are, you can start with five to 10 marbles.
- One marble at a time, pick it up with your toes without using your hands.
- To raise the marble off the ground, curl your toes and grasp it.
- After picking up a marble, gently set it in a cup, bowl, or other container (for convenience, keep the container near your feet).
- Until every stone has been picked up, keep picking them up one at a time and putting them in the container.
- For a more difficult session, try picking up the marbles as fast as you can, or try increasing the quantity.
- Then return to your neutral position.
- Then relax.
- Repeat this exercise 5 to 10 times.
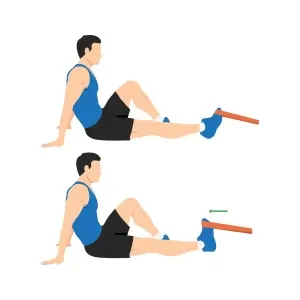
Ankle plantarflexion
- Sit on the floor
- Keeps your leg straight.
- Take a resistance band and wrap it around one foot’s ball.
- Hold the resistance band’s ends in your hands or firmly grasp the opposite end.
- The resistance band should be tightened before beginning the exercise.
- As you set up, you should feel some initial strain in the band.
- Maintain a straight leg and a slightly bent knee (avoid locking your knee).
- Point your toes down toward the floor slowly, as though you were pushing the gas pedal on a vehicle.
- The movements need to be gradual and slow.
- As you point your foot, feel your calf muscles contract as you attempt to move through the entire range of motion.
- To get the most contraction, point your toes as far down as you can and then hold them there for a few seconds.
- Maintaining control of the action, gradually relax the strain on your foot and go back to the beginning position.
- Then relax.
- Repeat this exercise 5 to 10 times.
Ankle dorsiflexion
- With your legs straight out in front of you, take a seat on the floor.
- Wrap the top of your foot, right below the toes, with a resistance band.
- Use your hands to hold the other end of the resistance band, secure it to a solid object, or have a partner hold it for you.
- Before you begin, make sure the resistance band is taut, which will create stress in the band.
- Maintain a straight leg and a flexed foot, with the toes first facing in your direction.
- As though you were attempting to move the top of your foot closer to your torso, slowly pull your toes upward toward your shin.
- As you attract the foot upward, you should feel your shin muscles (tibialis anterior) contract.
- The action should come from your ankle joint.
- Make sure you are raising your foot as much as your mobility allows as you move through the entire range of motion.
- To get the most contraction out of your tibialis anterior, hold your toes as high as you can for a few seconds.
- Release the tension gradually while keeping control of the movement and putting your foot back in the beginning position.
- Then relax.
- Repeat this exercise 5 to 10 times.
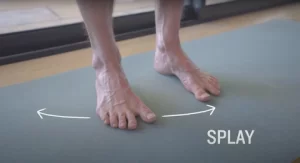
Toe splay
- Begin by standing comfortably on the floor.
- Make sure your toes are pointed forward and your feet are comfortable.
- Try to gradually create space between each toe by spreading them apart as far as you can.
- Instead of forcing them all at once, try to isolate each toe and spread them one at a time.
- Consider making the distance between your toes as large as you can.
- Hold the stance for a few seconds (or longer if you can) after spreading your toes apart.
- Keep yourself in check during the exercise and refrain from over-stretching your toes if doing so makes them uncomfortable.
- Return your toes to their neutral position gradually.
- Then relax.
- Repeat this exercise 5 to 10 times.
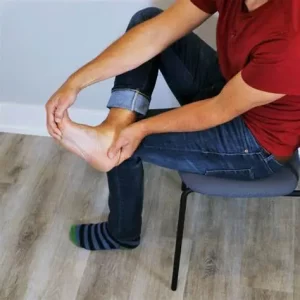
Planter fascia strech
- With your knees bent at a nearly 90-degree angle and your feet flat on the floor, take a seat comfortably.
- To reach the bottom of the foot, cross one leg over the other so that the affected foot rests on the thigh on the other side.
- Gripping the toes with the hand on the same side as the stretched foot, gradually draw them back towards your shin.
- This exercise aids in stretching your foot’s arch muscles and plantar fascia.
- You should experience a stretch throughout the arch of your foot, particularly in the plantar fascia region (on the bottom of the foot), as you bring your toes back.
- To prevent the tissue from being overstretched, keep the stretch light.
- Feel a light pull in the arch of your foot as you hold the stretch for a few seconds.
- Breathe deeply and let yourself relax while you perform the stretch.
- Then return to your neutral position.
- Then relax.
- Repeat this exercise 5 to 10 times.
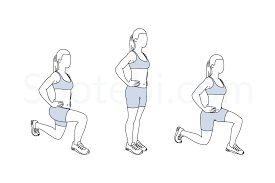
Lunges
- With your shoulders back, your core strong, and your feet hip-width apart, take a strong posture.
- You can maintain your balance by keeping your hands on your hips or out in front of you.
- Step forward with one leg while lowering your body so that your knee and ankle remain in alignment.
- Bend both knees while keeping your upper body straight and avoiding excessive forward tilt.
- Both knees should be bent at a 90-degree angle to lower your body.
- Although it shouldn’t touch the floor, the back knee should approach it.
- Make sure your front knee doesn’t go past your toes and that your front thigh is parallel to the floor.
- To put your feet back together and go back to the beginning, push through the heel of your front foot.
- Use the opposite leg to lead the movement as you switch legs.
- Then relax.
- Repeat this exercise 5 to 10 times.
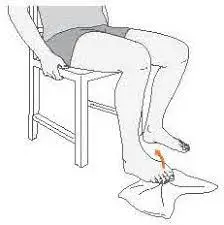
Towel curl
- With your feet flat on the ground and your knees bent at a 90-degree angle, take a seat on a chair or bench.
- A little towel should be placed on the floor in front of you.
- Ensure that the towel is long enough for you to curl it.
- For this exercise, make sure you are barefoot so you can feel your foot muscles contracting.
- Place one foot’s toes on the towel’s edge while keeping your heel flat on the ground.
- Under your foot, the towel should be spread flat.
- By flexing and grasping with your toes, you may curl the towel in your direction and pull it in.
- Try to grasp the towel with just your toes and pull it toward you, using your foot’s plantar flexor muscles.
- Hold the towel in place for a few seconds after it has completely curled beneath your foot.
- Then return to your neutral position.
- Then relax.
- Repeat this exercise 5 to 10 times.
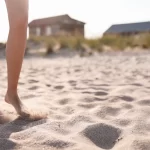
Sand walking
- Look for a sandpit or beach with loose, soft sand.
- If you want to make it more intense, try to find deeper, dry sand because walking on firmer sand (nearer the waterline) is easier.
- It works best when you’re walking barefoot on the sand because it helps your foot muscles contract.
- Start by moving across the sand at a regular speed.
- As you walk, pay attention to your posture, maintaining a straight back and an engaged core.
- To change up the difficulty, walk quickly, moderately, and slowly.
- Alternate your gait; walking in a straight line, sideways, or backward will help you strengthen your muscles and increase your coordination.
- Avoid falling over uneven sand by walking with your feet raised higher than you would on solid ground.
- Your calves, feet, and ankles will have to work harder to complete every move due to the resistance of the sand.
- As your strength and endurance improve, progressively extend the duration of your walk from ten to fifteen minutes.
- For maximum benefits, try to walk two or three times a week.
What safety measures should be taken when exercising?
It’s important to take safety measures when managing or preventing a Dancer’s heel to prevent more injuries and guarantee healing.
The following are important safety guidelines to remember:
- Properly Warm Up
To improve blood flow to the muscles and get your body ready for exercise, warm up your entire body with dynamic stretches. To prevent tension around the heel, concentrate on extending the calves, hamstrings, and feet.
- Pay attention to your body.
Keep your eye out for any sudden pain in your heel. Take a break and give yourself time to heal if you feel pain while dancing or after. Chronic harm can result from ignoring the pain.
- Take a Break and Get Well
Do not put too much strain on your body by practicing dancing too much. To give your foot and heel muscles time to heal, include rest days in your daily routine. Rest is essential for healing because overuse may worsen the disease.
- Put on the Right Footwear
Select dance shoes that offer sufficient stability, cushioning, and arch support. Stay away from overly tight shoes, worn out, or provide little support. If you need more heel and arch support, think about getting custom orthotics.
- Use the Proper Technique
To make sure you’re employing the right alignment and posture throughout movements, work with a dancing instructor. When you leap, try not to land too hard or place too much weight on your toes since these can put more strain on your heel.
- Regularly stretch and strengthen.
Include targeted exercises that target strengthening your feet, ankles, and calves. To ease pain, stretch your Achilles tendon and calves every day. Better support and less pressure on the heel are provided by strong muscles in these regions.
- Use ice after intense.
To lessen swelling and inflammation, apply ice to the injured heel for 15 to 20 minutes after dancing or engaging in any high-impact exercise. To avoid freezing from direct contact with the skin, make sure to cover the ice with a cloth.
- Seek Early Advice from a Healthcare Professional
Consult a physician, podiatrist, or physical therapist if you are in constant pain or difficulty. They can offer specialized treatment regimens, including physical therapy, specially designed exercises, and, if required, referrals for additional procedures like injections or surgery.
By following these safety measures, you can lessen your chance of developing a Dancer’s Heel and better manage the pain you already have, letting you resume dancing with a lower risk of getting hurt again.
When should you stop practicing Dancer’s Heel?
Understanding when to stop using a Dancer’s Heel for dancing or practice is important for avoiding more injuries and allowing a full recovery.
Key signs that it’s time to pause and get some rest or medical counsel include the following:
- Severe or Sharp Pain
Severe pain may be a sign of a more serious injury, like a heel spur or a tendon tear.
- Pain That Remains After Rest
It indicates that the issue is either becoming worse or not getting better if the pain persists even after you’ve rested.
- Having Trouble Putting Weight on the Heel
It’s time to quit practice if you can’t stand or walk normally without experiencing pain. Further harm may result from bearing weight on the damaged heel.
- Pain That Gets Worse With Time
Pain that gets worse over time may indicate that the injury is not getting better or that you are making it worse.
- Limited Progress Even with Self-Care
If you have tried every self-care technique (ice, rest, stretches) and nothing has changed, stop dancing and get a more complete evaluation from a medical professional.
When to Get Medical Help:
A physical therapist or orthopedic expert should be consulted if you have chronic pain, edema, or stiffness that doesn’t go away with rest or exercise. In addition to developing a personalized treatment plan that may involve advanced techniques like ultrasound, manual therapy, or, in rare instances, surgery, they can also help with evaluating the extent of the injury.
Summary:
Any dancer may find that a dancer’s heel is a painful injury, but it may be prevented or successfully treated with the right exercises, care, and technique. Exercises that improve mobility, strength, and flexibility are essential for both prevention and recovery.
Rest, ice, stretching, strengthening exercises, and suitable footwear are usually part of the treatment. Medical treatments such as physical therapy, orthotics, or even injections may be required in more severe situations. Avoiding pushing through heel pain could make it worse; instead, focus on treating the underlying reason.
Getting advice from a healthcare professional to identify the best rehabilitation plan is always a smart idea if you’re dealing with chronic pain.
FAQ:
Dancer’s Heel: What is it?
Ballet, jazz, and other dancing styles that demand a lot of footwork can induce heel pain, which is known as “dancer’s heel.” Tight calf muscles, plantar fasciitis, or Achilles tendinitis are some of the possible causes of this condition.
Which dancer’s heel workouts are the best?
Calf Stretch
Towel Stretch
Heel Raises
Foot Flexes
At what frequency should I perform these exercises?
Do the exercises two or three times a day at the very least, especially if you are healing from an injury. To increase strength and flexibility, regularity is essential.
With Dancer’s Heel, can I continue dancing?
Depending on how bad the pain is, yes. Resting and consulting a healthcare provider is essential if you’re feeling severe pain. If the underlying problem fails to be solved, dancing can get worse. It could be beneficial to cross-train with low-impact exercises like cycling or swimming.
What kind of shoes should I wear?
Wearing suitable shoes is essential. Shoes with enough arch support and cushioning should be chosen by dancers. Alignment problems that can be causing heel pain can also be resolved with the use of custom orthotics.
What happens if the pain remains?
See a medical expert, such as a podiatrist or physical therapist, if the pain doesn’t go away with rest, activity, and suitable footwear. After evaluating the problem, they could suggest other therapies like massage, ultrasound, or orthotics.
Does icing help with Dancer’s heel?
Actually! After dancing, icing your heel for 15 to 20 minutes can help relieve pain and inflammation. To prevent freezing to the skin, insert a piece of cloth between your skin and the ice pack.
Can a Dancer’s Heel be alleviated by stretching?
The prevention and treatment of Dancer’s heel do require stretching. Excessive strain on the heel can result from tight muscles, especially in the calf and foot. Frequent stretching relieves tension.
What signs and symptoms indicate Dancer’s heel?
The heel’s back or bottom hurts
Swelling in the area of the heel
Pain that gets worse after standing for Extended periods or dancing quickly
Heel stiffness and soreness when you wake up or after sleeping,
Pain that gets better with movement but comes back later
What is the cause of the dancer’s heel?
Typical reasons include of:
Overuse: Repetitive motions, excessive hopping, and balancing can cause heel pain.
Tight muscles: Especially in the arches of the feet or calves, which put more strain on the heel.
Wearing shoes that are excessively tight or don’t provide enough support can cause heel pain.
Incorrect technique: Heel stress can be worsened by poor posture or foot alignment during dancing.
What are the best ways to treat Dancer’s Heel?
Some alternatives for treatment are:
Rest: Avoid high-impact exercises and give the heel time to heal.
Applying ice for 15 to 20 minutes can help relieve inflammation.
Stretching Exercises: To increase flexibility, regularly stretch your calves and Achilles tendon.
Wear shoes that offer enough stability, cushioning, and arch support.
Orthotics: Custom insoles can assist equally in distributing pressure and improving foot alignment.
How can a Dancer’s Heel be avoided?
Warm-up and cool-down: Injuries can be avoided by properly warming up before dancing and stretching afterward.
Exercises to build muscle: To avoid putting undue tension on the heel, work on strengthening the muscles in the ankle and foot.
Footwear: Select dance shoes that fit properly and offer sufficient arch support.
Take breaks: To avoid overuse injuries, refrain from excessive activities and schedule rest periods.
For Dancer’s heel, should I consult a physician?
It is advised to consult a physician or physical therapist if pain worsens or if it does not go away after resting, stretching, and other self-care techniques. They can assist in diagnosing the ailment, suggesting a course of treatment, and looking for underlying problems such as plantar fasciitis or tendinitis.
Can I apply cold or heat therapy?
In general, cold therapy (ice) works better to reduce pain and inflammation, especially after exercise. Although it should be used carefully, heat therapy can help loosen up tense muscles. Use cold to reduce inflammation and heat to relax muscles.
References:
- Insanity, D. January 20, 2025. Strong ankle and foot exercises are essential for all dancers. Dancing Madness. https://www.danceinsanity.com/tutorial/strong-ankle-foot exercises/
- Prajapati, D. September 16, 2023. Samarpan Physio’s Top 22 Dancer’s Heel Exercises. Samarpan Clinic for Physiotherapy. #google_vignette https://samarpanphysioclinic.com/22-best-exercise-for-dancers-heel
- Training tailored to dance. February 10, 2025. Seven HEELS 👠 Dancer Exercises [Video]. YouTube. SSmXP5OmZrA https://www.youtube.com/watch?v
- Spencer, R. J. December 10, 2024. Ballet dancers’ heel discomfort in Southern California ankle and foot. Foot and Ankle Specialists in Southern California. Heel pain in ballet dancers: https://socalfootandankle.com/
- Dancer-Fitness.Com (May 18th, 2019). Use these three moves to improve the dancer’s balance and ankle strength. Dancer-Fitness.com. These three moves will help dancers improve their ankle strength and balance: https://dancer-fitness.com/
- Take care of Dancer’s heel right now with a skilled podiatrist in Idaho. (undated). Rocky Mountain Ankle & Foot. Treat dancer’s heel now: https://www.rockyfootandankle.com/library/
- Image 2, Achilles Tendon Eccentric Exercises | London Foot and Ankle. (n.d.). https://www.londonorthopaedicsurgery.co.uk/therapies-exercise-regimes/achilles-tendon-eccentric-exercises/
- Image 5, March 2, 2021; Thomas, Z. Can plantar fasciitis be alleviated by foam rolling? Pulseroll. https://pulseroll.com/blogs/blog/is foam rolling beneficial for plantar fasciitis?