Coordination Exercises
Coordination exercises are designed to improve the ability to synchronize multiple body parts and systems, enhancing overall physical performance and efficiency. These exercises are crucial for athletes, dancers, and anyone looking to maintain or improve their motor skills.
Definition of coordination exercise:
The capacity to produce motor responses that are accurate, controlled, and fluid—the best possible interplay of muscle function—is known as coordination.
The capacity to choose the appropriate muscle at the appropriate moment and intensity to produce the desired action is known as coordination.
For motions to be coordinated, each of the systems listed below has to be present.
- Cerebellum
- Vestibular system
- Motor system.
- Flexibility and ROM.
- Deep sensations.
- Vision.
Components of Coordinated Movement
Coordination of movement is reliant on:
Perception:- The brain combines motor impulses with sensory feedback to interpret stimuli and form implicit preconceptions. Vestibular and visual signals counteract reductions in preconception.
Dexterity:-using the fingers deftly while performing the line motor task.
The capacity to start, stop, or alter movement quickly and smoothly while keeping postural control.
Balance
-the dynamic mechanism that keeps the body in an equilibrium position.
-A body in equilibrium can be found at rest (static equilibrium) or moving steadily (dynamic equilibrium).
-The center of mass or center of gravity of the body remains constant over its support base.
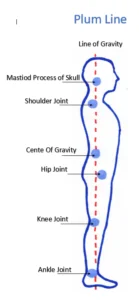
Center of gravity
-It is a hypothetical point of equilibrium where it is reasonable to assume that the body weight is evenly distributed and concentrated.
-Ant.2nd sacral vertebra.
Line of gravity
-The vertical line that goes through the center of gravity is called the “line of gravity”.
Base of support
-the limits of the body’s contact area with its support surface.
Receptors involved in coordination and balance
position of sense
To feel position, a variety of muscle senses are employed. the consciousness of one’s fixed position.
Kinesthesia ( kinesthetic sense )
Information from tendons, muscles, and joints is absorbed by sensory receptors..
pertains to joint motion awareness.
-EXAMPLE: to detect a moving arm
Proprioception
-join receptors’ (mechanoreceptors and sensory receptors’) function
-provides feedback on.
- joint position
- movement
- direction
- speed
Mechanoreceptors system
There are 3 types of mechanoreceptors
TYPE 1: (RUFFINI MECHANORECEPTORS)
-react slowly to a stationary joint position
TYPE 2:-(PACINIAN MECHANORECEPTORS)
-quickly adjust to modifications in joint position
-reduce ligament strain
-subtract the motion’s velocity
TYPE 3: (FREE NERVE ENDING)
-transmit data about inflammation and pain.
How can coordination be strengthened?
The nervous system is crucial to the synchronization of movement or action.
- Motor pathway
- cerebral cortex
- cerebellum
- kinesthetic sensation
- motor pathway
The afferent impulses that travel through motor pathways to each muscle group determine how that muscle group contracts.
2) cerebral cortex
Voluntary movement begins, most of the time, but not always, in response to a sensory stimulus.
This strategy is predicated on recollections of prior usage patterns.
3) cerebellum
The afferent pathways that bring impulses of kinesthetic sensation from the periphery and other areas of the brain, such as the cerebral cortex and vestibular action, to the cerebellum, serve as information-receiving stations.
4) kinesthetic sensation
The proprioceptors in muscles and the understanding of limb position and movement are the origins of the afferent impulses that give rise to kinesthetic experience.
Causes of in-coordination
Atherosclerosis is known to have several causes. They cover both chronic illnesses and those with an abrupt start.
A functional cerebellum, spinal cord, and peripheral nervous system are necessary for coordinated movement. Diseases and injuries that damage or kill any of these structures can cause ataxia.
- Traumatic brain injury
- Alcoholism
- Infection
- Neuropathies
- Spinal cord injuries
- Multiple Sclerosis (MS)
- Parkinson’s Disease
- Stroke
- Transient Ischemic Attack (TIA)
- Cerebral Palsy
- Brain Tumors
- Toxins can also cause ataxia.
These include:
- Alcohol (most common)
- Seizure medications
- Chemotherapy drugs
- Lithium
- Cocaine and heroin
- Sedatives
- Mercury, lead, and other heavy metals
- Toluene and other types of solvents
Types of Coordination:
Fine Motor skills:
For fine motor activity, which includes tasks like typing, writing, sketching, playing games, and blowing bubbles, the little muscles in the hands and face must be coordinated.
Gross Motor skills:
Coordinated contraction of a large muscle or group of muscles is necessary for gross motor movement (trunk, extremities)
like jogging, walking, and lifting exercises.
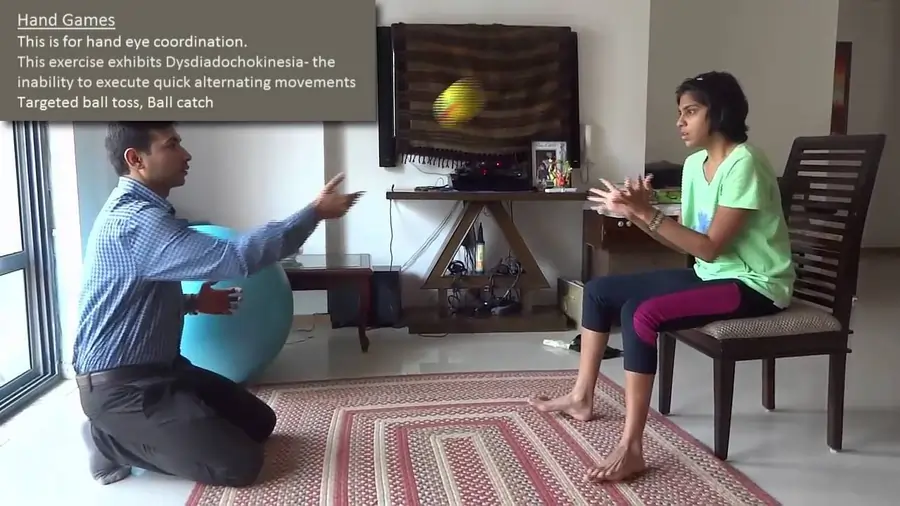
Hand-Eye skills:
The visual system can take in visual information, send it through the brain, and then use that information to control or guide the hands to finish a task.
like catching a ball, stitching, or utilizing a computer mouse
Incoordination
-Jerky, a rhythmic movement that is referred to as incoordination, is produced when any one of the components that work together to create a coordinated movement is interfered with.
Depending on where the lesion is located, there are four primary forms of incoordination.
- A certain muscle group’s weakness or flaccidity is linked to incoordination.
-A lesion to the LMN stops the muscles from receiving the proper signals, or the muscles’ usual response to these impulses is altered.
2. related to muscular stiffness and lack of coordination.
-lesion affecting the cerebral cortex’s motor region other than UMN.
3. Incoordination resulting from cerebellar lesions.
-usually referred to as cerebellar ataxia, is characterized by an erratic, swaying movement that has a noticeable intentional tremor.
4. Dysfunction of the kinaesthetic sense resulting in imbalance.
When a patient has sensory ataxia, also known as tabes dorsalis, they are oblivious to their body’s position in space or the locations of their joints.
Examine your coordination:
Dysmetria
-The term “dysmetria” particularly describes a problem with appropriately scaling movement distance.
Dysmetria can appear in a few forms
1)hypermetria:- when you go too far or step too soon
2)hypometria:-when you step or underreach
Upper limb test for in-coordination:
- finger nose test
- Nose-to-doctor’s finger test
- finger-to-finger test
- Alternate nose to finger
- Finger opposition
- mass grasp
- pronation / supination
- Rebound test
- Tapping of U.E
Lower limb test for in-coordination:
- Tapping of L.E
- Alternate Heel-to-knee / Heel-to-toe
- Toe to examiner’s finger
- heel on shin
finger nose test:
From Shoulder Horizontal abduction to Elbow Flexed, shoulder down, and keep at a 90-degree angle.
The person places the tip of their index finger on the nasal bridge.
Nose-to-doctor’s finger test:
Patients & therapists sit opposite each other.
The patient is instructed to lie supine and first to touch the therapist’s finger, then their big toe.
finger-to-finger test:
The patient is instructed to abduct their shoulders, bring both hands towards the midline, and roughly match the tip of the index finger with the hands across from them to 90 degrees and their elbow extended.
Alternate nose to finger:
The therapist’s index finger is placed first, then the tip of the patient’s nose.
Finger opposition:
The patient touches each fingertip individually.
Speed may be gradually changed.
Mass grasp:
The alteration between opening & closing fists.
Full finger flexion to full finger extension.
Speed may be gradually increased.
pronation / supination:
Elbow flexed to 90* &close to the body, Patient alternately raises and lowers palms.
The elbows can be extended, and the shoulders can be bowed to a 90-degree angle.
Rebound test:
The patient’s elbow was bent, and the therapist applied just enough manual force to cause the patient’s biceps to contract isometrically.
Resistance is suddenly released.
Tapping of U.E:
Elbow flexed & forearm pronated, patient is asked to the hand on knee.
Tapping of L.E:
Without elevating their knee, the patient is to tap the ball of one foot on the ground while maintaining their heel in touch with the ground.
Alternate Heel-to-knee / Heel-to-toe:
Without elevating their knee, the patient is to tap the ball of one foot on the ground while maintaining their heel in touch with the ground.
Toe to examiner’s finger:
The patient is advised to touch their big toe and then the therapist’s finger while lying supine.
Heel on shin:
The heel of one foot is moved up and down the opposing extremity’s shin while the person is prone.
Fixation or position holding U.E. /L.E. :
U.E – patient holds arms horizontally in front. (in sitting or standing position)
L.E -The patient holds the posture longer. (in a sitting position)
Coordination Tests for Athletes:
To evaluate and enhance an athlete’s abilities and performance, numerous advanced tests are available, such as the Stick Flip Coordination Test, Wall-Toss Test, Block Transfer, Soda Pop Test, Plate Tapping, Light Board, and Test Heel-to-Knee.
Fundamentals of Coordination Activities:
- Repeat a few motor exercises repeatedly.
- Utilizing proprioceptive, tactile, and visual cues to improve motor performance
- An increase in activity speed over time
- Tasks are divided into manageable pieces that can be completed accurately.
- When assistance is required, it is given.
- After two or three repeats, the patient should take a little pause to avoid weariness.
- Repetition of accurate performance at a fast rate is necessary to develop an engram.
- Every time a new movement is taught, the patient is given a variety of inputs to improve motor performance, such as auditory instructions, tactile stimulation, or positions where they can see the movement.
Exercise for progression:
1) Speed of exercise:- when a patient moves quickly, which needs less control than moving slowly.
2) Range of exercise:-broad range of motion utilizing large joints.
3) Complexity of exercise should begin with very basic motions and work their way up to more complex ones.
- Tai Chi
- Pilates
- Yoga
- Balancing Boards and the Otago Exercise Programme
- Neuromuscular coordination exercises
- Proprioceptive Neuromuscular Facilitation
- Neurophysiological Basis of Developmental Techniques
- Sensory Integrative Therapy
1) Tai Chi
-Tai chi and other Chinese movement activities are beneficial for treating a range of ailments. It also emphasizes flexibility, balance, stability, and muscular control, all of which can have major advantages. Also, the motions are extremely soft.
Warmup
-Your leg muscles will get stronger and your balance will be better after this warm-up.
-Maintain a slight bend in your knees and both legs wider than hip-distance apart while standing. Your hands can rest on your hips, but your arms should remain at your sides.
-Transfer almost 70% of your weight to your right leg by moving gently and methodically.
-Do this at least three times.
Torso twists
-Place both hands on your hips to gauge how much you are turning during this exercise. It is not desirable to be rotating from the hips. Instead, You should move your face away from the body in its place.
– Although your hips may naturally move slightly with your body, this is a twist for your spine.
-They ought to remain equally twisted.
– At least five twists to each side should be made.
A take on Holding Up the Sky called Energy to the Sky)
-Core stability will be improved with this exercise.
-With your hands at your sides, step your left foot to hip distance apart while maintaining the same starting posture as the warm-up. putting both hands in front of your face, maintaining your arms as straight as possible, and pointing your fingertips in each other’s direction, palms down.
-As you inhale slowly and start to extend your arms straight in front of you, then upward until they are above your head, keep your gaze fixed on your hands.
-At least five times should be repeated.
Drawing the bow
-This workout stimulates the heart and circulation while strengthening the arms, shoulders, chest, and legs.
-Pull your arms to the left, create a little fist, and bring them to your chest. Take a breath. Your left arm will naturally stretch somewhat farther than your right since you are rotated.
-Look past the “L” your left hand is making in reverse. Breathe in this place, then exhale as you put your hands down, extend your legs, and return to your starting posture.
-Continue on the opposite side.
-Be careful to do this on each side at least three times.
Penetrating Heaven and Earth
-It stretches and stimulates the body’s front side. Step back in with your right foot after Drawing the Bow. Place your feet hip-distance apart.
-Raise both hands to chest height, fingertips pointing inward towards one another while inhaling. Once you’re there, relax and inhale deeply.
-As you exhale, bring them back together, maintaining their position in the middle of your body.
Make sure to repeat this at least eight times.
2) Pilates
These principles can be applied to the exercises to achieve some advantages:
better posture and balance
More stability and strength in the core
Enhanced synchronization
decreased back pain in the lower back
increased adaptability
Increased awareness of kinaesthetics
The Corkscrew
-This exercise aims to facilitate the development of whole-body balance in a supine position while also mobilizing the hips and spine. It’s crucial to try to avoid rotating your spine during this exercise and to let your hips guide the movement instead. As you go, get the cores ready, and don’t put too much strain on your neck.
-Osteoporosis patients should not perform this exercise.
The saw
-This exercise can help you become more flexible in the hip, spine, and shoulder areas. To get the most out of this exercise, start by sitting tall, maintaining a neutral pelvis and spine, and extending your legs in front of you. Throughout, the pelvis should remain fixed to maintain the coccyx’s contact with the floor.
-For people with tight hamstrings or lower backs, this exercise can be modified by adding a block. It serves as an alternative to spine twists.
The Scissors
-enhancing hip flexor and hamstring flexibility, strengthening pelvic and spinal stability, and encouraging balance, awareness, and control throughout the body.
-With your legs outstretched and arms by your sides, palms down, begin supine. Use both hands to support the hips while the legs are raised higher. Breathe out, divide your legs in half like a scissor, and then inhale again to extend beyond. It is preferable to avoid letting the leg sag too much or drop in front of the face.
The Bicycle
-This exercise helps to flex the knees and hips. If you find it too challenging, you can adjust it by lying on your side. Take care throughout this exercise to avoid placing too much weight on your neck.
Swimming
-This exercise promotes upper and lower body coordination on reciprocal sides while mobilizing the hip and shoulder joints. Assume a prone position with your spine straight and your legs abducted to hip distance apart. The legs should be stretched together during this exercise; the knees should not be bent. With every count, switch sides and apply pressure on the gluteals.
-You can lift one arm or one leg at a time while lying prone to complete this exercise. To incorporate a progression, the movement’s speed can also be accelerated.
3) Frenkel’s Exercises
–Frenkel exercises help ataxic patients regain their coordination by involving a series of movements that get harder and harder. Restoring coordinated, fluid, and rhythmic motions is the goal of Frenkel’s workouts.
-Frenkel exercises were designed to compensate for the loss of kinaesthetic sensation by utilizing any remaining portion of the sensory mechanism—most notably, sight, sound, and touch—to establish voluntary control over movement. The steps involved in learning this alternate control method are the same as learning any new exercise; the key components are as follows:
- Concentration or attention
- Precision
- Repetition
General Guidelines for the Frenkel Workouts
- The patient can perform exercises unilaterally or bilaterally, with the limbs supported or unsupported.
- During the exercise, they should be counted out as the therapist speaks slowly to provide directions.
- Exercises should be done within the normal range of motion (ROM) to avoid overstretching the muscles.
- Before moving on to more challenging patterns, it is recommended to complete the first easy exercise.
- It’s critical that the space be well-lit and that the patients be arranged so they can readily observe every action.
- Avoid exercising more than four times a week. To prevent fatigue, take a break between each exercise.
- The workouts advance From the most secure to the most difficult positions.
- The exercises advance to stopping and starting on command, expanding the range, and carrying out the same movements with the patient’s eyes closed if their voluntary control improves.
- Balance and coordination can only be improved with practice and focus.
Frenkel exercises for lower limb
Exercises for the legs in lying
-(laying with one side up) One leg is extended and flexed by allowing the heel to move fluidly across the table.
feet flat on the table, knee bent, and hips adducted and adducted.
-With the knee and hip extended, perform abduction and adduction by sliding the entire leg across the table.
-Both legs are extended and flexible, with the heel gliding on the table.
-Extend one leg and flex the other.
-The tibia’s shin from the knee to the toe, from one leg to the other.
-The heel of one limb is transferred to the other by sliding along the crest of the tibia to the ankle (knee).
-The patient may also be instructed, under the therapist’s supervision, to first, place the heel of one leg on various points of the other leg, and extend the toe on one leg, and then the other.
Exercises for the legs in Sitting
-The second leg is extended to transfer the heel to a spot on the floor designated by a mark.
-the patient was instructed to stand and then sit while in a stride.
-Knees together, take a seat or stand.
-Hip adduction and abduction during seated.
Exercises for the Legs in Standing
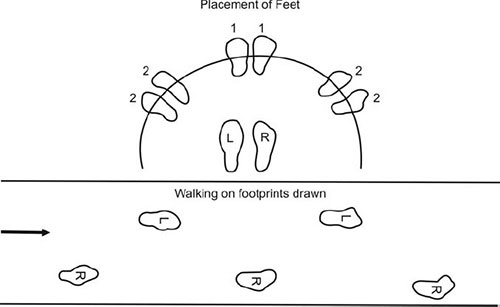
-weight is transferred from one leg to the other while the patient is standing in stride.
-Stroll along the narrow path.
-The patient walks in between two parallel lines.
-The patient enters sideways by planting their feet on the designated spot.
-Go about and make a turn.
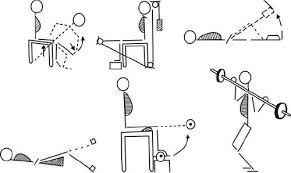
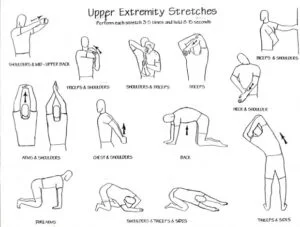
Frenkel exercises for upper limb
-To improve coordination of all upper limb movements, similar exercises can be designed for the patient’s upper limb. The patient would be instructed to place their hand on various points marked on a table or wallboard.
-the patient places several objects on a table in front of them, sits down, and touches each one with one hand before moving on to the next.
-The patient extends their elbow and wrist while flexing one shoulder to a 90-degree angle.
-As quickly as possible, the patient taps both hands on both thighs, alternating between the palmer and dorsal aspects. Additional activities that help with coordination include building with toy bricks or drawing on a blackboard, buttoning, combing, writing, and typing.
4) Strengthening exercise
-A common feature of dysdiadochokinesia is muscle weakness, which makes movement more challenging. Muscle strength also decreases with age. Enhancing balance and muscle strength can be achieved or maintained with the aid of exercises targeting the upper and lower extremities, particularly the shoulders and hips. Exercises that strengthen the core can also be helpful.
5) Balance training
In addition, patients can attempt coordinated arm and leg movements while sitting or standing, tapping their heel and toe alternately on the ground. By making you tense your abdominal muscles and pay attention to your posture at that precise moment, this exercise helps develop your core muscles.
-Static balance control
-Maintaining sitting
-half-kneeling
-tall kneeling
-standing postures on a firm surface
-tandem, single-leg stance
-squat position
-working on soft surfaces(e.g.-foam,sand,grass)
Perturbation
-the COG tracks the moving body parts.
-learning adaptation: distinguished by a notable decrease in the reactive reaction.
Romberg exercise
-The steps in this exercise are the same as those in the Romberg test. The patient is standing with a chair in front of them and their feet forced on the wall behind them. When they start to lose their balance, close their eyes for 30 seconds after keeping them open for 10 seconds to help them catch their balance. If someone loses their balance, they are told to stand with a chair in front of them and a wall behind them. Make sure the patient can stand alone with their eyes closed as the activity goes on.
Unilateral stance exercise
-asked the victim After a maximum of thirty seconds, place one leg on the ground. Use the other leg for this exercise. As the patient repeats this motion several times, the therapist may see that their balance has improved. As the patient advances in their exercise regimen, they can start working on different surfaces and motions to improve their posture and balance.
Dynamic balance exercise using moveable surfaces
1)Balance board exercise
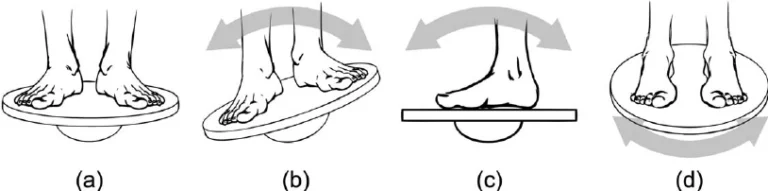
Starting position:
Board: Any type
-To find your balance on the board, place your feet hip-distance apart.
Hold yourself upright with a neutral spine.
-As needed, shift your weight to the center of the board to keep its edges off the ground.
-Hold it for at least 30 seconds.
-Increase difficulty: Extend both arms straight above your head, palms facing in, and place it down while maintaining a straight spine.
Front-to-back
Board: Wobble board
-Start from the beginning position.
-Make it easier: To keep your balance, use a railing or the wall.
-Increase difficulty: Extend both arms straight out from your sides.
Side-to-side
Board: Wobble or rocker board
Start from the beginning position.
-tilt for thirty seconds in each direction.
-Make it simpler: Add extra support with a railing.
-Raise the difficulty by fully extending both arms from your sides.
Round the clock
Board: Wobble board
-Start from the beginning position.
-The board should be rotated in a clockwise 360-degree circle.
-Continue rolling for about 30 more seconds.
-Make it simpler: Maintain your balance by using the wall.
2) SWISS BALL
Swiss Ball Sitting weight shifting
-This Balance Ball workout starts with you sitting up straight on a Swiss Ball with your feet together on the floor. Without elevating your leg, softly and slowly move the ball forward and backward keeping your back straight.
Swiss Ball sitting leg lifts
-With your feet together, start this Swiss Ball exercise by sitting up straight on a physioball. down your leg, then go to the opposite side as long as the exercise is pain-free, complete two to three sets of ten repetitions on each side.
Swiss Ball Squats
-To do this exercise, place a ball between the patient’s lower back and a wall while keeping your feet shoulder-width apart and pointing forward. Squat slowly while maintaining a straight back. Your knees should not go backward towards your toes; instead, they should be in line with your middle toes.
Swiss Ball Prone Single Leg Lifts
Take a seat on a Swiss ball to start the workout. With the Swiss Ball still in position and your knee straight, carefully raise one leg.
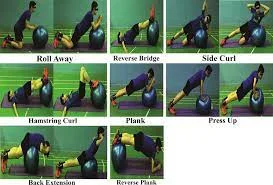
Stability Ball Hamstring Curl
-Stability Ball Exercises: Hamstring Rollout -Benefits: Using your core can strengthen your glutes and hamstrings.
-With your legs straight and the backs of your calves resting on a balance ball, assume a flat, laying position on your back.
-to ensure that your body forms a straight line from your shoulders to your heels, prepare your core and tighten your glutes to lift your hips off the ground. This is where things begin.
-Roll the ball as close to your butt as you can by dragging your heels (until your knees form 90-degree angles).
-To gently straighten your legs and return to the beginning position, pause and then roll your feet away from your glutes.
Stability Ball Deadbug
-Exercises with a Stability Ball: Dead bug
- Advantage is a full-body exercise that requires coordination between the legs and arms maintaining an upright posture while your arms and legs work independently. Maintain an erect posture as your arms and legs work independently.
-As you slowly lower your left leg and right arm to within six inches of the floor (both should stay in line with your body), prepare your core and hold.
-To get back to the starting position, reverse the movement, then repeat on the opposite side.
-Maintain switching between the sides, doing the same number of reps on each.
Stability Ball V-Pass
-Stability Ball Exercises: V-Up
-Prepare your core so that any lower back arch is minimized. This is where things begin.
-To form a “V” shape with the ball between your calves, lift your arms and legs by using your abs.
-Repeat the motion, alternating between your hands and legs.
Stability Ball “I-Y-T” Shoulder Raise
-Workouts with Exercise Balls – IYT Raise
-Extend your legs straight behind you while lying prone on a Swiss ball, pushing your toes into the ground for support.
-With your thumbs facing upward, make fists with your hands and let your arms fall straight down towards the floor. This is where things begin.
-Raise your arms straight up and in front of your ears, leading with your thumbs, while maintaining a downward pressure on your shoulders. The “I” formation is this.
-Lower your arms towards the floor, then raise them once more, but diagonally to form a ‘Y’ shape.
-“I-Y-T” is a single set cycle.
Stability Ball Rollout
-Workouts with Exercise Balls – Stability Ball Rollout
-Benefits: Your core stability and strength are evaluated with this workout.
-With your hands on a Swiss ball, kneel with your legs hip-width apart and your toes planted on the ground for support.
6) Neuromuscular exercise
-By improving the quality of motion in all three planes, the neuromuscular exercise program seeks to achieve functional joint stabilization and improve sensorimotor control.
-Many neurological rehabilitation approaches are built on the foundation of increasing and enhancing muscle activation to better motor control.
-Exercises in sitting, standing, and lying that involve closed kinetic chains in order to enhance sensorimotor control and achieve a low distributed articular surface pressure through co-activation of the muscles.
7)Proprioceptive neuromuscular facilitation
Tapping
-The technique known as “tapping” involves a therapist applying a light force to a tendon or muscle belly to promote voluntary control.
-A rapid contraction of the muscles is a normal response, and tapping is used to assess reflex activity.
Brushing
-Fast brushing is a treatment that uses a battery-operated brush on the skin overlaying the muscle to enhance static holding postural extensors and promote movement responses.
-Using this technique, the therapist applies firm, deep pressure to the skin to prevent itching, scratching, or tickling.
-The pressure input from rubbing the brush over the skin helps the central nervous system by focusing on touch receptors.
Cryotherapy-Brief
-Ice can be used to help muscles respond by combining the sensation of coolness with pain to cause the desired movement.
Passive Stretching
-During neurological rehabilitation, stretch can be applied in many different ways to get different results. Among the stretching techniques employed are
- Fast / Quick
- Prolonged
- Maintained
-The quick stretch that is applied helps to cause a muscle contraction that can result in a brief inhibition of the antagonist muscle and a brief contraction of the agonist muscle. It starts the monosynaptic reflex arc and reflexive facilitation of the muscle by turning on the main terminals of the muscular spindle.
Joint Compression
-Joint compression may improve joint awareness, which will enhance motor control. There are two possible outcomes from joint compression: exhibitory and inhibitory.
-Joint compression of the joint surfaces facilitates the work of the posture extensors, which are necessary to support the body. You can apply this compression slowly to impair muscle control or quickly to improve it. It is possible to apply with the help of weight-bearing postures or manually.
Joint compression can be achieved using one of two methods:
1) Light Compression: It is believed that allowing the body’s natural weight to travel down the long axis of the bone helps to avoid muscular stiffness.
2)Heavy Compression: More compression than that provided by body weight is believed to enable co-contraction at the joint that is under compression.
Vibration
Muscle Vibration
-Neurological patients have benefited from the application of muscle vibration to lessen their spasticity and tone. It is expected that muscle vibrations will enhance both inhibitory neuronal activity in the antagonistic muscle and corticospinal excitability.
-Muscle vibration can be applied in two ways: either at a high or low frequency, and it is essentially applied directly to the selected muscle or tendon.
Whole Body Vibration
-Whole body vibration is a relatively new modality that has been used to enhance balance and gait.
Vestibular Stimulation
-A very effective method for self-soothing, attentional focus, and a proprioceptive, unique sensory system with multisensory function is vestibular stimulation. Sending particular electrical signals to a nerve in the ear that regulates balance is known as galvanic vestibular stimulation.
-It is possible to achieve total body inhibition by moving slowly in all directions—forward and backward, horizontally, vertically, and linearly.
-Crawling, extended elbow rolls, and rocking motions on elbows can all be used to exhibit the entire body.
-Tonal responses are produced when spinning, and the overflow of impulses to higher centers greatly facilitates movement.
-Another benefit of vestibular stimulation is the facilitation of the back extensors when the patient is in the prone position and is moved quickly forward and backward or angularly.
Proprioception Neuromuscular Facilitation (PNF)
-A series of stretching exercises known as proprioceptive neuromuscular facilitation are used to increase flexibility and range of motion in both active and passive domains, which helps with motor control and rehabilitation. PNF is regarded as an ideal stretching technique that, emphasizes the development of movement sequence and increasing volitional movement.
-PNF places a strong emphasis on diagonal mass movement patterns that resemble the body’s overall functional movement.
-The principles of neurophysiology and functional human anatomy form the basis of PNF exercise.
Three areas are the main focus of PNF therapy methods:
-Enhance the agonist’s motor learning by using rhythmic initiation and repeated movement contractions.
-Reverse the antagonist muscles’ motor patterns.
-For isometric contraction, two methods are used: rhythmic stabilization and slow reversal.
-learning how to relax your muscles enhances flexibility and reduces spasticity.
-The movement patterns associated with PNF include multi-joint, multi-planar, diagonal, and rotational motions of the limbs, back, and neck. There are several PNF stretching methods, including Contract Unwind, Hold Unwind, and Contract Let go of the antagonist contract.
Contract Relax
The antagonist is contracted isotonically to encourage the patient to overcome resistance when stiff muscles restrict one’s range of motion.
Hold Relax
starts with the antagonist contracting isometrically against resistance, and then the agonist muscle contracts concentrically.
8) Sensory integrative therapy
-A therapy known as sensory integration therapy makes use of all five senses: touch, taste, smell, sight, and hearing. Repetitive behavior is improved by this therapy.
-In addition to therapies like deep pressure, brushing, weighted vests, and swinging, this therapy may involve the use of equipment like swings, trampolines, and slides. It can ease a child’s anxiety.
-Using headphones to immerse children in soothing sounds can help mitigate the effects of auditory processing disorders. You can play natural sounds to experience them as they would in real life, such as wind, rain, bird songs, and waves.
-A child can freely play with materials that enhance tactile processing, such as mud, dough, sand, water, or bubbles. Making bread dough by hand is a tough and enjoyable project.
-Aromatherapy, which involves giving kids a tiny bottle of essential oil to cover up smells they find offensive, is a popular and effective treatment for olfactory sensitivity.
-Children often like to guess the flavor of the foods, so play taste games with fruit and other foods. Using food on a plate to play games with could promote sampling.
-Children who struggle with proprioception are advantageous to them. such as labor-intensive tasks like pushing grocery carts, moving and stacking books or chairs, lifting large weights like full grocery bags, or raking and digging in the garden.
-Seesaws, swings, ride-on toys, and indoor or outdoor trampolines are all beneficial for reducing vestibular disorders.
Visually guided training of gait:
During visually guided gait training, the brain’s oculomotor and locomotor control systems (hand-eye-leg coordination) interact because the locomotor system needs information from the oculomotor system to place the feet correctly during a training session.
In a small trial, patients with mild cerebellar ataxia who underwent gait training with guided steps showed very positive outcomes.
Enhancing one’s gait, performance, and safety can be achieved by using eye movement alone to guide gait training. This involves looking at the foot to ensure proper placement for each step. This easy exercise can be done at home with assistance from family members, but it is task-specific and improves balance, coordination, and speed.
FAQs
How can you improve your coordination?
Maintaining an equally vital, healthy body requires coordination. Different exercises can help enhance your coordination. Simple activities that improve coordination, like hopscotch, juggling, or catching a ball, benefit beginners. Hand-eye coordination and motor abilities are needed for these tasks. as well as hand-eye coordination are required for these tasks.
How do we test for coordination?
Pointing a finger at one’s nose then to the examiner’s finger (finger-to-nose testing)
The heel-to-shin test involves running the heel down the shin from the opposing knee.
With the help of the index finger, tap the thumb.
faster hand movements that switch between pronation and supination.
What is the coordination ability?
The capacity for swiftly and deliberately executing complex spatiotemporal movement structures is known as coordination ability. In this context, coordination skills are viewed as an outwardly apparent result of the central nervous system’s control and regulation mechanisms for motor activity.
What is the main aim of coordination?
The goals of the organization and the individual can coexist peacefully when coordination exists. Explaining to people how achieving organizational goals will also benefit their personal goals, creates harmony between the two sorts of goals.
What are the advantages of coordination?
Conflicts, rivalries, waste, tardiness, apathy, and other organizational issues are reduced through coordination. It guarantees the organization’s efficient operation.
References:
- Dhameliya, N. (2022, August 7). Coordination exercise: Types, Test, Exercise – Samarpan Physio. Clinic. Samarpan Physiotherapy Clinic. https://samarpanphysioclinic.com/coordination-exercise-types-test/
- Kathiriya, N. (2022, July 24). CO-ORDINATION EXERCISE – Mobile Physiotherapy Clinic. Mobile Physiotherapy Clinic. https://mobilephysiotherapyclinic.in/co-ordination-exercise/