14 Best Restorative Yoga Poses
Introduction:
Stress and fatigue are increasingly connected in today’s fast-paced society. Restorative yoga improves life by calming, resetting, and repairing the body and mind. Restorative yoga positions, as opposed to more demanding ones, promote body-supporting techniques and deep, calm breathing. The goal of this activity is to restore the nervous system and promote calmness, not to increase strength or flexibility.
To allow the muscles to relax and the mind to enter a state of relaxation, each pose is frequently maintained for five to ten minutes. By stimulating the parasympathetic nervous system, this technique lowers stress chemicals like cortisol and encourages digestion and restful sleep.
A common piece of equipment in restorative yoga is a folded blanket, bolster, or block. You can more fully relax your body and deepen the pose with the help of these objects.
Restorative yoga is safe and gentle. If you are unsure whether restorative yoga is healthy for you, speak with your doctor or physical therapist before starting.
Benefits of Restorative Yoga Poses:
Here is a thorough explanation of the mental and physical advantages of restorative yoga positions, which have been supported by the ideas of meditation, relaxation, and parasympathetic nervous system activation:
Stress Reduction and Deep Relaxation
Yoga that promotes relaxation stimulates the parasympathetic nervous system, which is in charge of “rest and digestion.” This calms the mind and lowers cortisol levels, the stress hormone, by removing you from the fight-or-flight response.
- Improved Psychological Toughness
- Reduce blood pressure
- Lower heart rate
- Improved ability to manage sadness and anxiety
Promotes Immunity and Healing
It promotes lymphatic flow, oxygenates tissues, and increases circulation.
- Improved immunity
- Quicker recovery from disease or trauma
- Reduce inflammation
Improved Strain-Free Flexibility
This allows the muscles to gently and gradually release tension without exertion.
- Increased mobility of the joints
- Deep connective tissues are gently stretched.
Managing Pain and Releasing Emotions
Trauma and chronic pain frequently show up as stored tension in the body. Conscious breathing and prolonged rest are two ways that restorative yoga helps relieve this.
- Alleviation of migraines, tension headaches, or back pain
- Emotional release in a secure, encouraging setting
- Decreased sense of pain over time
Better Quality Sleep
By reducing physical stress and mental strain, many restorative postures help the body and mind get ready for a good night’s sleep. The lengthy holds (five to twenty minutes) facilitate the entry into a deeply calm state.
- Sleeplessness alleviation
- Decreased restlessness at night
Makes You More Self-Aware and Mindful
Practicing yoga for extended periods promotes presence. This promotes a more judgment-free awareness of breath, bodily sensations, and emotions.
- Improved concentration and focus
- Decrease in negative thought patterns
- Improved mental-physical integration
Restorative Yoga Poses:
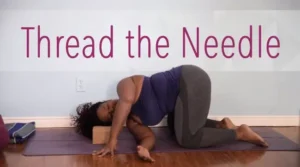
Thread the Needle Pose (Parsva Balasana)
- Start in the tabletop position to do this pose.
- Extend your right arm by placing its palm beneath your left arm.
- Similar to a half-child’s position, the hips remain raised or lowered toward the heels.
- Breathe and relax.
- Maintain your left arm bent, lying on your back, or stretched above.
- Hold this position for a few seconds.
- Return to the tabletop after gently relaxing by pressing onto the left hand.
- Then return to your neutral position.
- Then relax.
- Repeat these yoga poses 5 to 10 times.
Supported Child’s Pose (Balasana)
- Place your knees together or wide apart while sitting back on your heels; the bigger the space, the more flexibility your body has.
- Position Your Support or Bolster.
- Between your thighs, place a big cushion, bolster, or stack of folded blankets lengthwise.
- Over the Support, Fold Forward
- Onto the bolster, lower your body down.
- One side of your head should be turned; switch sides midway during the hold.
- Your arms should remain by your sides.
- Put your hands behind your head.
- Ankle blankets can also reduce pressure.
- Let your entire body become one with the equipment.
- Inhale deeply and slowly into your back.
- Then return to your neutral position.
- Then relax.
- Repeat these yoga poses 5 to 10 times.

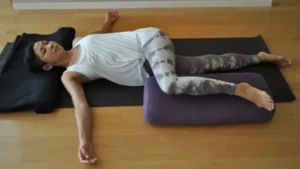
Supine Spinal Twist (Jathara Parivartanasana)
- Start by extending your spine on a yoga mat or other suitable surface.
- Here, take a couple of deep breaths.
- Gently pull both knees against your chest.
- After that, flex your right knee on the floor.
- The ideal position for the knees is at an acceptable angle, either layered or separated.
- Position and comfort can be improved by placing a blanket or cushion between your knees.
- The twist may be made passive by placing a little cushion beneath the upper thigh or lower knee.
- Extend your arms in a T-shape.
- Hold this position for a few seconds.
- Then return to your neutral position.
- Then relax.
- Repeat these yoga poses 5 to 10 times.
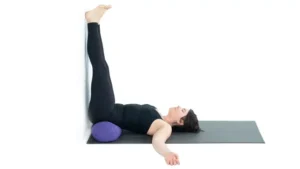
Legs Up the Wall Pose (Viparita Karani)
- Select the Wall Space You Want.
- Position your blanket or mat parallel to a clean stretch of wall.
- If you would like a slight elevation beneath your hips, place a hard cushion, folded blanket, or bolster 6 to 12 inches from the wall.
- One hip should be against the wall when you sit sideways.
- After raising your legs to the wall, hold this position for a few seconds.
- Then lower them back to the floor.
- Make sure your sitting bones are near the wall but not pressed up against it.
- Close your eyes.
- Relax your jaw, throat, and face.
- Then return to your neutral position.
- Then relax.
- Repeat these yoga poses 5 to 10 times.
Supported Fish Pose (Matsyasana)
- Lay out two blankets or a bolster on your mat, folded vertically.
- It should provide support from your mid-back to your head.
- Flex your knees while keeping your feet straight.
- Lower your back carefully onto the bolster so it supports your head, upper back, and mid-back.
- Legs were straight out.
- Palms looking up, out to the sides (T-shape)
- Support your head and neck.
- Make sure your chin is gently tucked in rather than flung back, and that your head is supported.
- Hold this for a little while, or longer if it seems comfortable.
- Then return to your neutral position.
- Then relax.
- Repeat these yoga poses 5 to 10 times.

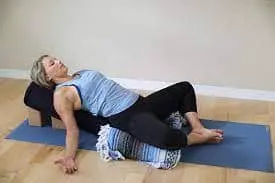
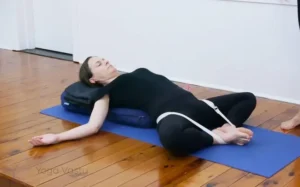
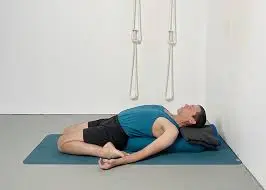
Reclining Bound Angle Pose (Supta Baddha Konasana)
- Place two blankets folded horizontally on your mat, or place a long cushion or bolster on it.
- Seat at the base of the support.
- After that, open your knees into a diamond shape by squeezing your feet together.
- Put bolsters or folded blankets under each outer knee or leg.
- Instead of feeling stretched, you want your knees to feel supported.
- If you need to support your neck, use a small cushion or blanket below your head.
- You can focus inward by placing your hands on your stomach and heart, or by your sides, palms up.
- If you want a mild chest stretch, arms can be included.
- Take a deep breath and relax.
- Put your eyes closed.
- Let your shoulders and mouth drop.
- Breathe deeply and gently, letting your breath expand into your abdomen and ribs.
- Hold this position for a few seconds.
- Knees should be pulled together gently with your hands.
- Then return to your neutral position.
- Then relax.
- Repeat these yoga poses 5 to 10 times.
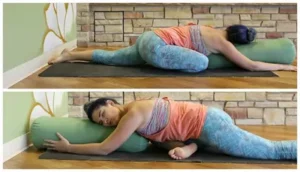
Sleeping Pigeon Pose (Eka Pada Rajakapotasana)
- Your right knee should be moved forward toward your right wrist.
- Place your right shin at an angle and your foot near your left hip.
- As you straighten your left foot, maintain it securely planted on the ground.
- To avoid knee and hip pain, place a folded blanket or block beneath the right hip if it doesn’t touch the floor.
- Ensure that your pelvis is supported and level, not tilting to one side.
- Your upper body should be lowered into the bolster.
- Then move your head to one side.
- Arms might be relaxed around the bolster, or hands can be placed beneath the forehead.
- Allow enough time for your body to relax entirely into the support.
- Slowly inhale into your hips and abdomen.
- Hold this position for a few seconds.
- Then return to your neutral position.
- Then relax.
- Repeat these yoga poses 5 to 10 times.
Reclining Hero Pose
- To start, sit on your heels.
- If necessary, place a block or folded blanket behind your hips to prevent pressure on your knees or ankles while sitting between your heels.
- Behind your back, near your hips, place a bolster, a long cushion, or two blankets placed lengthwise.
- Slowly lower your back onto the bolster.
- Start by using your hands to assist your spine, then your elbows, and finally, fully recline.
- Widen your feet a little or increase the height beneath your hips if your knees or ankles are causing you pain.
- For additional support, fold a blanket beneath each ankle or leg.
- Allow your breathing to deepen and slow.
- Over time, notice how the chest, abdomen, and quadriceps get firmer.
- Hold this position for a few seconds.
- Roll to one side, tuck your chin, and use your hands to press up.
- Then return to your neutral position.
- Then relax.
- Repeat these yoga poses 5 to 10 times.
Malasana
- Put a bolster under your sitting bones so that you may sit comfortably in a squat.
- With the toes turned out naturally, the feet are a little broader than the hips.
- Put a folded blanket or wedge below your heels for support if they rise off the ground.
- Maintain this position for a few seconds.
- Then return to your neutral position.
- Then relax.
- Repeat these yoga poses 5 to 10 times.
Gomukhasana
- While you’re sitting, elevate your hips with a folded blanket or bolster.
- This keeps the spine long and relieves pressure on the knees.
- To put them in the middle, put your right knee over your left.
- The outside hips will be next to your feet.
- Use a wrapped blanket beneath each thigh or try cross-legged poses (Sukhasana) if this is too difficult.
- Should both knees be lifted or strained, place blankets or blocks beneath them.
- The pelvis should feel evenly supported and anchored.
- Gently fold forward a bolster or two heaped blankets in your lap.
- Hold your head sideways while resting your body against the support.
- Only if it is very comfortable can you add the Gomukhasana arm hold.
- Hold this position for a few seconds.
- Once you have held, slowly uncross your legs, take a seat or recline.
- Then return to your neutral position.
- Then relax.
- Repeat these yoga poses 5 to 10 times.
Adept’s pose (Siddhasana)
- Sitting on a blanket that has been folded on the floor, spread your legs wide apart.
- The left knee should be flexed so that the heel is approaching the lower abdomen.
- The foot might rest close to the inner thigh or pubic bone if the right knee is bent and the heel is stacked over the left ankle.
- Maintain a straight spine and relaxed shoulders.
- Inhale deeply and gently.
- Hold this position for a few seconds.
- Then return to your neutral position.
- Then relax.
- Repeat these yoga poses 5 to 10 times.
Happy Baby Pose (Ananda Balasana)
- Begin by resting on the floor in a comfortable supine position.
- Lift your knees to your chest now.
- Use your hands to grasp the outside borders of your feet; if necessary, you can also grab your ankles, shins, or a strap.
- Maintaining your knees flexed wide enough to pull them toward your upper body.
- With the shins horizontal to the floor, the ankles should be above the knees.
- Hold this position for a few seconds.
- Then return to your neutral position.
- Then relax.
- Repeat these yoga poses 5 to 10 times.
Supported Half Frog Pose (Ardha Bhekasana)
- Lie down on the floor with a bolster over your chest.
- Your right leg’s knee should be bent such that the thigh is 90 degrees from your body.
- The shin and inner knee are supported by a blanket or mat.
- To prevent tension on the hip and groin, place a folded blanket or small bolster beneath the right knee or thigh.
- The left leg is still loose and straight out.
- You can lean your head to one side or place it face down on a warmed blanket or cushion.
- Hold this position for a few seconds.
- Then return to your neutral position.
- Then relax.
- Repeat these yoga poses 5 to 10 times.
Restorative Savasana (Corpse Pose)
This pose is one of the most essential and powerful restorative yoga poses, given its appearance of simplicity, because when supported with the right instruments, it helps the nervous system into a healing state.
- Start by lying flat on your back to reduce strain on your lower back.
- Lay a blanket under your head or neck to enhance the comfort and position of your spine.
- Try to remain inactive, but if something bothers you, change the objects being used.
- To direct your practice, set a timer or play relaxing music.
- You can anchor your awareness by focusing on your breath or by practicing a body scan meditation.
- Then return to your neutral position.
- Then relax.
- Repeat these yoga poses 5 to 10 times.
What precautions should be followed when practicing yoga poses?
Even though restorative yoga is easy to do and gentle, safety, comfort, and effectiveness still depend on focused practice.
The following are important safety measures to remember:
Pay Attention to Your Body
- Never force your body into a shape, even if the position is supported.
Don’t Overstretch
- The muscles’ function in restorative yoga is to release, not to purposefully stretch.
- If you experience strain or tugging, make adjustments until you feel comfortable.
Consider Your Pose Carefully
- Long holds are good, but don’t maintain a pose for too long if it makes you numb or uncomfortable.
When entering and exiting poses, exercise caution.
- To prevent lightheadedness or joint strain, especially after lying down for a long time, move carefully and slowly.
Make Good Use of Props
- Suitable support is essential.
- To make sure your body is completely supported and relaxed, particularly in the joints and lower back, use bolsters, blankets, and blocks.
Avoid Ignoring the Warmth
- The body cools rapidly while holding stationary.
- To be warm and cozy, use layers, blankets, or socks.
Practice in a Calm, Secure Environment
- Reduce the number of distractions. You can enter a deeper state of relaxation without feeling shocked or tense in a quiet, safe setting.
Adjust for Conditions or Injuries
- Adjust positions or get advice from a certified yoga instructor if you have joint problems, high blood pressure, back pain, or pregnancy.
Remain in the Present
- If you want to stay grounded and prevent falling asleep, even when you are still, maintain a calm awareness of your breath and your senses.
If necessary, get professional advice.
- Always get medical advice before starting a new practice, especially if you are pregnant, have just had surgery, or have other health issues.
When Should You Quit Working Out?
Being active is essential for good health, but it’s also important to know when to take breaks. The foundation of restorative yoga is the idea that sometimes quiet, rather than effort, is the best way for the body to heal.
You Experience Pain
- It should never hurt to do restorative yoga.
- Stop, adjust, or leave any posture if you have sudden or continuous pain, particularly in the lower back or joints.
You Feel As Though Your Breath Is Limited
- When doing restorative yoga, breathing should be easy and unrestricted.
- You’re either pushing yourself too hard or something isn’t positioned properly if you’re having trouble breathing in a pose.
You’ve Spent Too Much Time on the Mat
- Despite its gentleness, prolonged use of restorative postures (more than 90 minutes each session) can occasionally cause stiffness or mental tiredness.
You’re quite tired.
- Your body might want complete rest instead of even a little stretching if you feel more tired than relaxed.
- It’s acceptable to avoid yoga in favor of quiet time or sleep.
You Are Mentally Unable to Relax
- Stress, worry, or other distractions can cause your nervous system to become overactive, making it harder to relax into restorative positions.
- In these situations, you might want to take a break or write in your diary before practicing, or you could decide to stop completely.
You’re growing cold.
- You should stop or take a break if you’re lying still for extended periods and begin to feel cold.
Summary:
A practice of extreme self-care, healing, and deep listening, restorative yoga is more than just a series of poses. This soft approach provides a critical counterpoint in a culture that frequently exalts achievement and is busy. Your mental, emotional, and physical health can be greatly affected by just 10 to 15 minutes per day.
Restorative yoga promotes emotional, mental, and physical relaxation. Restorative yoga, which is suitable for all skill levels, is done slowly and focuses on deep breathing, silence, and extended holds.
Restorative yoga is a great way to balance your exercise regimen and reduce stress, so you might want to consider it. It accepts you for who you are, with compassion, tenderness, and quiet, regardless of your level of experience.
FAQ:
In what ways does restorative yoga vary from other forms of yoga?
Props like blocks, blankets, and bolsters are used in restorative yoga, a soft, passive kind of yoga, to fully support the body in calming positions. Restorative yoga focuses on calm, deep relaxation and nervous system healing above strength, flexibility, or cardiovascular conditioning, in contrast to more energetic yoga forms like Vinyasa or Hatha.
Which equipment is necessary for restorative yoga?
Although expensive equipment is not necessary, having the right object has a significant effect.
Necessary items include:
The back, knees, and chest can all be supported using a yoga bolster.
Yoga blocks: raise certain body regions
Blankets offer warmth and comfort.
A belt or strap secures limbs in place without the need for physical exertion.
Can I fall asleep when doing restorative yoga?
Yes! Think about training earlier in the day if you’re missing transitions or going to bed too early.
Set a mild timer or do shorter holds if your experience is disrupted by sleep (such as snoring or stiffness).
For whom is restorative yoga beneficial?
Nearly everyone may gain from it, particularly those who: Deal with ongoing stress or anxiety
Experience sleeplessness or tiredness
Are recuperating from disease, trauma, or surgery (with permission from a physician)
Pregnant (in altered positions)
You’re searching for mental clarity and emotional restoration.
Does restorative yoga have the potential for improved mental well-being?
Indeed. The parasympathetic state is supported when the nervous system is calmed by restorative yoga, which:
lower levels of the stress hormone cortisol
Encourages deeper sleep
Reduces emotional overload and anxiety
Promotes bodily awareness and attention
Does restorative yoga work well before bed?
Of course.
Relieves daytime stress in the muscles and mind and promotes deeper, more peaceful sleep.
Before going to bed, try the Reclining Bound Angle Pose, Supported Child’s Pose, or Legs-Up-the-Wall.
How frequently should I practice yoga for relaxation?
Your demands and goals will determine this:
To reduce stress, do so two or three times per week.
For rehabilitation from tiredness or severe healing: Every day or as required
To maintain an active yoga/workout regimen: 1-2 times each week
You may noticeably change your attitude and neurological system with just ten minutes a day.
Which traditional yoga positions are considered to be restorative?
Supported Child’s Pose (Balasana)
Legs-Up-the-Wall (Viparita Karani)
Reclining Bound Angle Pose (Supta Baddha Konasana)
Supported Bridge Pose (Setu Bandha Sarvangasana)
Reclining Twist
Which three elements make up restorative yoga?
The three main components of restorative yoga are mental, emotional, and physical health. Together, all of these elements form a complete practice.
Is stretching effective with restorative yoga?
Long, contemplative stretches and stress relief are two benefits of restorative yoga. Think about participating in an online course or attending a studio lesson from the convenience of your own home.
Is restorative yoga something I can do every day?
Yet, as you become capable, you may incorporate restorative yoga into your regular workout routine.
Does restorative yoga help people lose weight?
Yoga styles that are more physically demanding and burn more calories than others include vinyasa, power, and ashtanga. Restorative yoga and its focus on relaxation might help people lose weight, even if certain forms of yoga may burn more calories.
Is restorative yoga beneficial for back pain?
Although it can help with certain pain in the back, stress reduction, and body awareness, a more active type of yoga would be more advantageous for the health of the spine.
References:
- Ross (1970) said, “These nine calming yoga positions will provide you with the relief you’re yearning for.”
- 2020 Lindberg: The advantages of restorative yoga and positions to attempt
- 11 relaxing yoga poses to help with digestion and sleep are included in Varni’s Breathe Together Yoga (2021).
- Matson’s 2024 list of the top ten healing yoga poses that even your grandma could perform.
- Rachel’s list of the top ten relaxing yoga poses for regulating the nervous system in 2024
- The most relaxing yoga poses for stress treatment in 2015, according to Shakeshaft.
- Try these four calming yoga positions to unwind both mentally and physically in 2022—Yoga Medicine.
- Image 1, Needle Threading / Parsva Balasana
- Image 3, Calm and inspiring: 2023 Supported Supine fashion The Jannyca
- Image 4, Your Comprehensive Guide to the Legs up the Wall Pose by Viparita Karani, 2023 Jannyca
- Image 5: This month’s yoga pose is Carrie’s “Supported Fish” from 2023.
- Image 6, Yoga Vastu, is what Supta Baddha Konasana will be doing in 2022.
- Image 7, Kait’s Top 8 Relaxing Yoga Pose Ideas | 2021 Contemporary Boho Habits
- Image 8, Rod’s 2025 version of Supta Virasana (Reclining Hero Pose)