Muscular Endurance
What is a Muscular Endurance?
Muscular endurance is the ability of a muscle or group of muscles to maintain constant contractions against resistance for a prolonged period. It’s a key component of overall fitness and plays a crucial role in various daily activities and sports.
These muscles can continue to contract and resist these forces if their activity is increased.
A person with greater physical endurance may perform workouts like push-ups and squats more often.
Do you need muscular endurance?
Patients will be able to carry out physical activities for longer periods by increasing their muscular endurance. Strength enables you to lift a force, but endurance enables the patient to do so repeatedly over time.
How to Measure Muscular Endurance
McGill Core Endurance Test
Purpose of the test:
To evaluate the body’s stabilizing muscles’ physical endurance
PROCEDURE:
The four tests in the protocol use isometric muscle strength to assess whole-body strength.
- Trunk flexor test (TFT)
- The rectus abdominis, or anterior core muscles, are evaluated for endurance using TFT.
- Sitting with the back against the jig at a 60-degree angle to the floor is how the flexural resistance test starts. Arms are crossed across the chest, hands are on the opposite shoulder, feet are stretched, and both knees and hips are bent 90 degrees. The individual holds the isometric position for as long as they can when the jig is first brought back 10 cm. When a person’s back makes contact with the jig, it is considered a failure.
- Note the client’s location holding time in seconds.
- Trunk Extensor Test (TET)
- The erector spinae and multifidis are assessed using TET.
- To guarantee correct alignment, the practitioner stands close to the client’s body.
- The hips, knees, and pelvis are locked while the upper body extends above the test stand’s head to test the back extensors. With hands resting on opposing shoulders, the upper limbs are held across the chest. When the upper body deviates from the horizontal posture, an error occurs.
- Lateral musculature test:
- The lumbar region, transversus abdominis, and obliques are measured using lateral muscle testing (LBM).
- Both the le! and the procedure for testing the right lateral muscles are as follows: “The right side is tested separately; the lateral muscles are tested when the person is in a full lateral bridge posture (le).” The upper leg is positioned in front of the lower leg to provide support, and the legs are spread wide. To form a straight line from head to toe, clients descend their pelvis to the floor while supporting themselves with one leg and one elbow. The hand on the other shoulder holds the released arm across the chest. Failure happens when the person’s back becomes unnaturally curved and their pelvis hits the floor again.
- Lateral weakness is apparent if the collateral weakness is apparent if the client is unable to adopt the proper posture.
- Throughout the exam, make sure the customer stays in the proper position.
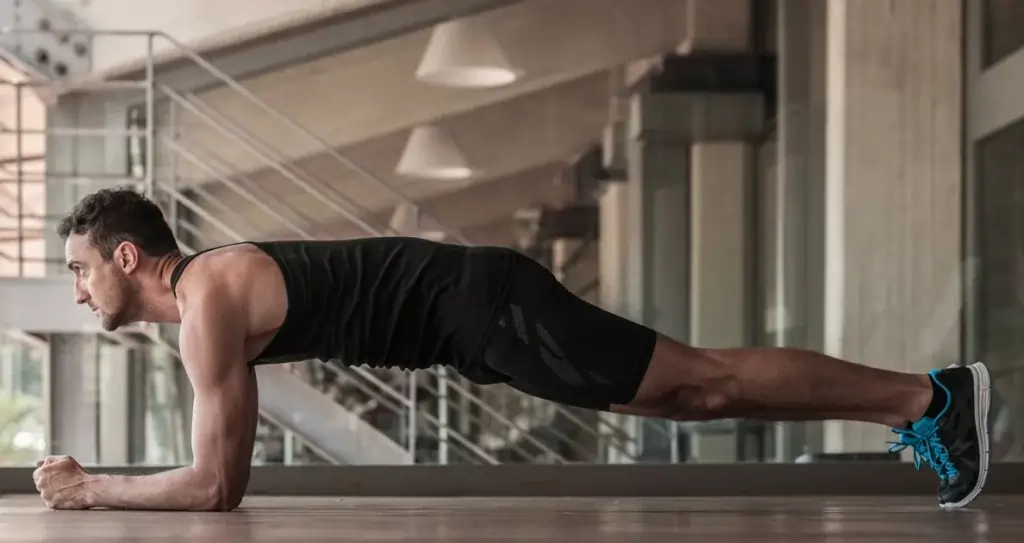
Plank Hold
Purpose of the test:
Assess core muscle strength.
Necessary equipment:
Stopwatch
PROCEDURE:
- The client should start by resting on their back on a level, sturdy surface.
- Give the client instructions to position their elbows just behind their shoulder girdle while their forearms are on the floor.
- Then touch the floor by pressing your toes down.
- When the client is ready, have them use their hands to push off the ground and float into a plank position. • Pay attention to both sides’ pelvic height or adjustment.
- The plank holds the exam in a timed format: When the client is still and not moving, start the stopwatch. When the client is no longer able to maintain the position, or after one minute, stop timing.
Static Squat Test
Purpose of the test:
Assess lower body muscle strength
Necessary equipment:
The wall
Stopwatch
PROCEDURE:
- The client is standing with their knees bent at a 90° angle, hips bent, and both feet against the wall.
- Instruct the client to raise one leg 5 cm off the floor and maintain it there for as long as possible.
- When the leg is dragged, time begins, and when it hits the ground, time stops. • Note the longest duration for every leg.
Maximum Push Test
Purpose of the test:
to evaluate the upper body’s muscular strength.
PROCEDURE:
The following are the procedures for both the modified pushup test and the maximal pushup test:
Pushup test (performed on the client’s toes)
- Extend your arms fully while lying on the mat with your hands shoulder-width apart.
- The patient’s body should be lowered until your elbows form a 90-degree angle.
- Return to the beginning position with the patient’s arms completely extended; do not hold the patient’s legs.
- There should be no breaks in the pushing motion.
- Compress as many times as you can.
- Keep track of how many full-body push-ups you complete.
The client’s knees are used for the modified pushup test.
- The patient’s upper body should be lowered until your elbows form a 90-degree angle.
- Return to the beginning position while the patient’s arms are outstretched.
- The client’s legs should not be held.
- There should be no breaks in the pushing motion.
- Create as many unique seals as you can.
- Note how many modified seals there are in total.
The benefits of muscle endurance training
- help sustain stability and proper posture over time.
- increases muscles’ aerobic capacity
- and enhances one’s capacity to carry out everyday tasks like moving large goods.
- Improving sports performance in endurance
Exercise For Muscular Endurance
Cardiovascular or Aerobic Exercises:
By using big muscle groups for prolonged periods of time, exercises like running, cycling, swimming, brisk walking, and jumping jacks enhance cardiovascular health and increase general endurance.
Swimming

- Swimming might be a nice alternative if jogging isn’t your thing. One of the greatest activities for the entire body is swimming, which can result in incredible muscular endurance and a fantastic physique. Without expert assistance, swimming correctly can be challenging; nevertheless, the following tips can be helpful:
- Keep your movements tidy and don’t weep. In addition to adding weight to the body, the additional motions make it more challenging to glide through the water.
- “Dig” with your hands through the water. Longer propellants are made possible by this.
- Don’t look up. It maintains the body in a healthy position and helps to optimize power dynamics.
- These should get you started, but there are a lot more ways to increase muscle endurance for effective swimming. Start gently and strive for a manageable swim time if you’re new to swimming. Try swimming for at least 30 to 60 minutes every day to build muscle.
Running

- It might be time to investigate cardio as a fitness enhancer if you work without it. Running not only increases cardiovascular endurance but also endurance because it works a variety of body muscles.
- Maintaining proper posture reduces the chance of injury and optimizes benefits.
- Always keep your core active. Running involves the entire body, although most people consider it a lower-body sport. Although it requires effort, endurance jogging can develop significant cardio-respiratory endurance that can be easily transferred to strength training. Avoid establishing pace objectives that are too quick over extended distances.
Body-weight Exercises:
Plank
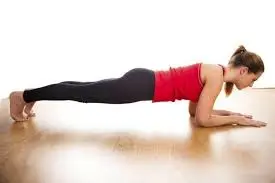
- Maintaining a neutral spine, take one step back at a time until you are in a straight line from the head to the heel.
- To support the patient’s lower back, contract their abs. Visualize elevating your chest away from your elbows without rounding your back.
- Hold for as long as the patient can tolerate, aiming for 30- to 45-second intervals, and then let go. That’s one rep.
- Advice: It’s a good idea to take a break before doing another rep if you begin to lose form (either your hips sink low or your buttocks begin to lift).
Body Weight Squats
- Sit with your legs bent until your buttocks are knee-level. You should push through your glutes as you ascend.
- Perform 2-4 sets of 25 reps. If you think you can do more after each set, change the amount of repetitions. Advice: Keep your shoulders back, head up, and chest high to preserve proper form.
- Experiment with this classic squat by pointing your toes and broadening your posture. The inner thighs are the focus of this exercise.
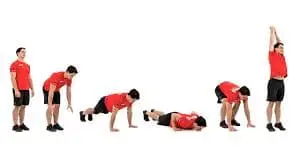
Basic Burpee
- Bend your elbows and extend your legs behind you before dropping your complete body to the ground. Leap your legs back under your torso fast, then use your arms to propel yourself back up. Raise the patient’s arms above your head and leap straight into the air. Proceed directly to the following exercise after finishing with your knees slightly bent.
Push up
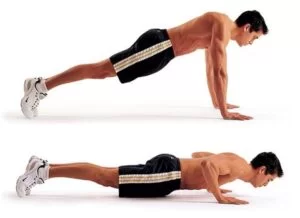
Step 1
Starting position: Bring your legs together behind you while kneeling on the floor or exercise mat.
Step 2
To place your palms on the mat, softly lean forward with your hands shoulder-width apart and your fingers pointed forward or inward. As you progressively raise your weight forward, keep your shoulders precisely over your hands. To fully stretch your body without bending your hips or knees, position your arms as necessary.
aligns your head with your spine and strengthens your body by “tightening” your glutes, quadriceps, and core/abdominal muscles. With your ankles bent back and your toes pointing toward your shins, place your feet together.
Step 3
Bottom Phase: Keep your head in line with your spine and your body tight as you slowly lower yourself to the floor.
During this lowering phase, avoid letting your hips lift or your lower back slump. Continue descending until your chin or chest makes contact with the mat or floor. During the descending phase, let the elbows flare outward.
Step 4
Rise phase: Maintaining your head in alignment with your spine and your body rigid, push up through your arms. Think about pushing the floor away from you for more strength. Avoid letting your hips rise or your lower backdrop.
Keep applying pressure until the patient’s arms reach their full elbow length.
Step 5
An alternate position is to retain your elbows close to your sides during the down phase while rotating your arms to face forward. This can lessen the strain on the shoulder joint by refocusing attention from the pectorals to the triceps.
Compression and stability are added to the shoulders by pushing via the outside of the palm and the heel.
Strength Training Exercises:
Lunges
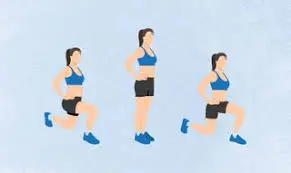
- Place your right foot two to three feet ahead of your left foot while standing in a split stance. Your posture is straight, shoulders back and down, hands on hips, and core contracted.
- Lower your body till your back knee is only a few inches off the floor while bending the patient’s knees. At the bottom of the exercise, your back knee is pointed toward the floor, your front thigh is parallel to the floor, and your body weight is evenly distributed between both legs.
- Maintaining the patient’s weight on the front foot’s heel, push back to the beginning position.
Crunches
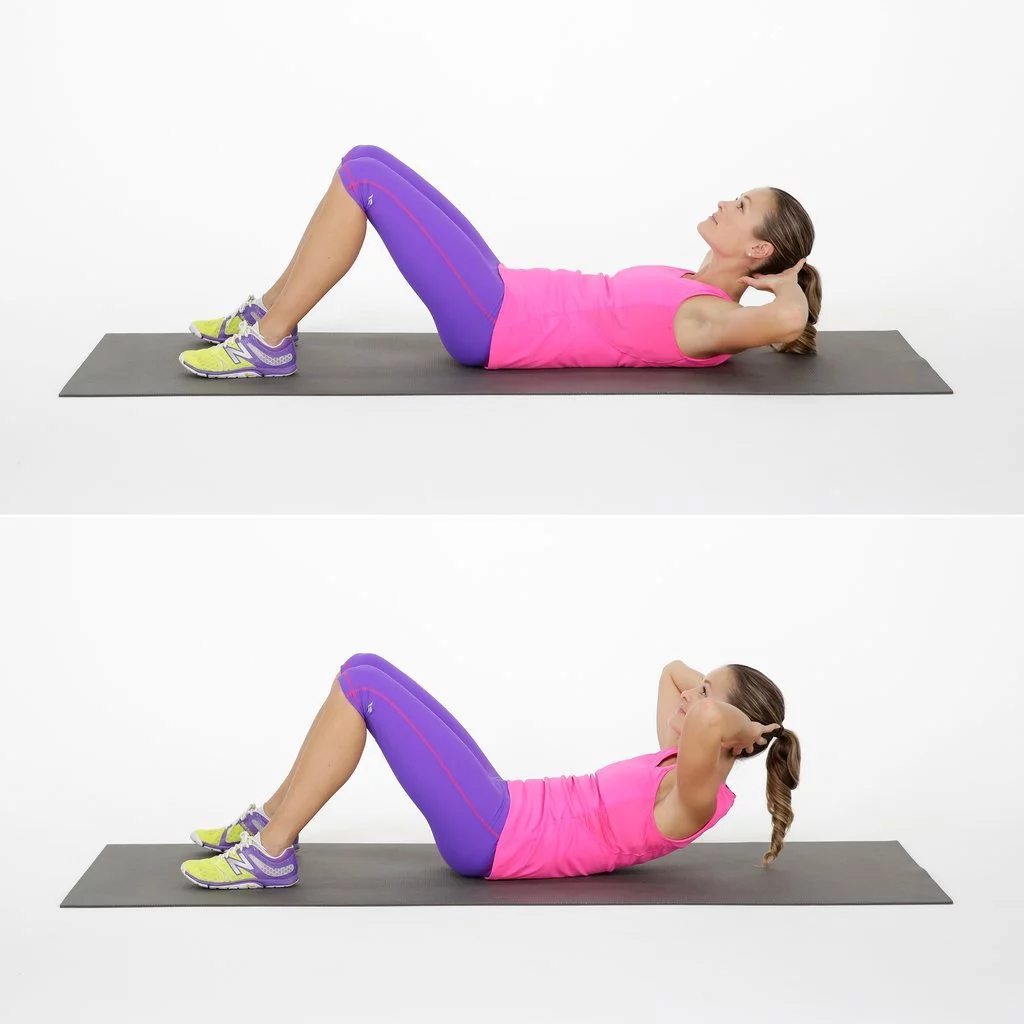
- With your elbows by your sides, place your hands just behind your head to support your neck. Raise your shoulders and upper back off the floor by twisting your torso up and bracing your stomach. Instead of swinging your elbows over your head, keep them at your sides. Refrain from employing momentum instead of muscle to raise your body. Put a golf ball between your chest and chin. Lower your body gradually to maximize the strength of your muscles. Perform five sets of twenty-five reps.
Abdominal crunch
- Tuck your chin in and rest your hands softly on the back of your head. Return the patient to the starting position with gentleness. Do 10 to 15 repetitions for a starter set.
Pike crunch
- The pike crunch is an additional example of an abdominal crunch.
- Place your arms over your head, knees apart, and back straight on the floor. Form a pike by raising your legs and body off the ground. Reach your arms toward your feet while keeping your feet straight up in the air at a right angle.
Bench Press
- Traditional flat bench press
- Dumbbells, a barbell, or a flat bench are necessary equipment (extra weights are optional).
- Place the patient’s back on a level bench. When clutching the bar, the patient’s hands should be a little wider than shoulder width. Directly above the shoulder joint is where the band should be. Maintain your hips on the bench and the patient’s feet firmly on the ground throughout the session.
- Throughout the exercise, keep the patient’s spine neutral and activate their core muscles. Do not arch your back. Raise the dumbbells or barbells gradually if the patient is using them.
- When the patient’s elbows are beneath the bench, stop counting. To return to the starting position, push the bar up and place the patient’s feet on the floor. Depending on the weight you are using, perform 5–10 repetitions. Finish as many as three sets.
2. Narrow grip bench press
- Equipment required: flat bench, barbell (extra weights optional),
- For a classic bench press, follow the previous instructions, but maintain a shoulder-width distance between the bar and your body.
3. Incline bench press
- Equipment required: an incline bench at a 45–60 degree angle, two weights, or a barbell
- Lean back just enough to flatten your back against the bench, but keep your feet on the floor. Dumbbells or barbells should be held just over your shoulders to begin. Wrap your thumb around the handle and position your hands forward. With the elbows at a 45-degree angle, press the weight to the eyes or just above. Breathe in, then gently and carefully lower the dumbbells until they contact or extend just above your wrists, elbows, and chest, then out to your sides. Do at least five repetitions of the push.
- Keep in mind that the number of repetitions will vary depending on your weight and goals. Compared to someone who uses lighter weights, someone who uses greater weights can complete fewer repetitions.
4. Decline chest press
- Equipment required: barbell or dumbbells and a 15-degree bench
- Maintaining a straight back, slowly recline on the bench with your legs over your head.
- bench Put your feet up on the available stools. As you use the dumbbells, ask a spotter to assist you in grabbing them or lifting the bar from the rack. Hold the weight directly above your shoulders with hands that are slightly wider than shoulder height. Do at least five repetitions of the push. Keep in mind that the number of repetitions will vary depending on your weight and goals. Compared to someone who uses lighter weights, someone who uses greater weights can complete fewer repetitions.
Step up:
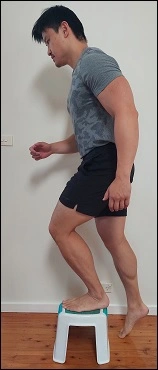
- Place your feet on the box so that the hip crease is just below the knee or the knee is bent at a 90-degree angle, depending on how strong and flexible your hips are. Stand about a foot away from the box, use body weight, and hold the dumbbells to the patient’s chest.
- Place the entire lead leg on the box, toes toward the front. To stand, push through the wire leg. Consider extending the patient’s glutes forward as you get to your feet. Press the non-working leg onto a high knee, balance on the patient’s leg, or position one foot on a box while the knee is extended. Use the non-lead foot to take a gentle step down, then reset and repeat.
Walking Lunges:
- Place your feet hip-width apart as you stand. Make sure your body is tall and erect, your core is active, your shoulders are back, and your chin is up before you begin. Look directly forward. Take a big step forward with your right foot, roughly two feet forward, and allow your left heel to lift naturally. With every step, you might want to put your hands on your hips or just move your arms with your elbows at a 90-degree angle.
- Maintain an erect posture and an active core. Lower the rear knee to the ground while bending both knees. Just before it touches, stop. During the exercise’s downward (or eccentric) phase, take a breath. Lift your left foot off the ground and plant it about two feet in front of your right foot. To stand up, push hard with your right heel and straighten your right knee. When performing this exercise, try not to slant your body forward from the hips. As you rise, exhale (the exercise’s concentration phase).
- With every jump, keep taking a step forward, switching sides. At the top of each step, pause with your feet together if you start to lose your balance. Regain your equilibrium and proceed. To complete the series, bring the back foot into contact with the front foot on the final jump.
Wall Sits:
- The patient should begin with their back to a wall and their feet shoulder-width apart, roughly two feet from the wall. Make sure your knees are exactly over your ankles, not over your toes, by adjusting your legs. Don’t turn away from the wall.
- For 20 to 60 seconds, hold the position. To stand, they usually slither up the wall. Repeat the exercise three times after taking a 30- to 40-second break. As your power increases, extend your hold period every five seconds.
Calf Raises:
Double Leg Calf Raise
- Place your feet shoulder-width apart and point your toes forward while standing on a yoga or exercise mat. Even a standing desk is an option. This calf-raise exercise can also benefit from the handlebars seen on some trampolines. Maintain the patient’s abs drawn in, shoulders back and down, and back straight.
- With your knees stretched but not locked, slowly lift the patient’s heels. Stand on your toes and pause as long as you can.
Triceps Dips:
- You can sit in a solid chair or weight bench, or walk along the edge while clutching it with your hips. The triceps can also be dipped using certain pull-up bars. With your heels hitting the floor and your legs spread out hip-width apart, your toes should be directed toward your feet.
- To raise your torso and glide forward just enough to remove your back from the chair’s edge, press into your palms. Lower yourself and bend your elbows 45-90 degrees. Use your complete range of motion to regulate the activity movement. Repeat after slowly raising yourself back up until the patient’s arms are nearly straight.
Pull-Ups or Chin-Ups:
Chin up
- Use your leg and core muscles. Raise your shoulders off the floor so that your chin is above the bar. Hold on a second. Return to the starting position by lowering. Perform 8–10 repetitions in total.
Pull up
- Shrug your shoulders. Pull the chest up until the head is visible through the tank. Hold on a second. Lower yourself back to the beginning position. Perform 8–10 repetitions in total.
Resistance Band Bicep Curls:
- Standing Resistance Band Bicep Curls
- Position yourself at the resistance band’s center. Holding the resistance band by its ends, ensure that the middle section is on the ground. Put one foot on the strap, centered on it. Verify that the strap remains in place and that your feet are comfortable. Resistance bands are available online or at any sporting goods store. Use one foot to tap the resistance band for a less strenuous workout.
- Position the patient’s hands on the resistance band’s ends. As you complete the exercise, keep your back straight and focus on the future. With your palms pointing inward, maintain a straight arm position. While holding the band, keep your arms and legs slightly taut.
- To make them easier for patients to hold, certain resistance bands come with handles. If not, take hold of them with all your strength. Hold the curls two or three times while bending your elbows. To avoid breaking or slipping the tapes, move slowly and carefully. To engage the muscles, put your hands in front of your shoulders and flex your biceps for one to two seconds.
- Use only dumbbells and a resistance band if you want to make your curls more intricate. With each curl, you can either lift both arms simultaneously or switch between them. Extend your arms once again at the same controlled pace after counting. When lowering your arms, keep your grip on the straps to avoid hurting yourself. Before starting your repetitions again, take a one-count break with your arms by your sides and the resistance band relaxed once again. Perform the exercises in two to three sets of ten to fifteen repetitions. When curling, avoid lifting your legs since the resistance band could break and do you harm.
2. Seated Resistance Band Bicep Curls
- Sit in a chair and put a resistance band under your feet. When creating a bench or chair without sides, use loops. Make sure your feet are shoulder-width apart by sliding the resistance band’s center under them. To prevent the resistance band from slipping out from beneath your feet, make sure the chair or bench you’re using doesn’t shift around too much.
- Squeeze the ends of the resistance band with your palms facing inwards. Hold your arms at your sides, dangling over the seat. As you relax, firmly grab the resistance band’s ends so that it expands a little. To facilitate easy bending, turn your palms inward.
- When bending, try not to move your elbows, shoulders, or back. Raise your arms to your chest while maintaining a straight wrist so that your hands are in line with each other to stretch the resistance band. When you reach the peak of the curl, hold it for 1-2 seconds.
- After one or two counts, lower your arms until they are straight. Lower your arms gently until the resistance bands have released and your arms are straight. Your workout will be less effective if you allow the band to drag your arm down too rapidly. After the repeat is finished, take a little rest before starting the next set.
- Perform 2-3 sets of 10–15 reps.
Bicep Curls with Lunges
- Put one foot in the resistance band’s middle. To begin, pick one foot and place it in the center of the tape. Instead of putting the tape in the center of your foot, place it beneath your toes. When your arms are straight, hold the resistance band’s ends with both hands to add some resistance.
- Whichever leg you begin with, you will eventually switch them.
- You can bend only one arm against the leg you walk forward with, or both arms at once.
- Take a long, one-footed step forward. Position one foot around two to three feet (61 to 91 cm) in front of the resistance band. To keep your form, make sure your feet are pointed forward. Maintain a straight back and a slight bend in your knees to face forward. The resistance band becomes more tense when you step forward. Reduce the resistance or release the head grip if it feels excessively tight or difficult to pull. If you have trouble staying balanced, don’t go too far since if you fall, the resistance bar might come back to you.
- The patient should bend their knees to a 90-degree angle. Bend the patient’s knees to bring your body closer to the floor. As you approach the floor, maintain a straight back to strengthen your hips and legs. Hold the position for one to two seconds when the front knee reaches a 90-degree angle.
- When kicking, avoid raising your feet off the ground because this could obstruct the slip out from under you.
- Bend your arms toward your shoulders while maintaining your thrust forward. Bend your elbows to bring your hands closer to your shoulders as you lower your body into the push-up position. Maintaining a straight wrist position with your palms facing in will make extending the resistance band easier. Hold the lunge stance and curl for approximately one second while keeping your biceps contracted. Then, to finish the loop, softly lower your arms. Dumbbells are a great way to add weight to your program. For a steady workout, switch the leg behind you every ten to fifteen reps. Perform two to three sets of ten to fifteen reps for each leg.
Bicycle Crunches:
- Lying on a yoga mat, rug, or towel, bend your knees and press your lower back into the ground. The feet should be on the ground, and the hands behind the head.
- Draw in your stomach and engage your core muscles to assist in stabilizing your spine. Gently place your head in your hands. Lift your feet off the ground by slowly bringing your knees up to a 90-degree angle while pulling your shoulders back. Release your breath and slowly ride a bicycle, keeping your hips elevated and extending one leg while bringing the other knee up to your armpit. As your opposite knee lifts, turn your body so that your elbow touches it. Pull one knee to the armpit and stretch the other leg till the elbow meets the opposing knee as you pivot to the opposite side. The goal is to complete three sets of twelve to twenty repetitions.
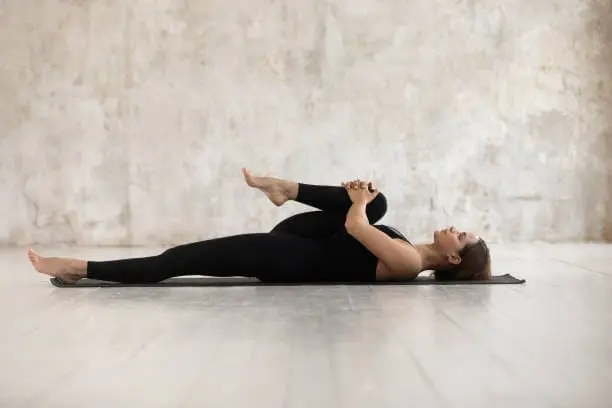
Straight leg raise exercise
Step 1: Establish Your Position
Laying flat on your back and stretching your legs is a good way to start this workout. Extend your arms and place them at your sides, then gently press your hands into the ground.
Step 2: Exhale and rise
The body is grounded at the beginning of the exercise, which puts pressure on the lower back and creates tension in the core. Make sure you put this shallow ground nozzle correctly.
After exhaling, raise your legs until your lower back feels like it’s “peeling” off the floor. Stop and begin the landing if you get to this position before your lower back starts to feel like it’s losing contact with the ground.
Coach’s Tip: Because it may result in somewhat better core contractions because there is less inflated support in the body, I like to exhale during the concentric (lifting) portion.
Step 3: Lower and Repeat
As you drop, check your legs, take a breath, and maintain contact with the ground with your lower back. Maintaining your feet off the floor at the end of the exercise, repeat the previous three steps the predetermined number of times.
Box Jump:
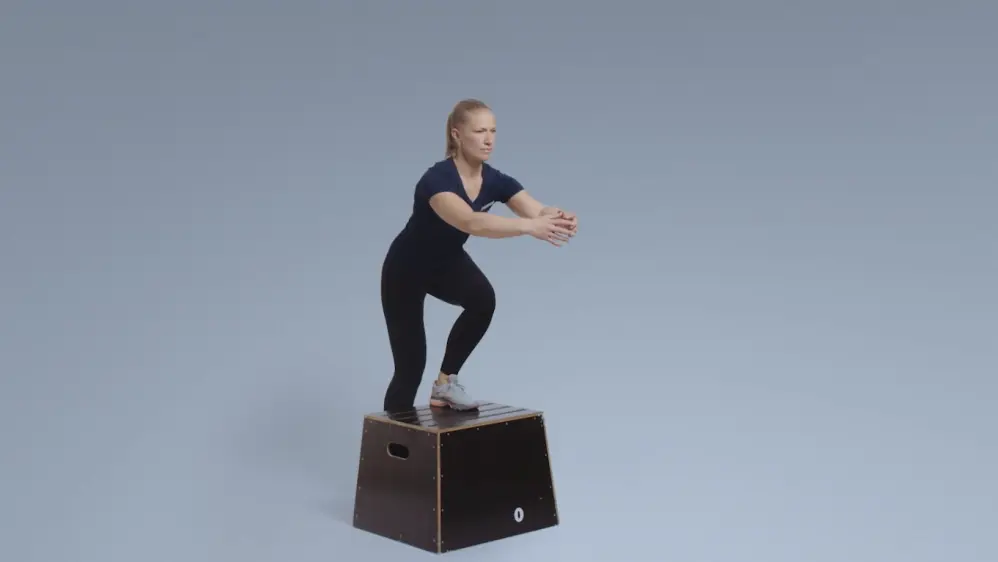
- Stand in front of a plyo box with your feet wide apart, your hands in front of your face, your arms in front of your chest, and your elbows slightly bent.
- Press through the floor to jump into the box, bringing your hands back in front of your chest after bending your knees slightly and bringing them down and behind your body.
- Place both feet on the box gently, chest up, knees bent at a 90-degree angle. To extend your legs and get back to standing, press your legs. Lower your arms to your sides and take one step at a time out of the box.
Kettlebell Swings:
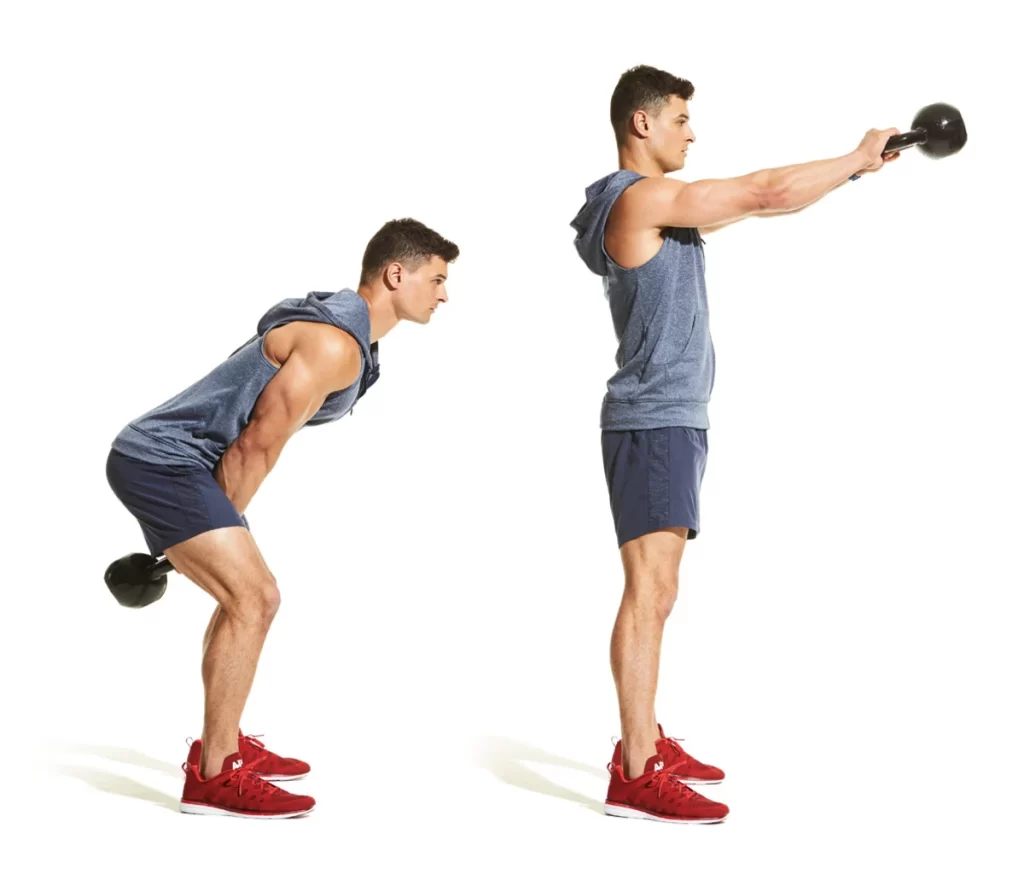
- Place your arms straight down, palms facing up, shoulder-width apart. Bend your knees slightly to place the kettlebell between your legs, then exhale and push your hips back. To raise your body, exhale, tighten the patient’s glute muscles, and thrust your hips forward.
- Allow the two-bell to swing in your hand until it does so naturally. Even if you don’t wish to lift the kettlebell with your arms, your objective should be shoulder height or parallel to the floor. To maximum lift and establish a cadence, it could take a few spins. As you lower the kettlebell between your legs, take a deep breath, push your hips back, and gently bend your knees. One representative is shown here. Perform two to three sets of ten to twenty repetitions, or go on for as long as you like (for example, as many as you can in five minutes).
5 Battle Rope Exercises

Each exercise should be performed in three to four sets, with a 20 to 30-second rest period between each set. Try working up to 30 to 60 seconds as you advance, taking only 15 to 20 seconds off in between sets.
Single arm wave:
- Begin in an athletic stance with your feet hip-width apart, gripping one end of the fighting rope with your left hand (thumb on top). Start violently moving your hand up and down while controlling and bending the patient’s wrist. The shoulders, not the hands, must initiate the action.
Double-handed wave:
- Start bending and controlling your wrists while you forcefully raise and lower your arms at the same time. The shoulders, not the hands, must initiate the action. As a result, momentum and waves are created all over the rope.
Alternating waves:
- Holding both ends of the fighting rope, stand with your feet hip-width apart and your thumbs up. Start pushing your left arm upward while maintaining wrist control and bending. Repeat the movement with your right hand while the left string descends. Keep the rhythm going by switching back and forth between the left and right sides. Waves and momentum are produced via the rope as a result.
Single-arm slam:
- Holding one end of the combat rope with the handle in your left hand (thumb on top), begin standing with your feet hip-width apart. Controllably raise the rope, then apply pressure. Repeat this motion, kicking as hard as you can while keeping both feet “glued” to the ground and in the same posture.
Double-arm slam:
- Holding both ends of the combat rope in your hands (thumbs up), begin standing with your feet hip-width apart. Controllably raise both ends of the rope, then press them down at the same time. Repeat this motion while keeping your foot position and both feet “glued” to the ground, simultaneously squeezing both ropes as hard as you can.
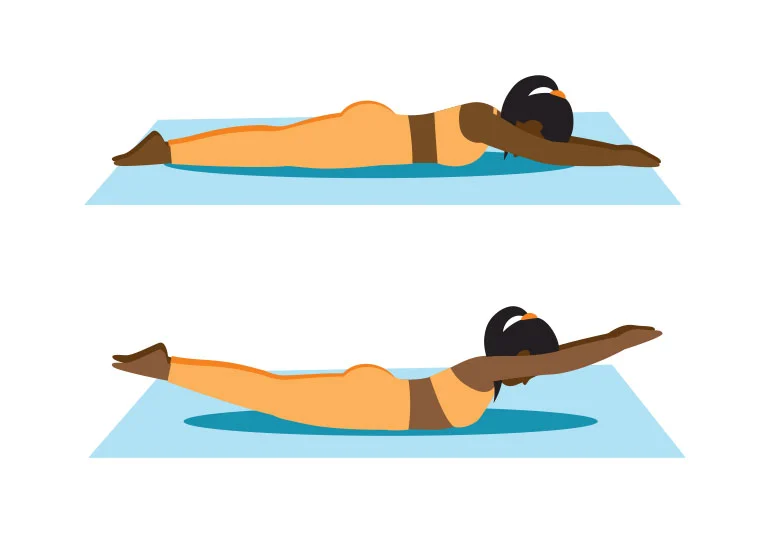
- Sleep prone (face down) on the ground with your arms out in the direction of you and your legs straight. Raise your arms and legs gradually about 6 inches off the ground, or until your lower back contracts, while maintaining a neutral head position (don’t look up). At the same moment, contract your inter-scapular, gluteal, and core muscles.
- To compress your stomach, try raising your navel a little bit off the ground. To put it simply, picture the patient as Superman soaring through the skies. For two or three seconds, maintain this posture. Verify that the patient is always breathing. Return the patient’s stomach, arms, and legs to the ground. Do two to three sets of eight to twelve repetitions of this superhero exercise.
Shoulder Press:
- On the rack, a barbell with the required weight should be positioned shoulder-high. Slowly raise it straight up after dipping beneath the bar stand. The bar should sit atop your shoulders when you’re done. With your elbows pointed directly ahead and your hands facing up, grasp the bar. Maintain a straight back for good form. Press the bar above after carefully stepping back from the rack while maintaining a straight back. Bring the bar slowly to your shoulders once you are unable to stretch your arms any farther, and repeat as many times as required. Enter the rack and exit the bar at shoulder height once more after the final repetition. Last but not least, lower the bar and leave the bar alone.
Hammer Curls:
- Keep your knees below your hips and your legs straight—not locked or rigid. With a dumbbell in each hand and the weights resting next to your outer thighs, your arms are by your sides.
- To draw the weights toward your shoulders, raise your arms and bend at the elbow. Your wrists are in alignment with your hands, and your upper arms remain motionless. Hold for five to seven seconds while the activity is at its most intense. Your palms are facing inward toward your midline, and your thumbs are near your shoulders.
Triceps Kickbacks:
- Use your left hand to raise a stop.
- Standing in a split stance, bring the patient’s right foot forward.
- Maintain a straight back and align your head with your spine as you lean forward and tighten your core.
- The patient’s right hand should rest on your right thigh.
- Maintaining the upper arm in alignment with the upper body, bend the left arm that is holding the bar to a 90-degree angle. Slowly straighten your arm while maintaining a rigid wrist without moving your upper arm or upper torso.
- Slowly bring your arms back to the beginning position while keeping them at a 90-degree angle. Perform the number of repetitions that you want.
- Continue on the opposite side.
Jumping Jacks:
- Assume a straight stance with your toes pointed forward, arms at your sides, and feet together. The first step is to adopt this athletic mindset.
- Then, quickly leap your legs to the sides of your body, thrust your arms out to the sides, lift them above your head, and bend your knees slightly. Be sure to do all of these tasks simultaneously.
- Return to the starting position with your feet together and your arms at your sides by reversing the pattern after landing. Do 10-100 repetitions for roughly six sets, repeating the entire procedure. Don’t twist or curl your toes outward; instead, keep your position.
Bent-Over Rows:
- Keep the patient’s feet shoulder-width apart as you stand behind the barbell. With your legs slightly bent and the patient’s back straight, bend at the hips. Your barbell position will be determined by moving your tailbone behind your legs as you sit down a little. No more than 45 degrees should be the maximum angle at which the body is bent forward. Hold the bar slightly wider than shoulder width while lying down with your palms facing your shins.
- Lift the bar into your abs and tuck your elbows behind you to activate your core and glutes. Maintaining a straight back, compress your shoulders and pull your elbows behind you. After a second of holding, carefully return the bar to the beginning position, making sure your arms and barbell plates are fully off the ground. Do three sets of 6–12 repetitions.
FAQ
How can I improve muscle endurance?
Strength training, high-intensity interval training (HIIT), regular aerobic exercise, and a healthy diet can all help you build muscle endurance.
Are there specific exercises to target muscle endurance?
Indeed, activities like planks, lunges, squats, push-ups, and cycling improve muscle endurance.
What are the benefits of muscular endurance?
Boost your capacity to work tirelessly at tasks like chopping wood, lifting boxes, and opening doors.
Lower the chance of getting hurt.
aids in keeping a healthy weight. results in stronger, healthier bones and muscles.
Boost your self-esteem and the patient’s confidence. provides a feeling of achievement.
You can incorporate fresh and varied exercises into your routine.
Is muscular endurance more important?
For athletes who play sports that demand constant effort throughout the game, muscular endurance might be a far more significant fitness characteristic than sheer strength. The simplest method for building muscle endurance is to increase the frequency while decreasing the intensity.
References:
- Mpt, T. E. P. (2023, December 4). What is Muscular Endurance and Exercises to Improve it. Healthline. https://www.healthline.com/health/fitness-exercise/muscular-endurance-exercises
- Nelson, C. (2020, November 3). The Top 10 Muscular Endurance Exercises to Become Unstoppable. Levels. https://levelsprotein.com/blogs/training/muscular-endurance-exercises
- McCoy, J. (2023, December 4). 5 Ways To Improve Muscular Endurance. Health. https://www.health.com/fitness/muscular-endurance
- Sissons, B. (2021, January 29). The best way to train is to improve muscular endurance. https://www.medicalnewstoday.com/articles/muscular-endurance
- Patel, P. (2023, December 21). Muscular Endurance – Benefits, Exercise. How to Improve? Mobile Physiotherapy Clinic. https://mobilephysiotherapyclinic.in/muscular-endurance/

