12 Best Exercises for Thoracic Outlet Syndrome
Exercise for Thoracic Outlet Syndrome is an important component of the entire treatment plan that helps to alleviate symptoms through expanding thoracic outlet space.
Introduction:
Luckily, physical therapy and painkillers can usually prevent this syndrome from happening. Rarely, surgery may be necessary.
Through an increase in thoracic outlet space, exercise can help to minimize the symptoms. Exercise may help restore the compressed vessels’ normal function, helping the affected muscles become stronger, and stretching the vessels.
What is the Thoracic Outlet Syndrome?
Thoracic outlet syndromes are caused by compression of the thoracic outlet blood vessels or nerves.
Thoracic outlet constriction can result in symptoms such as pain, weakness, tingling or numbness, discoloration, swelling, muscle atrophy, bulging veins, cold hands, and in more serious situations, an embolism or aneurysm.
The symptoms of thoracic outlet syndrome vary depending on the individual, as there are three main types of the condition.
Thoracic outlet syndrome comes in three primary forms;
- Neurogenic thoracic outlet syndrome
This represents nerve compression. Pressure on your brachial plexus, or the network of linked nerves that run across your upper chest, can result in neurogenic thoracic outlet syndrome. Acute trauma to the neck (such as whiplash) and repetitive stress injuries (usually from sports) are the most common causes.
- Arterial thoracic outlet syndrome
It appears that your subclavian artery is compressed. About 1% of situations of Thoracic Outlet Syndrome are associated with this rarest variant of the condition. However, arterial Thoracic outlet syndrome is the most common cause of sudden blood clots in the arm in individuals under 40. The most common cause of arterial thoracic outlet syndrome is birth abnormalities in anatomy (such as a cervical rib).
- Venous thoracic outlet syndrome
Your subclavian vein is compressed as a result. Usually occurring during their 20s or 30s, males and individuals male are more likely to suffer from venous thoracic outlet syndrome.
Signs and symptoms:
Usually affecting one side of the upper body (neck, upper chest, shoulder, arm, or hand), thoracic outlet syndrome symptoms are on both sides.
You might have;
- Weaknesses
- Feeling heavy or swollen
- Pain that might get worse if you raise your arms
- Tingling
- Numbness
- Skin tone shifts (becoming pale or blue-looking)
- Cold skin to the touch.
The particular symptoms you experience can change according to the kind of throat outlet syndrome you have. This is because some structures, such as blood vessels or nerves, become compressed and generate symptoms. Because of this compression, specific components are unable to perform as intended.
The benefits of exercise:
- Lessening the symptoms involves increasing the thoracic outlet space.
- Help in expanding the compressed vessels
- Helps in normalizing how they function
- Gain affected the muscles’ strength.
- Keep your posture straight.
- Helps in lessening the tingling and numbness symptoms
Do this before you begin your exercise routines:
- Before beginning any exercise program, seek medical advice. Working out with a physical therapist will help you understand your diagnosis and provide you with customized exercise plans based on your needs.
- Physical therapy is typically recommended for individuals with neurogenic thoracic outlet syndrome; however, it may not be suitable for those with symptoms of venous or arterial thoracic outlet syndrome, as surgical intervention is typically required. It is best to see a doctor if conservative treatment is ineffective.
- The recommended exercise may help in your recovery, but you should only perform it when you and a doctor figure out that you are ready. The exercise is meant to strengthen the muscles in your upper back, shoulders, and posture stabilizers. Daily posture correction may help with symptoms.
- Warming up the region around your neck and shoulders with warm water or a low-heat heating pad is the proper method to get your muscles ready for exercise. Do this for ten to twelve minutes, or until you feel comfortable. It is crucial to prevent overheating as this could lead to burns.
- Gently stretch until you feel a force in your muscles, not an ache. Try not to stretch any further if it becomes painful.
Exercises for Thoracic Outlet Syndrome:
When you and your doctor determine that you are ready, you should perform the following exercises, which may help in your rehabilitation. The goal is to make your upper back and shoulder muscles, as well as your postural stabilizers, stronger. You can also help improve symptoms by regularly correcting your posture.
Upper extremity neural mobilization
- Place your hand on a wall and point your fingers downward to begin this exercise.
- Keep your arm straight and your shoulder facing down at this point.
- You can now turn your neck smoothly to the left and right.
- Then return to your neutral position.
- Then relax.
- Do this exercise five to ten times.

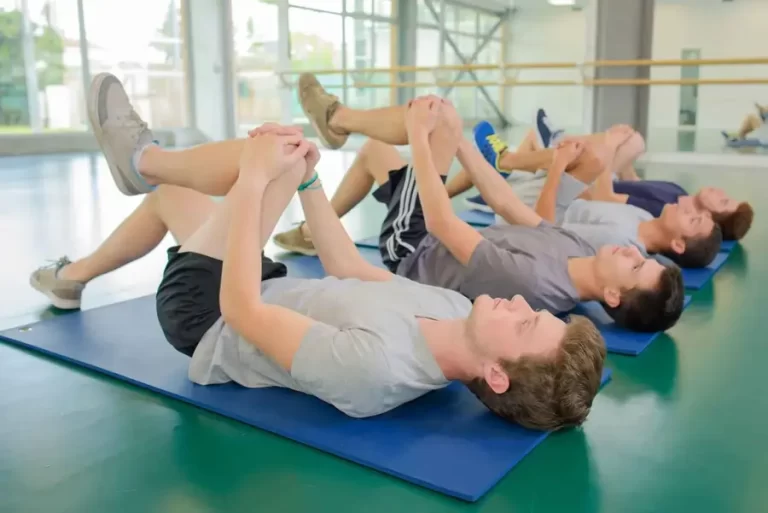
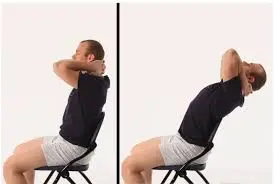
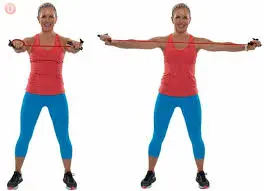
Sitting back extension
- Take a straight chair seat, place your hands behind your head, and extend your elbows to the side.
- Elevate your head slowly until your chest stretches.
- Hold this position for a few seconds.
- Then return to your neutral position.
- Then relax.
- Complete this exercise five to ten times.
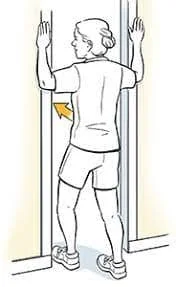
Doorway shoulder stretch
- Position yourself at a door’s opening, placing both hands on either side of the doorframe.
- You should be holding your hands just above your shoulders.
- Next, extend your chest by letting your body lean forward.
- Step forward with one foot and bend your knee slightly for more support.
- Hold this position for a few seconds.
- Then return to your neutral position.
- Then relax.
- This is an exercise that you should do five or ten times.
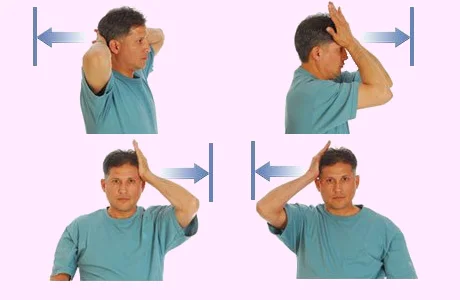
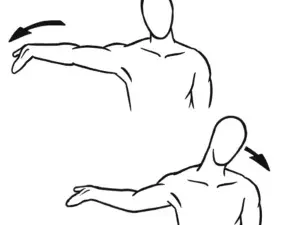
Scalene stretch
- With your feet flat on the ground, take a seat in a chair.
- Using your right hand, grasp the chair’s seat.
- Next, maintain a straight head while tilting it to the left.
- Your right side of the neck ought to feel stretched.
- Reduce the length of the stretch or stop if it hurts.
- Hold this position for a few seconds.
- Then return to your neutral position.
- Then relax.
- Repeat on the opposite side.
- Perform this exercise in five or ten repetitions.

Median nerve flossing
- You must stand with the arm you are flossing abducted to ninety degrees, palm facing front, and fingers straight when doing this type of flossing.
- Move the opposite ear in the direction of the opposite shoulder (side bend your head) while flexing your wrist forward and maintaining your fingers straight.
- Then, turn your ear to the same side’s shoulder while extending your wrist and keeping your fingers straight.
- These two positions have to be switched.
- Then return to your neutral position.
- Then relax.
- Do this exercise five to ten times.
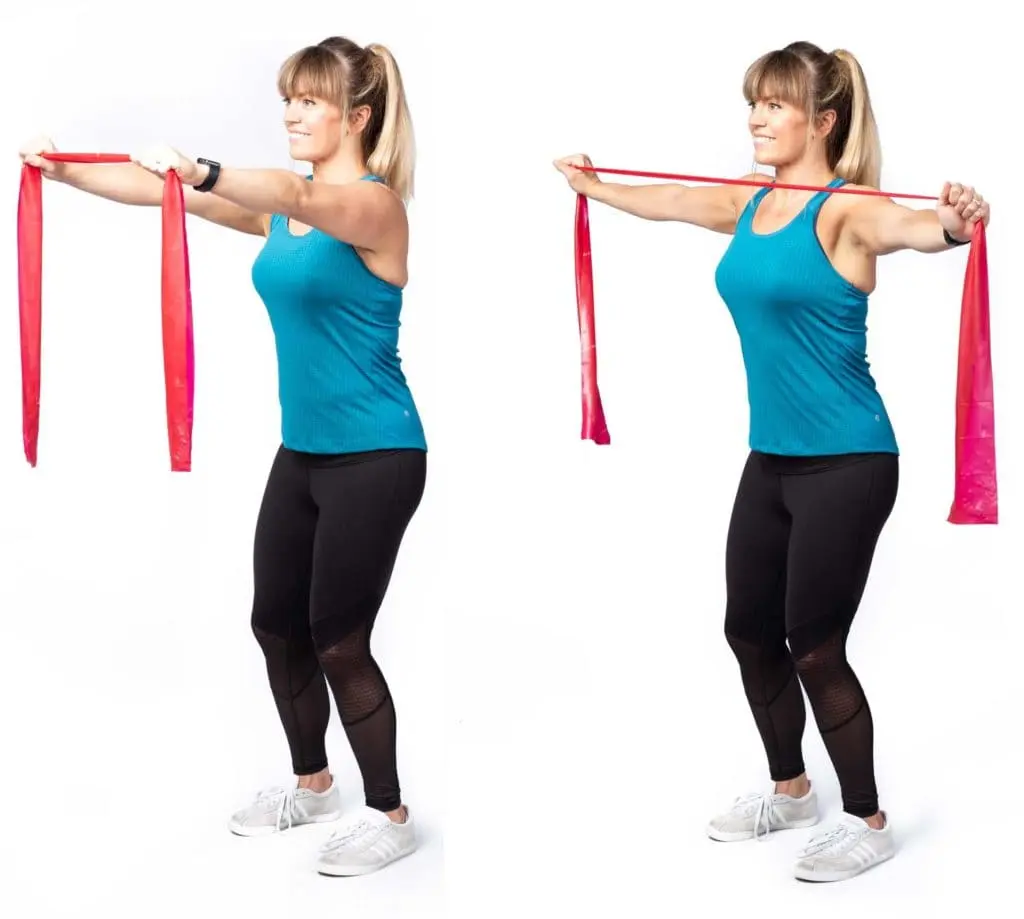
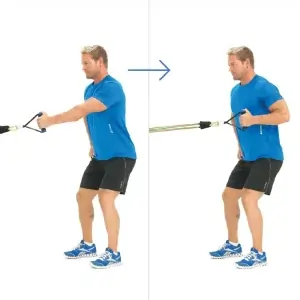
Resistance band pull-apart
- With your elbows bent at a 90-degree angle, stand up straight.
- With both hands (palms facing up), grasp a firm resistance band in front of you.
- The band needs to be in line with the ground.
- Stretching out your elbows, slowly move the band toward your body’s center while maintaining your arms out to the sides.
- To start the movement and maintain a neutral spine, concentrate on pressing your shoulder blades together.
- Hold this position for a few seconds.
- Then return to your neutral position.
- Then relax.
- Complete this exercise five to ten times.
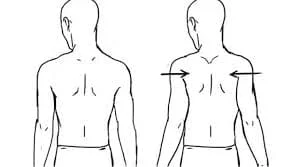
Scapula squeeze
- With your arms by your sides, you can do this exercise while sitting or standing.
- To avoid rounding your back, shift your weight slightly forward.
- Keep your hips, shoulders, and ears in their right position.
- Push your shoulders and elbows backward while bringing your shoulder blades together.
- Hold this position for a few seconds.
- Then return to your neutral position.
- Then relax.
- It is recommended that you perform this exercise five or ten times.
Standing rows
- Around a solid structure, attach a resistance band.
- As an alternative, secure the door by closing it after wrapping the band around a doorknob.
- With both hands, grasp the resistance band and maintain a straight posture.
- Bending at the elbows, slowly pull the resistance band back until your elbows barely touch your sides.
- Hold this position for a few seconds.
- Then return to your neutral position.
- Then relax.
- Do this exercise five to ten times.
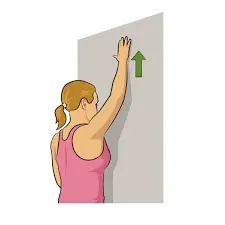
Arms slide on the wall
- You stand with your back against a wall and your elbows and wrists against the wall to begin the arms slides exercise.
- Keeping your elbows and wrists against the wall, slowly raise your arms as high as you can.
- Then return to your neutral position.
- Then relax.
- Perform this exercise five to ten times.
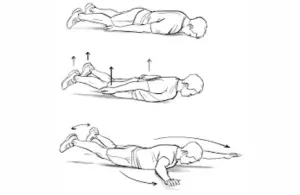
Prone snow angel
- Rest on your stomach, legs extended, arms at your sides (palms facing down), forehead in contact with the floor.
- Pull your shoulder blades back and raise your arms a few inches off the ground.
- Here’s where we start.
- Following that, gradually extend your arms to the sides so they are parallel to your body.
- After your arms are over your head, if it is comfortable to do so, keep going.
- After that, slowly raise your arms to their initial position.
- You’ll see that moving around is similar to making snow angels.
- Then relax.
- This is an exercise that you should do five or ten times.
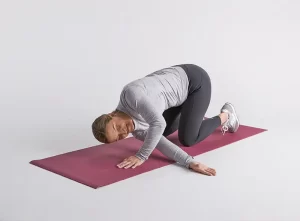
Quadruped thread the needle
- Keeping your spine neutral, start from a kneeling position with your palms flat on the floor.
- Check how your knees and hips are positioned, as well as how your hands and shoulders are positioned.
- Raise your right hand, allowing it to gently make contact with the ground, and then slide it under your left arm.
- Let the floor touch your right shoulder and chest.
- Next, turn your chest to the right by slowly retracting your right arm and extending it toward the ceiling.
- After that, lower your right arm again and carry out the same movements.
- Then return to your neutral position.
- Then relax.
- Five to ten repetitions of this exercise are recommended.
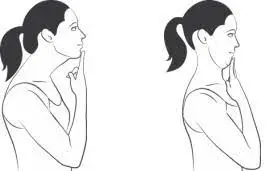
Chin tuck
- Keep your shoulders and neck in a relaxed position first.
- Gazed directly forward.
- Next, pull your chin into the area around your neck without holding your breath.
- There will be a slight squeeze on your upper neck.
- Additionally, keep in mind not to tilt your head forward or backward.
- Hold this position for a few seconds.
- Then return to your neutral position.
- Then relax.
- You can perform this exercise five to ten times every day.
What safety precautions must be taken before exercising?
- During your exercises, make sure to maintain a straight posture.
- Before starting any exercise, warm up and stretch.
- Between exercises, give yourself a rest.
- When working out, stop if you experience any sudden pain.
- The protocol must be followed for all exercises, requiring the proper amount of repetitions for each exercise as well as warm-ups and cool-downs.
- Wearing loose, carefree clothing that encourages movement and relaxation is ideal for working out. Don’t dress in fashionable or tight clothing.
- It’s normal and even necessary to stretch the tense muscles, even though it might be difficult. Stretching or exercise should never cause stabbing or painful sensations as this is risky and makes the issue worse.
- Avoid engaging in strenuous exercise.
When do you not exercise?
- Fever
- Headache
- You’re not feeling well
- Blurry vision
Why does thoracic outlet syndrome require proper posture?
Maintaining proper posture can release the strain on the thoracic outlet’s vessels and nerves. Rounding the shoulders and upper back, as well as bringing the head and neck forward, are common indications of poor posture. Over time, the thoracic outlet may become compressed and muscles may become tense in these positions.
Certain activities, such as bending forward to play musical instruments like string instruments, carrying heavy bags or a child, working at a computer, and other repetitive motions that force the shoulders and neck forward, can aggravate posture.
Maintaining proper posture and keeping the thoracic outlet “open” are crucial to preventing this. You can accomplish this by keeping your head up, shoulders back and up, neck neutral, and chin parallel to the floor. Posture can also be improved with exercises that build the muscles in the upper back and neck.
Activities to stay away from if you have thoracic outlet syndrome:
- Although there are no activities that are completely restricted, you might need to limit some of them while you recover from neurogenic thoracic outlet syndrome.
- It’s usually advised that you restrict or stay away from overhead exercises or activities that require lifting heavy objects (like dumbbells, barbells, etc.) until your physical therapist or other healthcare provider gives the all-clear.
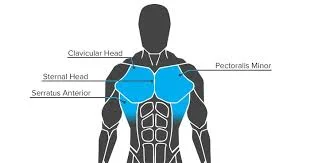
- In many cases, waiting until you are further along in your recovery before doing chest exercises (like bench presses) may also be a wise decision. The back muscles need to be strengthened more than the front muscles while treating thoracic outlet syndrome.
- During the healing process, it’s important to move slowly and avoid overdoing since this could make your situation worse. Pay attention to your body and only perform movements that are pain-free and relaxed.
Lifestyle Choices and Natural Remedies:
A physical therapist may recommend at-home exercises if you have been diagnosed with thoracic outlet syndrome. The muscles surrounding your thoracic outlet can be strengthened and supported by the exercises.
In general, such as to lessen the excessive strain on your thoracic outlet muscles and shoulders;
- Keep a straight posture.
- When working, take regular breaks to stretch and move around.
- Maintaining a healthy weight.
- Make sure your workspace doesn’t aggravate your symptoms and lets you maintain proper posture.
- Stretch your thoracic outlet and shoulders gently.
- Cover the area with a heating pad.
- Engage in relaxation techniques such as stretching, meditation, and deep breathing.
Summary:
Thoracic outlet syndrome (TOS) may be caused by compression of blood vessels or nerves in the upper chest and lower neck. Pain, tingling, and numbness in your hands and arms are among the symptoms. Common reasons include traumatic accidents, birth defects in anatomy, and intensive arm movements (especially in sports).
Thoracic outlet syndrome is typically treated with physical therapy and pain management; however, in some cases, surgery may be necessary.
Consult a doctor to make sure you are receiving the best treatment possible for your condition.
FAQ:
How long does recovery from surgery for thoracic outlet syndrome take?
Recovery: Following surgery, most patients experience some degree of pain or discomfort for at least a week or longer.
Activities resumed: After seven to ten days, patients usually start up again with minimal activity.
The thoracic outlet syndrome affects which nerve?
Pinching of the brachial plexus nerves, subclavian artery, and vein, and axillary artery and vein results in Thoracic Outlet Syndrome symptoms.
How beneficial is massage for thoracic outlet syndrome?
Some thoracic outlet syndrome sufferers may find that massage therapy helps them feel better and have fewer symptoms. It is best to speak with a qualified medical professional to prevent making the injury worse.
For thoracic outlet syndrome, what is the best course of action?
Physical therapy.
For neurogenic thoracic outlet syndrome, physical therapy is the initial course of treatment. The shoulder muscles are strengthened and stretched during the exercises, helping in opening the thoracic outlet. Your posture and range of motion both benefit from this.
Can someone with thoracic outlet syndrome exercise?
Although there are officially no exercises that are off-limits, you might need to restrict some of your movements while you heal from neurogenic thoracic outlet syndrome. If you think you may have venous or arterial thoracic outlet syndrome, see your physician first.
When it comes to thoracic outlet syndrome, what should one avoid?
Avoid lifting heavy objects and performing repetitive movements if you are at risk of thoracic outlet compression. Reducing your weight could help you avoid or treat thoracic outlet syndrome symptoms if you’re overweight.
Which muscles in thoracic outlet syndrome are tense?
People who suffer from an injury such as a broken arm and are required to wear a sling for an extended length of time also experience thoracic outlet syndrome. The combination of inactivity and the body’s natural defense mechanism against injury causes the muscles in the neck, shoulders, and chest to tense.
How can a person with thoracic outlet syndrome sleep?
Sleeping Positions: Don’t sleep on the side that is affected! Although lying on your back is the best position, it’s also okay to lie on your non-affected side with a pillow between your arms to prevent your shoulders from rounding.
References:
- December 13, 2023b; Tirgar, P. The Finest Thoracic Outlet Syndrome Exercises – Mobile Physio Practice. The ideal thoracic outlet syndrome exercises are available at https://mobilephysiotherapyclinic.in.
- Syndrome of the Thoracic Outlet. (2024d, August 26). Cleveland Medical Center. Thoracic outlet syndrome (TOS): https://my.clevelandclinic.org/health/diseases/17553
- 12 Activities for Thoracic Outlet Syndrome that Provide Long-Lasting Relief. 2024, June 19. Thoracic Outlet Syndrome Exercises: https://www.georgiauppercervical.com
- On October 4, 2022b, Cpt, K. D. M. R. Activities to address Thoracic Outlet Syndrome. From Healthline: https://www.healthline.com/thoracic outlet syndrome exercises
- The Mayo Clinic provides diagnosis and treatment for thoracic outlet syndrome (2024b, June 4). Thoracic outlet syndrome: https://www.mayoclinic.org/diseases-conditions/thoracic-outlet-syndrome/diagnosis-treatment/drc-20353994
- Image 1, Higgins, J., Paquette, P., Lamontagne, M., & Gagnon, D. (2015b). A mixed population’s longitudinal median nerve excursion measures showed little discernible change during upper limb neurodynamic techniques, according to a pilot study employing musculoskeletal ultrasound imaging, while repeatability was preserved. Minimal Observable Alteration and Repeatability in Lamontagne Limb Patquette: https://www.semanticscholar.org/paper/72d762b37d4c0ed0446aecb199e64350b7eca6b4
- Image 2, June 16, 2021, Sportsspt. 7 Simple Stretches to Combat All-Day Sitting The website optimalsportspt.com offers seven simple stretches to help combat sitting all day.
- Image 5, How to Let Go of Your Fears. (2024b, 4 June). How to Lose Your Nerves at Peak Performance Chiropractic in Wyomissing, New York
- Image 7, Exercises, routines, and workouts related to SCALENE STRETCH (n.d.). Exercises/Scalene Stretch: https://www.workoutsprograms.com
- Image 9, Park Sports Physical Therapy. (2019b, May 7) Shoulder Wall Slides. Physical therapy at Park Sports. Increasing range of motion in the injured shoulder and shoulder wall slides: https://parksportspt.com/2019/05/07/
- Image 10, On June 2, 2023c, Cscs, B. R. D. P. This bodyweight exercise will work every part of your body. The website Wellness52 provides a bodyweight workout that works every part of the body.