Wrist Joint Range of Motion Exercise
What is the Wrist Range of Motion Exercise?
Range of motion of the wrist Exercise primarily refers to activities meant to enhance wrist joint motion. Numerous components, including the arrangement of bone surfaces within a joint, the joint capsule, ligaments, tendons, and muscles acting on the joint, all have an impact on this movement.
This is a joint’s ability to move through its whole range of motion. A joint’s range of motion can be described as active, passive, or active-assisted.
There are mainly three main types of Wrist range of motion exercises
- Passive range of motion: The first is the passive range of motion, which is a movement that is only applied to a wrist joint by a passive motion machine or another person. An external force moves a bodily part, like the wrist, over its available range while a passive range of motion applies total relaxation to the wrist joint of the individual receiving exercise.
- Active-assisted range of motion: Second, the range of motion known as active-assisted, in which the wrist joint partially benefits from external aid. From each source, the wrist joint may only receive half of the effort.
- Active range of motion: Last but not least is the active range of motion, which is wrist joint motion that is solely produced by the person executing the exercise. There is no external force assisting in the motion during this kind of exercise.
Normal range of the wrist motions:
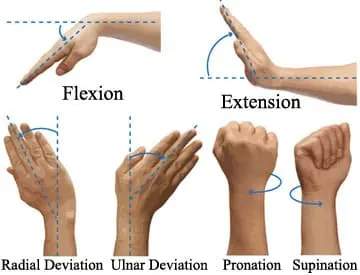
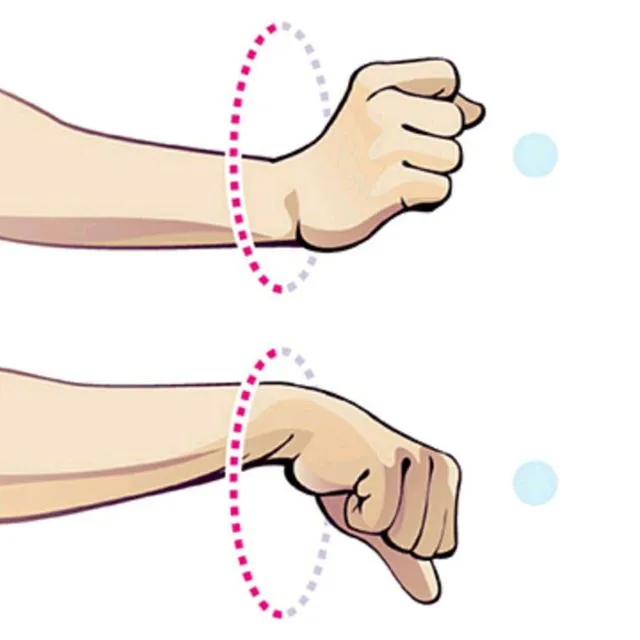
- Flexion of the wrist: 0 to 80 degrees
- Extension of the wrist: 0 to 70 degrees
- Ulnar deviation of the wrist: 0 to 30 degrees
- Wrist radial deviation: 0–20 degrees
- Supination: 0 to 90 degrees
- Pronation: 0 to 90 degrees
- Flexion of the fingers (IP): 0 to 90 degrees
- Flexion of PIP: 0 to 110 degrees
- Flexion of DIP: 0 to 100 degrees
Wrist Passive range of motion exercise
Exercises involving a passive range of motion are beneficial for joints that have become immobile as a result of trauma or paralysis. The patient does not move the limb or body part of the stiff joint during the passive range of motion exercises; instead, the therapist or caregiver moves it, gradually extending the muscles and reminding the patient how to move correctly as well.
To aid in the quicker healing of a stiff or flaccid joint, therapeutic stretching activities are typically combined with passive range-of-motion exercises. Here, the therapist stretches the wrist’s soft tissue to release tension and relax the nearby muscles. Exercises including passive range of motion also aid in reducing stiffness, rigidity, or flaccidity in the immobilized wrist joint.
In order to increase muscle flexibility, stretching the surrounding muscles is one of the most popular and safest passive range of motion exercises. Using a tool, such as a stretching strap, is one method of performing this exercise. This will make it easier for the patient to maintain the stretch for a longer amount of time. In order to improve muscle flexibility, a qualified professional does this kind of exercise by moving the body into a stretch and holding it there.
This is better in a few ways.
First of all, the physical therapist knows when to stop and has a good understanding of appropriate boundaries.
Second, the practitioner is aware of how long to maintain the stretch. Last but not least, physical therapists are educated to determine whether treatment is reaching the right targets for maximum advantages. Keeping that in consideration.
Under what circumstances should a physical therapist use a passive wrist range of motion exercise?
Exercises involving passive range of motion (PROM) are usually employed in the following situations: paralysis; comatose patients; mending fractures; or situations in which pain is triggered by active muscular contractions. Combating the detrimental consequences of immobilization is one of the primary objectives of passive range of motion exercise, or PROM. It’s crucial to keep in mind, though, that this kind of (PROM) exercise is unable to stop muscular loss.
Several advantages of the passive range-of-motion wrist exercise
In addition to aiding in the promotion of healthy joint functionality, this kind of exercise helps patients by lowering pain, accelerating healing, restoring and preserving the range of motion in affected joints, and increasing muscle mass, which improves blood flow and raises oxygen levels.
Wrist-passive range of motion exercises
- Passive wrist extension
Start by assuming a comfortable posture, such as sitting in the chair with your affected hand fully pronated hanging over the edge of the table. Put a rolled towel underneath the affected hand as well. Do three sessions a day, 10 times a session, of this action.
- Passive wrist flexion
First, instruct the patient to assume a comfortable posture, such as sitting in a chair with their injured hand hanging fully pronated over the edge of the table. Additionally, put a rolled towel underneath the hurt hand. The therapist then positions themselves across from the patient. The patient is instructed by the physical therapist to try to move their wrist downward while the therapist does the action. The therapist moves the patient’s wrist downward until the patient feels the strain. Do this exercise ten times in a session. Work out three times a day.
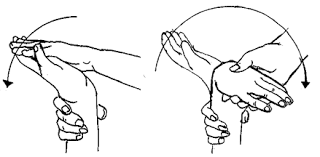
- Passive wrist ulnar deviation
First, instruct the patient to sit in a comfortable position with their affected hand in a mid-pronated position. Furthermore, put the rolled towel beneath the affected hand. Subsequently, the physical therapist positions themselves across from the patient. The patient is then instructed by the therapist to try to move their wrist downward as the physical therapist does the exercise. Work out three times a day.
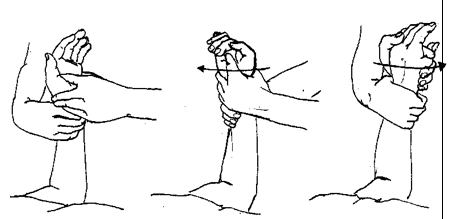
- Passive wrist radial deviation
Ask the patient to first assume a comfortable position, such as sitting in a chair with their affected hand in the mid-suspination position. Put a cloth that has been rolled below the damaged hand as well. The therapist then positions themselves across from the patient. Next, the patient is instructed by the physical therapist to attempt to raise their wrist while the therapist does the action. The therapist then raises the patient’s wrist upward until the patient feels the stretch. Do this exercise ten times in a session. Work out three times a day.
- Passive supination
Initially, tell the patient to settle into a comfortable position. They could sit on a chair, for instance, with their wounded hand fully pronated or with their back to the ceiling. Furthermore, place a rolled towel under the injured hand. The physical therapist then takes a position across from the patient. During this activity, the patient is instructed by the therapist to try to rotate their wrist. Repeat this move ten times in a single session. Engage in three daily exercises.
- Passive pronation
First, instruct the patient to assume a comfortable position, such as sitting in a chair with their affected hand in full supination, which means their back is facing the floor. Additionally, under the afflicted hand, insert a rolled towel. The therapist then positions themselves across from the patient. Subsequently, the physical therapist instructs the patient to attempt wrist rotation as the physical therapist does this action. Do this exercise ten times in a session. Work out three times a day.
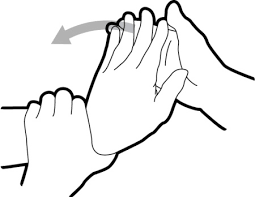
- Passive finger flexion
The wounded finger should be placed flat on the table with the palm facing up. Subsequently, the therapist applies pressure with his or her free hand to the rear of the fingers, bending them inward. For roughly ten seconds, hold. Next, make the finger straight. In a single session, perform this exercise eight to ten times. Work out three times a day.
- Passive finger extension
Initially, lay a hand with the injured finger flat and palm up on a table. The physical therapist then applies pressure with a firm palm on the rear of the fingers, which should be bent. Your wounded finger will not be immobile. Next, bend your fingers. Work out three times a day.
- Passive thumb flexion
First, instruct the patient to settle into a comfortable position. For example, they can sit on a chair with their hands in a mid-pronation position. Next, bend the thumb downward with the therapist’s firm hand to feel a mild stretch. Keep it for six seconds. Ten times a session, repeat. Make three sessions a day.
- Passive thumb extension
First, instruct the patient to assume a comfortable position, such as sitting in a chair with their hands in a mid-pronation position. For the next six seconds, hold. In a single session, repeat ten times. Perform three sessions per day.
- Passive thumb abduction
First, instruct the patient to sit comfortably on a chair with a rolled towel beneath the afflicted hand, which should be in a mid-pronation posture. Next, make the thumb appear to be opening the palm to hold a huge jar by stretching it out from the patient. But keep in mind that you should stretch at the base of your thumb, not the tip. Keep it for six seconds. Ten times a session, repeat. Work out three times a day.
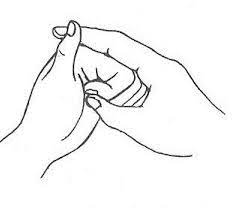
- Passive thumb opposition
First, instruct the patient to settle into a comfortable position, like a chair. Once the patient finds it easy to perform this exercise, have them touch each finger farther down until they can reach the base of each finger. In a single session, repeat ten times. Work out three times a day.
Active-assisted wrist range of motion exercises
As the name implies, the patient or the physical therapist will mostly provide only minimal or partial support during these exercises. The majority of the motion is performed by the patient, but little help is given to ensure that the motion is done correctly. Most often, the cause of this limited range of motion is either weakness or discomfort from bumps, bruising, falls, or other mishaps that result in moderate to severe injuries. Before assisting with the movement, the therapist typically secures the joint with a band or strap. When beginning these exercises, a patient may experience severe discomfort and weakness; nevertheless, with time, there is a good chance that the patient’s wrist joint range of motion may gradually and permanently improve.
Exercise for wrist range of motion with active assistance has several advantages.
- Perform more wrist joint motion.
- Increase the effectiveness of motion.
- Increase self-reliance.
- Reduce the pain in your wrists.
- Enhance the integrity of the wrist joint.
Active-assisted wrist range of motion exercises
- Active-assisted wrist flexion
First, instruct the patient to assume a comfortable position, such as sitting on the chair with their affected hand relaxed on the table’s edge and fully pronated. When the patient is unable to move his or her hand during that period, the physical therapist offers directions to try to move the wrist down. Do three sessions in a day, performing this activity ten times each.
- Active-assisted wrist extension
First, instruct the patient to get into a comfortable posture, such as a chair, and to rest their wounded hand fully pronated on the table’s edge. Put the towel that has been rolled below the damaged hand as well. Next, the patient is instructed to try to move their wrist upward by the physical therapist. If the patient is unable to achieve the end range at that point, the therapist will assist them in reaching the entire range. In one session, repeat this action ten times; in a single day, complete three sessions.
- Active-assisted wrist ulnar deviation
First, instruct the patient to sit comfortably on a chair with their damaged hand in the mid-suspension position. Put a cloth that has been rolled below the damaged hand as well. The therapist then positions themselves across from the patient. The patient is then instructed to try to slide their wrist downward by the therapist, which will aid them in reaching the end range if they are stopped in their tracks while making the action. Ten times during the session, carry out this action. Work out three times a day.
- Active-assisted wrist radial deviation
First, instruct the patient to sit comfortably in a chair with their damaged hand in a mid-supination position. Put the towel that has been rolled below the damaged hand as well. Subsequently, the therapist instructs the patient to attempt raising their wrist, and if the patient is halted mid-movement, the therapist assists them in reaching the end range. Do this exercise ten times in a session. Work out three times a day.
- Active-assisted supination
To begin, instruct the patient to assume a calm posture, such as sitting in a chair with their affected hand fully pronated that is, with the front of the hand facing the floor. Put a cloth that has been rolled below the damaged hand as well. Subsequently, the therapist applies external force to achieve the entire range of supination once the patient quits trying to rotate their wrist at the clinician’s order. Do this exercise ten times in a session. Work out three times a day.
- Active-assisted pronation
For example, they can sit on a chair with their damaged hand in full supination, which means their palm is facing the ceiling. Additionally, put a rolled towel underneath the hurt hand. Subsequently, the therapist positions themselves across from the patient. Subsequently, the therapist instructs the patient to attempt wrist rotation; if the patient stops before reaching the end range, the therapist helps the patient complete the range. Work out three times a day.
- Active-assisted finger flexion
The physical therapist then instructs the patient to bend their fingers inward by placing his or her free hand on the back of the fingers. If the patient stops at any time during this action, the therapist helps them achieve the full range of motion. Hold on for roughly half a minute. Straighten the finger after that. Ten times during the session, repeat this exercise. Work out three times a day.
- Active-assisted finger extension
The therapist next applies pressure with a firm hand on the rear of the fingers, which should be in a flexion position. After instructing the patient to straighten their fingers, the therapist will apply external force to the fingers when the patient stops moving within the prescribed range. Hold for a duration of roughly three seconds. Next, let your fingers relax. Ten times during the session, repeat this exercise. Work out three times a day.
- Active-assisted thumb flexion
They can sit on a chair with their hands in a mid-pronation position. The patient is then instructed by the clinician to bend their thumb downward until they feel a slight strain. The finger will then go across the palm. In a single session, repeat ten times. Work out three times a day.
- Active-assisted thumb extension
For example, they can sit on a chair with their hands in a mid-supination position. The patient is then instructed to extend their thumb outside, which implies somewhat posteriorly to the palm. If the patient is unable to reach the whole range, the therapist will assist them in completing a full thumb extension. Ten times a session, repeat. Work out three times a day.
- Active-assisted thumb abduction
First, have the patient get into a comfortable posture. For example, they can sit in a chair with a rolled towel beneath the damaged hand, which should be in the mid-suspination position. Next, instruct the patient to extend their thumb from their palm in the manner of someone opening their hand to handle a huge jar. But keep in mind that stretching at the large thumb knuckle is not a recommendation; rather, if the patient is unable to achieve the entire range, the therapist will help them achieve the full abduction of the thumb. In a single session, repeat ten times. Work out three times a day.
- Active-assisted thumb opposition
First, instruct the patient to settle into a comfortable position, such as a chair. Once a patient can perform this exercise with ease, have them touch each finger farther down until they can reach the base of each finger. Ten times a session, repeat. Work out three times a day.
Active wrist range of motion exercises
This kind of exercise is carried out by the patient alone because the patient is fully capable of performing these exercises. Physical therapists often only provide verbal cues and instructions on how to improve the posture and movement involved in the exercises. This is helpful when there are mild injuries that do not significantly limit wrist movement, although it may cause pain, discomfort, or obstruction.
Active wrist range of motion exercises
- Active wrist circles
First, the patient should be instructed by the therapist to get into a comfortable position, such as sitting on a chair. Swivel your wrists in a circular manner. To optimize the range of motion, try to keep the patient’s palms pointing downward after that. In each direction, complete about 20 circles in a session. Work out three times a day.
- Active wrists shake
First, instruct the patient to raise their hand in the namaste position. After that, just shake your wrists for one to two minutes for each set of one session. Work out three times a day.
- Shake it out
After a period of time spent in one position, shaking up the hands and wrists is an excellent way to release joint stiffness and restore blood flow. Shake hands slowly, allowing one wrist to fall limp. For thirty seconds, keep going. In a single set, repeat up to three times. In one session, one set is sufficient. Work out three times a day.
- Fist to Fan
Make a double-handed fist. Partially open the hand such that one finger is bowed at the knuckles. For five to ten seconds, hold. The hands should be fully opened with all five fingers straight and far apart. Perform three sessions in a single day and ten times per session. Make a new fist and go through the motions once more.
- Active thumb touches
In addition to helping to restore blood flow to the injured area, this exercise helps to enhance thumb and forefinger coordination. If the other hand is hurting, repeat with that hand as well. Using both hands, repeat ten repetitions during each session. Work out three times a day.
- Active wrist supination
Initially, instructing a patient to assume a relaxed posture entails having them stand or even sit with their arms at their sides. Give the patient the order to raise their hand and face the roof without holding it at the finishing position. Work out three times a day.
- Active wrist pronation
The first step in the treatment plan is for the therapist to instruct the patient to assume a relaxed position, which can be either standing. Next, instruct the patient to reach down and face the floor with their hand, not holding it at the end. Perform a set ten times in a single session. Work out three times a day.
- Active wrist extension
Start by resting a forearm on a table with a hand dangling off the edge of a sturdy surface, such as the table, palm down, and the forearm on the rolled-up towel for padding. The patient should receive instructions from the physical therapist to move their hand upward until they feel a light stretch. Ten times in a single session, do it. Work out three times a day.
- Active wrist flexion
First, instruct the patient to rest their forearm on the table’s rolled-up towel for padding while their hand hangs over the edge of a sturdy surface, such as the table, and their wrists are fully extended in the pronated position. The patient should then be instructed by the therapist to slide the hand downward until they feel a slight stretch. Perform ten repetitions of each set in a single session. Work out three times a day.
- Active wrist flexion in supination
Before beginning, instruct the patient to rest their forearms on the table’s rolled-up towel for padding and to hang their hands off the edge of a sturdy surface, like the table, with their palms facing down. The patient should be instructed by the physical therapist to raise their hand until they feel a slight stretch. Perform each set ten times in a session. Work out three times a day.
- Active wrist extension in supination
First, instruct the patient to place their forearm, with their hand fully supinated, on the edge of the table, using the rolled-up towel as padding. Subsequently, the patient should be instructed by the therapist to slide the hand downward until they get a mild strain. Go back to the embarking position after that. In one session, perform ten repetitions. Work out three times a day.
- Active wrist ulnar deviation
The therapist’s first duty is to instruct the patient to assume a comfortable position, supporting their forearm on a table with a rolled-up towel for padding or even on their knee, with their thumb pointing upward. Ten times during a session, do it. Work out three times a day.
- Active wrist radial deviation
The patient is first instructed by the physical therapist to assume a comfortable position with their forearm supported on the table, either on the rolled-up towel for cushioning or even on their knee, with their thumb pointing upward. Next, extend the wrist to its maximum range of motion. Ten times in a single session, do it. Work out three times a day.
- Active thumb flexion
The patient is instructed to assume a comfortable position on the table, with their forearm supported by a rolled-up towel for comfort, or even on their knee, by the therapist. The thumb is then extended outward, moved over a palm, and then brought back to the embarking position. Ten times in a single session, do it. Work out three times a day.
- Active thumb extension
Initially, the therapist should instruct the patient to assume a comfortable position, supporting their forearm on a table with a rolled-up towel for comfort or even on their knees. An outward-pointing thumb is used. Once the thumb has been moved across the palm, return to the embarking posture and take a small, non-abduction-oriented step backward. In one session, perform ten repetitions. Work out three times a day.
- Active finger flexion
Start by laying a hand with the damaged finger flat and palm up on the table. The patient is then instructed to bend their fingers inward by the therapist. Next, extend the fingers straight. In a single session, repeat ten times. Work out three times a day.
- Active finger extension
To begin, lay the afflicted finger flat on the table, palm facing up. The patient will next be instructed to straighten their fingers by the therapist. Next, let your fingers relax. Ten times in a single session, repeat it. Work out three times a day.
- Active thumb abduction
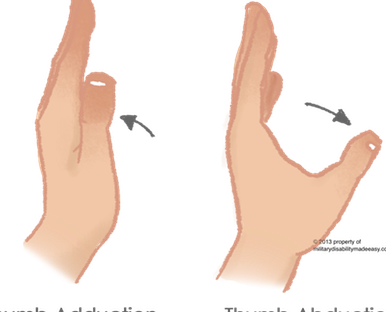
To begin, instruct the patient to assume a comfortable position, such as sitting in a chair with a rolled towel beneath the afflicted hand, with the hand in a mid-pronation position. Next, instruct the patient to extend their thumb from their palm, as though they were holding a giant jar. However, it is important to note that the thumb should be stretched at the big knuckle rather than the tip. Ten times a session, repeat. Work out three times a day.
- Active thumb opposition
First, instruct the patient to settle into a comfortable position, such as sitting in a chair. Next, place your thumb on the tips of your fingers. Once the patient can perform this exercise with ease, have them touch each finger farther down until they can reach the base of each finger. In a single session, repeat ten times. Work out three times a day. The thumb’s most crucial workout.
FAQs
How can wrist discomfort be managed at home?
Rest: Allowing your wrist to heal will require a vacation from activities like jobs, hobbies, or sports that resulted in a wrist injury. Icing: Several times a day, apply a cold compress or ice pack for ten to fifteen minutes. Use a towel or washcloth to cover the ice pack rather than putting it straight on your skin.
Is it possible to extend the wrist’s range of motion?
Moving within your comfort zone and avoiding suffering is what’s most crucial. Spend some time honing the range you have and stop just short of where you start to experience pain. That range will expand with time, and you’ll be able to accomplish more and feel better. You can also use animal movements to strengthen your wrists.
Do wrist exercises have to be done?
Why Use a Wrist Curl?
It can also help you get better at other upper body exercises like suitcase carry and pull-ups that use these muscles. In addition to strengthening a body component that is frequently ignored, wrist curls also aid in increasing grip strength and promote stronger wrists.
Which wrist position is ideal?
Flexing the Wrist and Repeated Stress
You can lower your risk of carpal tunnel syndrome by being mindful of how your wrists are positioned. The most protective wrist position is neutral. This is the alignment of your hand with your wrist.
How far is the wrist extended normally?
Wrist extension usually has a normal range of motion of 0 to 70 degrees. However, the precise range can change based on things like age, gender, and anatomical and flexible variances among individuals. For adults, a wrist extension range of 60 to 70 degrees is generally regarded as typical.
What is the typical wrist rotation range?
Normal Rotation
The ideal definition of “normal” for your patient would be the measurement of an unaffected side. This is due to the fact that a lot of people have greater and anticipate having more range of motion again.
Why do wrists get weak?
Ten reasons why hands get weak and what to do about them
Many diseases, including ganglion cysts, peripheral neuropathy, carpal tunnel syndrome, and arthritis, can cause hand weakness. A weak hand or grip can significantly increase the difficulty of daily duties. The causes of hand weakness, related symptoms, and available treatments are covered in this page.
How can weak wrists be fixed?
With your hand dangling over your knee, grasp a weight with your palms facing downward. Slowly and deliberately raise and lower your hand to the maximum and minimum distances. Perform ten reps in a set, then stop. Perform the same exercise, except this time, turn your palms up.
How should my wrist be measured?
Position the measuring tape end in the same orientation as you would wear your watch to determine the center point of your wrist width. You don’t want too much space between your arm and the tape, but it also shouldn’t be too tight. That’s all; you now know the size of your wrist.
How can wrist pain be relieved?
To ease wrist pain, there are several typing pads, split keyboards, and wrist splints (braces) available. These might lessen the symptoms. Experiment with a few varieties to see if any of them work.
How can wrist strength and mobility be increased?
stretches that target the wrists
Wrist rotation can be done up, down, and side to side. Four times, repeat.
Extend your fingers widely, let them relax, and then extend them once more. Four times, repeat.
Pulling your thumb back softly, holding it, and then releasing it will stretch it. Four times, repeat.
Why should wrists be strengthened?
You can better posture your hands for action if you have strong wrists. They support your weight bearing, grip, and hand stability so you can hold objects. It is challenging to perform daily duties like putting on clothes, cooking, and turning on faucets without strong hands and wrists.
Which wrist position exercises are there?
As you point your hand toward the ground, bend your wrist. Gently bend your wrist more with your other hand until your forearm stretches mildly to moderately. For a minimum of 15 to 30 seconds, hold.
What is the wrist motion’s functional range?
Three degrees of freedom were discovered for the wrist joint: rotation, radioulnar deviation, and flexion-extension. Five degrees of flexion, thirty degrees of extension, ten degrees of radial deviation, and fifteen degrees of ulnar deviation constitute the typical functional range of wrist motion.
How may the wrists’ range of motion be increased?
Holding your outstretched hand with your free hand, slowly draw your fingers inward until you feel a slight stretch in the back of your wrist. Once more, perform this exercise with your fingers pointing UP toward the ceiling and your palm still pointing in the direction of your body.
What is the typical range of motion of the wrist?
About 80° flexion to 70° extension and 20° radial deviation to 30° ulnar deviation constitute a normal active wrist range of motion.
How should I work out if I have wrist pain?
Extensor wrist stretches
With the afflicted wrist extended in front of you, orient your fingers downward.
Gently bend your wrist more with your other hand until your forearm stretches mildly to moderately.
Do this two or four times.
How far can one’s wrist move normally?
This translates to 40 degrees of wrist extension and flexion separately, as well as 40 degrees of combined radial-ulnar deviation. Normal norms for the wrist’s functional range of motion are provided by this study.
How can wrist range of motion be improved?
Bending your wrist and clenching your fingers into a fist will raise your hand. After six seconds, relax your fingers and reposition your wrist such that it is bent downward. Hold for a further six seconds. Follow these steps eight to twelve times for optimal outcomes.
References
- Prajapati, N. (2022a, May 6). Wrist range of motion exercise: Types, Benefits, How to do? | Samarpan. Samarpan Physiotherapy Clinic. https://samarpanphysioclinic.com/wrist-range-of-motion-exercise/