16 Best Exercises for Good Posture
Good posture is essential for maintaining balance, reducing strain on muscles and ligaments, and preventing discomfort. Incorporating exercises that strengthen the core, back, and shoulder muscles can significantly improve posture. Focusing on alignment, flexibility, and stability helps create a strong foundation for standing and sitting with ease and confidence.
Introduction:
Maintaining good posture is important for both your appearance and the health and function of your body. Poor posture can lead to fatigue, headaches, neck strain, and back pain. It is important to take action to improve your posture, no matter whether you work at a desk or are always moving. One of the best ways to increase alignment is to regularly strengthen and stretch key muscle groups.
The following muscle groups must be balanced to maintain proper posture:
- Core Muscles: The lower back and abdominal muscles are essential for maintaining the spine.
- Upper back and shoulder muscles: Strong muscles in the upper back and shoulders support the alignment of the neck and the shoulders.
- Hip flexors and glutes: Poor posture can result from pelvic tilt, which is caused by tight hip flexors and weak glutes.
- Neck Muscles: To avoid tension and pain, keep your neck in a neutral position.
What factors affect posture?
Numerous physical and psychological elements might affect posture. Here are a few important ones:
- Flexibility and Muscle Strength
Weak muscles: Poor posture can result from weak core muscles (back, abdomen) or other muscle groups, since the body may compensate by aligning itself incorrectly.
Tight muscles: Tight muscles can cause the body to become out of alignment, particularly in the hip flexors and chest.
Flexibility: Poor posture can result from a lack of flexibility, especially in the hips and spine.
- Age
Degeneration: As we age, our posture, strength, and flexibility can decrease due to normal wear and tear on our joints and muscles.
Bone density: Conditions such as osteoporosis can result in abnormalities of the spine, which can lead to bad posture.
- Footwear
Incorrect footwear: Your posture and general body alignment may be impacted by wearing shoes that are too high or don’t support your arch properly.
- Ergonomics
Workplace: A poorly designed workstation might encourage bending over or leaning forward, particularly while sitting for extended periods.
Incorrect seating: Over time, bad posture can result from desks that aren’t at the proper height or chairs that don’t support your spine’s natural curve.
- Habits of Lifestyle
Long-term sitting: Sitting for extended periods, such as at work or when using a computer, can cause bending over and a forward head posture in many persons.
Physical activity: Muscle imbalances caused by inactivity might make it more difficult to maintain proper posture.
Using an incorrectly fitting backpack or carrying a big bag on one shoulder can cause back pain and alter posture.
- Use of Technology
Screen time: Prolonged bending from staring down at phones or tablets can cause “tech neck,” a condition in which the neck and spine become misaligned.
- Aspects of Psychology
Stress: Excessive stress can cause strain in the back, shoulders, and neck, which may affect posture.
Mental state: Because mental states affect physical conduct, individuals who are unhappy, anxious, or short on energy may have a natural tendency to lean.
- Weight of Body
Overweight/obesity: Excess weight, particularly around the abdomen, can put stress on the spine and cause bad posture, including a body that leans forward.
- Pain or Injury
Past injuries: If the body adjusts its alignment to compensate for pain or weakness, a history of back, neck, or joint injuries may affect posture.
Chronic pain issues: Misalignments and pain that affect posture can also be caused by illnesses such as scoliosis, fibromyalgia, or arthritis.
Benefits of Exercises
Exercise is necessary for maintaining and improving posture. Frequent exercise improves flexibility, builds muscle strength, and raises awareness of good body alignment.
- Increases Core Muscle Strength
Better support: Maintaining good posture requires the use of core muscles, which include the pelvic, lower back, and abdominal muscles. You can support your spine and keep your posture straighter with less effort if you strengthen these muscles.
Decreased back pain: Having a strong core can help you avoid pain and improve spinal alignment by reducing strain on your back.
- Lessens Muscle Unbalances
Muscle imbalances are common, with some muscular groups (like the chest) getting stronger while others (like the back) get weaker. Round shoulders and other bad postures might be worsened by this imbalance. Exercises that focus on posture correct these abnormalities and improve alignment.
Corrects alignment: By stretching tight, hyperactive muscles and strengthening inactive ones, exercises help in the body’s alignment.
- Improves Spine Health
Maintaining a neutral spine with regular exercise may help avoid slouching, hunching, or severe curvature.
Increased bone density: Exercises involving weight bearing help to strengthen bones, which is particularly advantageous for avoiding diseases like osteoporosis that may affect posture.
- Improves Mobility and Flexibility
Prevents stiffness: Especially in areas that are subject to stress, such as the hip flexors, shoulders, and chest, stretching and flexibility exercises may help ease muscle tightness. Better alignment and range of motion are made possible by this.
Flexibility balance: Good posture is supported by the muscles surrounding the spine remaining flexible, which allows it to maintain its natural curves.
- Improves Postural Habits and Body Awareness
Better posture awareness: Some exercises, such as yoga or pilates, help raise body awareness, which makes it simpler to identify bad posture and fix it in day-to-day tasks.
Promotes mindful movement: Whether you’re walking, standing, or sitting, exercise teaches you how to move while maintaining good posture.
- Reduces and Prevents Pain
Back, shoulder, and neck pain can be lessened by strengthening and stretching the muscles that support your spine. This can avoid the pain that is frequently linked to bad posture, like shoulder and neck strain.
Injury prevention: As a stronger, more flexible, and well-aligned body is able to endure the stresses of regular movement and physical exercise, it is less likely to get an injury.
- Increases Energy and Circulation
Improved circulation: Frequent exercise increases blood flow, which supports healthy posture by stimulating the muscles and tissues.
Improved energy: Physical activity increases vitality and decreases slowdown, which can lead to bending over or bad posture.
- Psychological Advantages
Improved confidence: Feelings of self-assurance and confidence can be affected by having proper posture. It can have a positive effect on your self-image and how other people see you.
Decreased stress: Exercise causes the body to release endorphins, which lessen tension and stress. The need to lean forward can be avoided with less neck and shoulder strain.
Exercises for Good Posture:
The purpose of the following exercises is to stretch any tight muscles that may result from bad habits and strengthen the muscles that support proper posture.
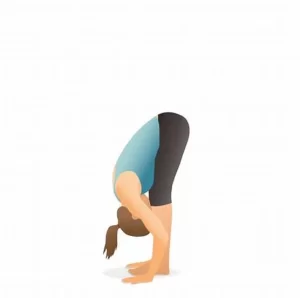
Uttanasana
- With your feet hip-width apart and your feet grounded, take a straight position.
- Lift your kneecaps, stretch through your back, and engage your thighs.
- Push your shoulder blades back and down while keeping your arms relaxed at your sides.
- Stretch your arms upwards as you take a breath to extend your body.
- Fold forward and bend at the hips to pull your chest closer to your thighs as you release the breath.
- If necessary, keep your knees slightly bent, particularly if your hamstrings are tight.
- When folding, move your head closer to your knees.
- Allow your arms to drop, and depending on your flexibility, place your hands on your ankles, shins, or the floor.
- Try to relax into the stretch and deepen the fold with each inhalation.
- Avoid rounding at the back and maintain an extended body.
- Instead of simply bending forward, consider lengthening your spine.
- Breathe deeply and let your body settle into the stretch while you hold for a few seconds to a minute.
- Then return to your neutral position.
- Then relax.
- Repeat this exercise 5 to 10 times.
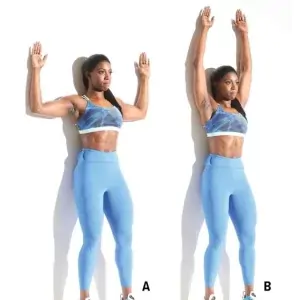
Shoulder roll
- Maintain a straight spine while sitting or standing.
- Relax your arms by your sides and maintain a hip-width distance between your feet.
- Make sure your posture is calm and neutral.
- Breathe in deeply.
- Squeeze both shoulders slightly as you raise them toward your ears when you take a breath.
- Roll your shoulders back in a gentle circular motion as you release the breath, moving them down and then back up toward your ears.
- You should be creating large circles with your shoulders in a circular motion.
- Perform five to ten backward shoulder rolls, paying close attention to a controlled and natural movement.
- When performing the roll, try not to tense your face or neck; instead, maintain everything relaxed.
- Once the backward rolls are finished, change directions.
- Take a breath and raise your shoulders to your ears.
- To lower your shoulders down and forward toward your chest, exhale and roll them forward.
- Perform five to ten more shoulder rolls forward.
- Then return to your neutral position.
- Then relax.

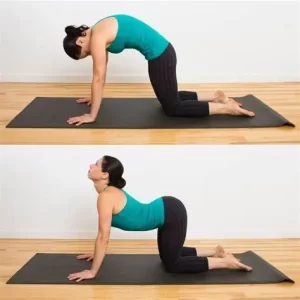
Cat-Cow Stretch
- Start by placing your knees behind your hips and your wrists directly beneath your shoulders in a tabletop position.
- To support your weight, keep your fingers wide apart.
- Your neck should be relaxed, your head should be in line with your back, and your spine should be neutral.
- Keep your eyes between your palms and look down at the ground.
- Take a deep breath while arching your back and sliding your pelvis forward.
- Drop your belly to the floor and raise your tailbone to the ceiling, opening your chest.
- Look up a little while you slowly raise your head and chest (don’t strain your neck).
- Use your back muscles and maintain a straight elbow position.
- Pull your belly button toward your spine and tuck your tailbone as you exhale and turn your back toward the ceiling.
- Let your chin pull in, rounding through your upper back, and lower your head towards your chest.
- As you press onto your hands and knees, see your spine forming a “C” shape.
- Keep your breath in line with your movement as you transition easily between Cow Pose (inhale) and Cat Pose (exhale).
- Then return to your neutral position.
- Then relax.
- Repeat this exercise 5 to 10 times.
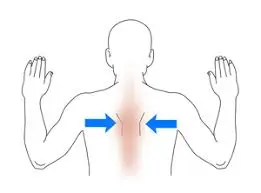
Shoulder Blade Squeeze
- You can perform this workout sitting or standing.
- Make sure your spine is straight and your feet are flat on the floor if you’re seated.
- If you’re standing, take a straight posture, place your feet hip-width apart, and contract your core.
- Start with your arms by your sides and your shoulders relaxed.
- Maintain a relaxed face and neck.
- As you gently pull your shoulder blades (scapulae) toward one another, take a deep breath and release it slowly.
- Consider trying to squeeze a piece of paper or a pencil between your shoulder blades.
- Instead of rolling your shoulders up toward your ears, concentrate on squeezing the rhomboids and trapezius muscles, which are located between your shoulder blades.
- For a few seconds, hold the pressure while making sure your breathing remains constant.
- When you squeeze, keep your shoulders down and your chest open.
- Release the squeeze gradually and go back to the beginning position.
- Put your arms back.
- Before you do the exercise again, take a moment to reset.
- Then relax.
- Repeat this exercise 5 to 10 times.
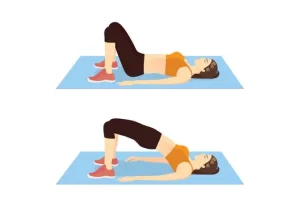
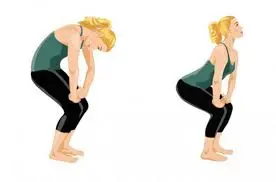
Glutes Bridge
- Start by resting on your back on a level surface, like a carpet or yoga mat.
- To place your feet hip-width apart and flat on the floor, bend your knees.
- When your arms are at your sides, your heels should be near enough to your glutes to allow you to touch them with your fingertips.
- Engage your core muscles and plant your feet firmly on the ground.
- This keeps your lower back safe while you’re moving.
- With your hands facing down, keep your arms at your sides.
- As you raise your hips toward the ceiling, take a breath and release it.
- To lift your hips, tighten your glutes and push through your heels.
- At the highest point of the exercise, your body should be in a straight line from your knees to your shoulders.
- Stay away of too arching your lower back; the lift should originate from your hips rather than your spine.
- Squeeze your glutes firmly at the highest point for one to two seconds once your hips are fully raised.
- Do not let your lower back drop; instead, keep your core active.
- Take a breath and manage the drop as you gently move your hips back to the beginning position.
- Be sure you’re not falling too fast.
- Then relax.
- Repeat this exercise 5 to 10 times.
Seated Row (with Resistance Band)
- With your legs straight out in front of you, take a seat on the floor.
- Holding both ends of a resistance band in your hands, loop it around your feet, making sure it is strong but not too tight.
- With your spine straight, shoulders back, and chest raised, take an upright position.
- Although your legs should be extended, they shouldn’t be locked out; a small knee bend is okay.
- Using both hands, grasp the resistance band’s ends.
- Holding the band at a shoulder-width distance, extend your arms forward.
- To ensure stability throughout the workout, contract your core and tighten your glutes before starting the movement.
- Pull the resistance band toward your body while inhaling and exhaling.
- Pay attention to keeping your elbows close to your body as you raise them back.
- As you pull the band, contract your biceps and upper back muscles (traps, rhomboids) by pulling your shoulder blades together.
- Try to position your elbows behind you and your hands close to your body.
- Hold the contraction for a time while keeping your shoulder blades squeezed together until your hands are close to your body.
- Keeping the band under control and preventing it from bending back, take a breath while you slowly stretch your arms back to the beginning position.
- Throughout the return phase, keep your chest raised and refrain from rounding your back.
- Then relax.
- Repeat this exercise 5 to 10 times.

Standing Cat-Cow
- Stand with your spine in a neutral position, your feet hip-width apart, and your knees slightly bent but not locked.
- Stand tall with your shoulders down and away from your ears, and let your arms drop to your sides.
- Make sure each of your feet has to support the same amount of your weight.
- Pull your belly button toward your spine to gently activate your core.
- Throughout the workout, keep your posture long and upright.
- Avoid any strain by letting your face and neck relax.
- Take a deep breath and raise your chest and tailbone toward the ceiling by gently straightening your back.
- To prevent neck pain, open your chest, roll your shoulders back, and let your head rise a little.
- As you open your chest, feel your shoulder blades come together and pull downward.
- As you raise your chest, slightly push your hips forward.
- Pull your belly button into your spine and tuck your pelvis under as you slowly exhale around your back.
- Let your shoulders curve forward and your head droop gently toward your chest.
- Feel the stretch in your shoulders and upper back as you pull your shoulder blades apart.
- Breathe in time with your movements as you alternate between Cow Pose and Cat Pose.
- Continue to breathe in during Cow and out during Cat, moving fluidly between these two positions.
- Then return to your neutral position.
- Then relax.
- Repeat this exercise 5 to 10 times.
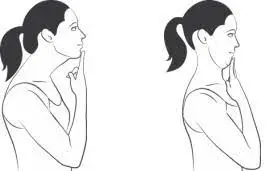
Chin tuck
- When standing or sitting, keep your shoulders relaxed and your back upright.
- This exercise can be performed standing with your feet hip-width apart or while seated in a chair.
- Keep your gaze forward and your head in line with your spine.
- To activate your core muscles, gently pull your belly button toward your spine.
- During the activity, this supports your neck and back.
- Without lowering your head, gently pull your chin toward your chest.
- A “double chin” can be achieved by pulling your head straight back rather than down.
- The muscles in the front of your neck should be slightly activated, and the rear of your neck should feel stretched.
- Avoid rounding or bending your shoulders; instead, keep them relaxed.
- For five to ten seconds, hold the chin tucked while keeping your spine straight and taking deep breaths.
- Make sure your neck isn’t being overworked.
- Return your head to a neutral position, with your ears in line with your shoulders, by slowly releasing the chin tuck.
- Then relax.
- Repeat this exercise 5 to 10 times.
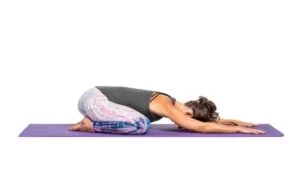
Child pose stretch
- Start by spreading your knees hip-width apart on the mat, or wider if that is more comfortable.
- With your toes pointed straight back or slightly bent out, sit back on your heels.
- Exhale and gradually drop your body toward the floor, resting your forehead on the mat (or, if more comfortable, a block or cushion).
- Keep your palms on the mat while you extend your arms forward.
- For a more relaxed version, you may also place your arms resting palms up alongside your body.
- Ensure that the hips are exactly above the knees.
- As you lower yourself into the pose, keep your body upright and stretch your spine to prevent arching your lower back.
- As you stretch, let your ribs expand by taking a deep breath into your abdomen.
- To gently extend your lower back, let your hips drop toward your heels without pushing them.
- Pay attention to your breathing.
- Breathe in deeply and out gently so that each breath helps your body relax even more into the stretch.
- Depending on how comfortable you are, hold the position for a few seconds.
- Then return to your neutral position.
- Then relax.
- Repeat this exercise 5 to 10 times.
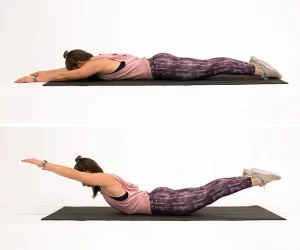
Superman
- Start by extending your arms straight in front of you and your legs straight behind you, like Superman flying, while lying face down on a mat or other level surface.
- Keep your head in a neutral position, which means it should not be drooping or raised above your spine.
- Pull your belly button slightly toward your spine to tighten your core.
- Then, engage your glutes and lower back muscles.
- Your body will remain more stable during the movement as a result.
- Squeeze your shoulders, glutes, and lower back to raise your arms, chest, and legs off the floor all at once.
- Don’t overextend; instead, try to raise your legs and body a few inches off the ground.
- From your chest to your legs, your body should gently bend, giving the impression that you are flying like Superman.
- Avoid flexing your neck to look forward and maintain a neutral head position.
- For a few seconds, maintain a raised posture while extending your arms and legs fully.
- Throughout the hold, stay in control and use your core, glutes, and back.
- Return to the beginning position by carefully lowering your arms, legs, and chest to the floor while defying gravity.
- To keep the muscles you’re using tense, make sure you lower your body gradually.
- Then relax.
- Repeat this exercise 5 to 10 times.
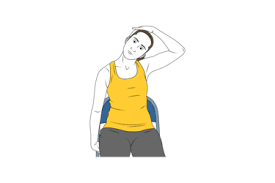
Upper-trapezius-stretch
- Position yourself straight in a chair so that your feet are flat on the floor.
- Maintain a neutral spine and relaxed shoulders.
- Hold the bottom of your chair if you’re seated, or place your right hand behind your back.
- Move your head slowly to the left, moving your left ear close to your left.
- Do not turn your head; instead, keep your chin parallel to the ground.
- The upper shoulder region and right side of your neck should feel slightly stretched.
- You may direct the lean more toward your left shoulder by applying a little pressure with your left hand on the right side of your head for a deeper stretch.
- Allow your muscles to stretch naturally without pulling or forcing them.
- For a few seconds, hold the stretch while concentrating on deep, slow breathing.
- Exhale and relax into the stretch.
- Then return to your neutral position.
- Then relax.
- Repeat this exercise 5 to 10 times.
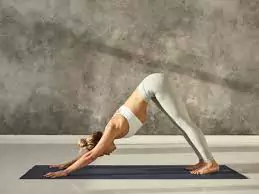
Downward facing dog
- Start on your hands and knees, placing your knees beneath your hips and your wrists exactly beneath your shoulders. The neutral tabletop position is this.
- As you get ready to raise your hips toward the ceiling, pull your toes beneath.
- Make an upside-down V with your body as you inhale, pressing your palms firmly into the floor and starting to raise your hips toward the ceiling.
- You should straighten your knees and extend your arms fully.
- Instead of just pulling your hips upward, concentrate on stretching your spine.
- Consider trying to put as much distance as you can between your hands and hips.
- Allow your head to hang between your arms to maintain a neutral neck position, but keep your chin away from your chest.
- To stretch the calves and hamstrings, try to gently press your heels toward the floor, even if they might not contact it (particularly if you’re just starting).
- You can maintain a small bend in your knees until you increase your range of motion if your hamstrings are tight.
- Keep your legs moving and contract your core muscles, particularly your abdominals.
- By doing this, you can keep your lower back stable and avoid strain.
- To help divide the weight equally, apply pressure through your palms and the bases of your fingers.
- As long as it seems comfortable, hold the downward-facing dog position for a few seconds.
- Maintain a relaxed yet active body while concentrating on deep, regular breathing.
- Then return to your neutral position.
- Then relax.
- Repeat this exercise 5 to 10 times.
Pigeon pose
- Get down on your knees on the tabletop Place your knees beneath your hips and your wrists just beneath your shoulders.
- Keeping your right ankle as close to your left wrist as is comfortable, push your right knee forward toward your right wrist from the tabletop.
- The stretch will be deeper as far as you push the knee forward.
- Depending on your flexibility, lower your right shin to the floor so that it is parallel to or slightly inclined to the front edge of the mat.
- Your left hip should be in the direction of your right foot.
- Maintaining your left foot and knee on the ground, slide your left leg straight back behind you.
- With the top of your foot on the ground and your toes pointed down, maintain an extended left leg.
- Your left hip should remain level with the floor, and your left leg should be straight.
- Your hips should ideally be square to the front of your mat.
- To level your hips, gently press your right hip lower if it tries to raise toward the ceiling.
- If your right hip feels unbalanced or uncomfortable, you can put a block or cushion underneath it.
- Raise your chest a little as you inhale to stretch your spine.
- Keep your neck neutral and extended, and your eyes forward.
- For a few seconds, maintain the posture. Breathe deeply, then let your hips open with each breath as you relax into the stretch.
- Consider using cushions or blocks as extra support and relax out of the stretch if you experience pain or difficulty.
- Then return to your neutral position.
- Then relax.
- Repeat this exercise 5 to 10 times.
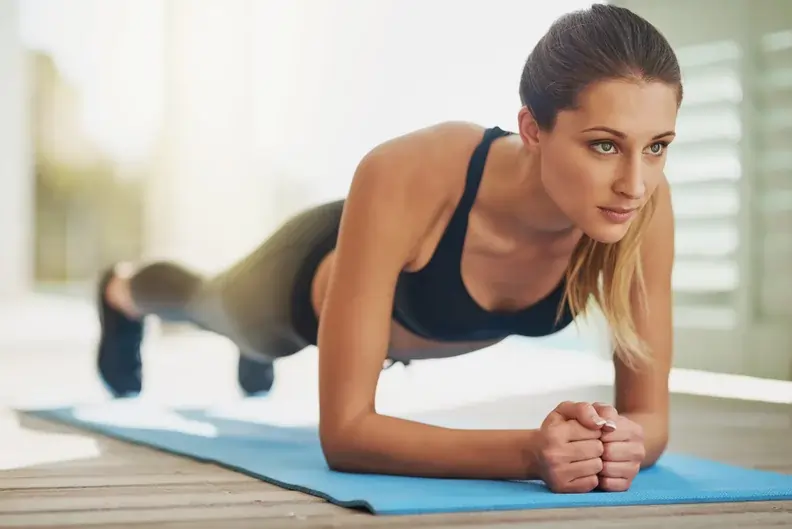
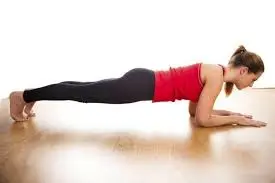
Plank
- Start with a prone position on the floor.
- Spread your fingers wide for stability and place your hands directly beneath your shoulders.
- Don’t look up or down; keep your neck neutral.
- Stay away from lifting your hips too high or lowering them toward the floor.
- To engage your core, squeeze your belly button toward your spine.
- This will help protect your lower back and keep your body stable.
- To stay in a strong, stable posture, tighten your glutes, quadriceps, and abs.
- Make sure your feet are hip-width apart, your elbows are a little flexible yet not locked, and your wrists are exactly beneath your shoulders.
- For a few seconds, maintain the plank position. Keep your body straight and strong, and concentrate on breathing regularly.
- Keep your chest wide and your eyes slightly forward rather than down.
- Keep your shoulders from leaning up toward your ears or letting your lower backdrop.
- Then return to your neutral position.
- Then relax.
- Repeat this exercise 5 to 10 times.
Wall angles
- Maintain a neutral, upright posture while standing with your back to a wall and your feet 5 to 6 inches from the wall.
- Without pushing, gently press your head, upper back, and lower back against the wall.
- Your entire spine should be in a straight line.
- Lift your arms until your elbows are 90 degrees bent.
- With your palms facing forward (or slightly inward), place your wrists, upper arms, and backs of your forearms against the wall.
- Make sure your elbows are in line with your shoulders and your upper arms are parallel to the floor.
- Pull your belly button slightly toward your spine to tighten your core.
- Maintain a straight, neutral spine and flexible hips and knees.
- Make sure your head stays in contact with the wall and avoid arching your lower back.
- As you slowly lift your arms overhead, try to maintain your elbows, forearms, and backs of your hands as close to the wall as you can.
- Make an effort to keep your arms in contact with the wall as you raise them.
- If it’s hard to keep your arms in contact with the wall, don’t fully extend them; instead, keep your elbows bent at a 90-degree angle or slightly broader.
- Keep going until you can raise your arms as high as you can without arching your back or losing contact with the wall.
- Return to the starting position by lowering your arms slowly while maintaining as much of your wrists and arms against the wall as you can.
- To keep your muscles engaged, concentrate on making flexible, controlled motions.
- Then relax.
- Repeat this exercise 5 to 10 times.
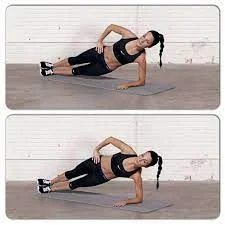
Side plank
- With your legs straight and placed on top of one another, start by lying on your side.
- To guarantee proper alignment, position your elbow just behind your shoulder.
- Maintain your forearm parallel to your body on the ground.
- Engage your glutes (buttocks) and tighten your core muscles (imagine pulling your belly button toward your spine).
- Maintaining a straight body without drooping or arching your back is important.
- Press into your forearm and the edge of your bottom foot to raise your hips off the ground as you exhale.
- Make sure your hips don’t fall to the floor and maintain your shoulders raised above your elbows.
- For a short while, hold the side plank.
- By gazing directly ahead or slightly up, you may maintain a neutral neck without straining or moving your head.
- Throughout the hold, maintain an active gluteal position and keep your core engaged.
- When you’re ready, return to the starting position by carefully lowering your hips back to the floor.
- Once one side is finished, switch to the other side and repeat the side plank.
- Make an effort to maintain the same form on both sides.
- Then relax.
- Repeat this exercise 5 to 10 times.
Which safety precautions ought to be taken when exercising?
Safety is important when exercising, especially to improve posture, in order to prevent injuries and get maximum benefit out of your sessions.
The following are some important safety measures to keep in mind:
- Properly Warm Up
Avoid injuries by always warming up before an activity session to get your heart, muscles, and joints ready. An effective warm-up lowers the chance of muscular sprains and strains by improving blood flow and flexibility.
- Stay Hydrated
Drink plenty of water because dehydration can affect how well muscles work and raise the chance of cramping or injury.
- Use the Correct Form
Correct technique: To avoid strain and injury, always make sure you’re completing exercises with the right form. When performing posture exercises, concentrate on keeping the spine in a neutral alignment and using the right muscles.
- Be careful not to overdo it.
Pay attention to your body: To prevent overexertion, it’s important to train within your current level of fitness. Especially when strengthening the muscles that support your posture, pushing too hard might result in muscle fatigue, strain, or injury.
- Put on the Right Shoes
Supportive footwear: Your posture and general safety can be greatly improved by wearing shoes that are suitable. For your particular activity, wear shoes that offer enough arch support, cushioning, and stability.
- Do not overstretch
Stretching gently is important for proper posture, but too much stretching can cause joint or muscle strains. Never push your body into a painful or uncomfortable position; instead, stretch carefully.
- Pay attention to stability and balance.
Exercises for balance: A lot of posture exercises require the use of stabilizing muscles. Practice exercises that increase balance because they develop coordination and body awareness, two things that are essential for maintaining good posture in day-to-day tasks.
- Make Slow Progress
Gradual intensity: It’s important to progressively increase strength and flexibility, particularly when trying to improve posture. To avoid overworking your muscles and joints, start with easy exercises and work your way up to more difficult ones.
- Keep Your Spine Aligned Neutrally
Spinal protection: When performing posture-correcting exercises, it’s important to keep your spine neutral during movement to prevent excessive rounding or arching. This guarantees that you’re not overstressing your spine and that you’re strengthening the right muscles.
- Keep an eye on pain and tenderness.
Prevent pain: While some pain is common during exercise, severe or sudden pain is not. Stop the exercise right away if you feel pain, and evaluate your form and technique to see what might have gone wrong.
- Make Use of the Right Equipment
Stabilizing tools: Use the correct weight or resistance level for your level of fitness while using dumbbells, resistance bands, or other equipment. Increase the weight gradually from the lighter starting position as your strength improves.
- After working out, relax.
Prevent stiffness: To help relieve muscle tension and stiffness, always stretch gently after working out. Additionally, it keeps you flexible and helps you avoid pain after working out.
You can exercise safely and effectively while reducing your chance of injury and gradually improving your posture by following these safety guidelines.
When should you stop exercising?
If you experience any symptoms or signs that suggest it might not be safe to continue exercising, it’s important to pay attention to your body and stop.
When performing posture exercises, the following are a few indicators that you should stop:
- Pain
Sharp or acute pain: You should stop exercising right once if you have sudden, sharp, or severe pain, especially in the shoulders, back, joints, or neck.
Muscle strain: Take a break and rest if a muscle feels overworked or strained. Ignoring pain could worsen it and prevent you from moving forward.
- Lightheadedness or dizziness
Feeling faint: Stop exercising immediately if you begin to feel lightheaded, faint, or dizzy. Overexertion, low blood sugar, or dehydration may all lead to these symptoms.
Nausea: Your body may require a rest if you feel nauseous or very tired. Rest and drink plenty of water.
- Breathing Problems
Inability to breathe: Quit working out and take a break if you can’t breathe or if it gets difficult or irregular. During activities, sustaining energy and proper posture requires proper breathing.
Chest pain: Stop right away and, if required, get medical help if you feel any tightness or pain in your chest.
- If you have a medical condition or are feeling ill
Cold or flu symptoms: It’s advisable to stop and rest if you’re feeling symptoms like a cold, a fever, or muscle pains that aren’t connected to your workout.
Underlying medical conditions: Before beginning an exercise program, speak with a healthcare provider if you have any underlying medical conditions, such as joint problems, heart problems, or other health concerns.
- Joint Weakness or Instability
Stop exercising if you experience any weakness or instability in any of your joints, particularly in your knees, ankles, or wrists. This might indicate bad form or a possible injury.
Sudden joint pain: To prevent additional damage, stop exercising if a joint feels uncomfortable, or swollen.
- Sweating excessively or being dehydrated
Sweating excessively: Stop and take a break if you’re feeling thirsty and sweating a lot. For maximum efficiency and muscular function, hydration is essential.
Dry mouth or severe thirst: These symptoms indicate that you need to drink more water. Before continuing, take a break and drink some water.
- Excessive Fatigue
Unable to maintain form: It’s time to stop exercising if you’re feeling too exhausted to continue with the exercises in a proper alignment or form. Ineffective form lowers the exercise’s effectiveness and raises the chance of injury.
Muscle fatigue: Take a break and give your muscles time to rest if they are so tired out that you are unable to use them effectively.
- Sudden Alignment or Posture Change
Loss of control over posture: Stop if you observe that your posture is declining, such as when you lean or circle your back too much. When performing posture exercises, it’s important to keep your alignment correct to prevent repeating harmful habits.
Bad form: You should take a break if you feel that your form is unsustainable or that you are no longer able to use the proper muscles.
- Indices of Stress or Overworking
Chronic soreness: You can be overworking if, after getting enough sleep, you still feel extremely stiff or sore. Degeneration of muscles and decreased performance may result from this. Allowing enough time for recovery in between sessions is important.
Mental fatigue: Overtraining may also be indicated by a feeling of mental stress or difficulty concentrating. Poor form caused by mental exhaustion might raise the chance of injury.
- Muscle Spasms
Leg or back cramps: Dehydration or overexertion may be the cause of muscle cramps, particularly in the legs, back, or abdomen. Take a moment to relax the muscles, drink some water, and stretch slowly.
You can guarantee a more secure and effective workout that promotes proper posture without running the risk of injury by listening to the signals from your body and pausing when needed.
Advice for Keeping Your Posture Correct:
- Stand tall by keeping your feet shoulder-width apart, your shoulders relaxed, and your head in line with your spine.
- Support yourself by sitting back in your chair with your knees at a straight angle and your feet flat on the ground. Make sure the chair supports your back, particularly the lower back.
- Set up your workspace: If you use a desk, ensure sure your chair supports your head and that your computer screen is at eye level.
- Take breaks: To avoid tension and stiffness, get up and stretch every 30 to 60 minutes if you’re sitting for extended periods of time.
Summary:
Maintaining proper posture involves more than just standing straight; it also involves positioning your body to support balance, comfort, and stability. In addition to back pain and muscular strain, poor posture can cause long-term health problems like breathing problems and joint pain. Having proper posture is important whether you’re in front of a computer, working at a desk, or going about your everyday business.
By adding posture-improving exercises to your routine, you may experience better alignment, reduced pain, and an overall improvement in your condition. You will feel and look better if you strengthen and stretch the muscles that support proper posture. The previously mentioned exercises focus on the muscles that support your shoulders, core, and spine the most.
As you gain comfort, progressively raise the intensity of the exercises you begin with, starting with a small number at a time. Consistent practice will help you feel more balanced, pain-free, and refreshed in addition to improving your posture.
FAQ:
Why is good posture so important?
Proper posture lowers the chance of developing chronic pain, especially in the shoulders, neck, and back, helps maintain the spine’s natural alignment, and reduces the strain on muscles and ligaments. Additionally, it improves digestion, respiration, and general energy.
In what ways do exercises help with posture?
Exercises that promote proper posture help you become more flexible, build up your body awareness, and strengthen important muscle groups like your shoulders, back, and core. This lessens the possibility of bending over or misalignments by making it simpler to maintain correct alignment throughout daily tasks.
How frequently should I practice my posture?
Try to perform posture exercises three to four times a week for best effects. But even making small modifications to your routine, like stretching or checking your posture, can help you keep making progress. The secret is regularity!
Which typical issues with posture can be solved through exercises?
Exercises for posture may help with problems like:
Rounded shoulders as a result of weak back muscles and tight chest muscles.
Forward head position, which is frequently caused by staring at displays.
excessive curvature of the lower back (lordosis)
bending over or slouching (caused by weak upper back and core muscles)
Scoliosis (under the supervision of a medical expert)
Which exercises are good for posture?
Plank
Chest Opener Stretch
Shoulder Blade Squeeze
Cat-Cow Stretch.
Bridges
Wall Angels
Can back pain be relieved by posture exercises?
Yes, several posture exercises focus on the shoulders, lower back, and core muscle areas that frequently cause back pain and can help reduce the pain that is caused by bad posture.
Can rounded shoulders be improved with posture exercises?
In fact! Round shoulders, which are frequently caused by extended sitting and bad posture, can be effectively corrected with posture exercises including back stretches, shoulder blade squeezes, and chest openers.
What part does core strength play in proper posture?
Maintaining an upright, balanced posture requires a strong core. It prevents straining or drooping when standing or sitting by supporting the pelvis and spine.
When can we expect to see improvements?
With regular practice, posture can improve in as little as a few weeks. However, it takes constant work and awareness to maintain long-term posture improvement.
Can anyone safely perform posture exercises?
The majority of posture exercises are safe, but before beginning a new workout program, you should speak with your doctor if you already have a medical issue such as osteoporosis, scoliosis, or herniated discs.
Can breathing difficulties be resolved with posture exercises?
Real! More lung expansion is possible with proper posture. Posture exercises help you keep your breathing more open and relaxed by strengthening your core muscles and opening up your chest.
References:
- On June 22, 2023, Hospitals, M., & Hospitals, M. The Top 8 Posture Correction Exercises for You to Try Right Now. Hospitals in Manipal. These are the top posture correction exercises you should try today: https://www.manipalhospitals.com/blog/8
- Eske, J. (February 13, 2023). Tips and exercises to improve posture. The article 325883 can be found at https://www.medicalnewstoday.com.
- Goswami, K. January 21, 2024. Enhance your fitness and wellness with these 19 top posture exercises. Samarpan Clinic for Physiotherapy. The best posture exercises can be found at https://samarpanphysioclinic.com/
- Cronkleton, E. July 13, 2023. Twelve Posture-Improving Exercises. Healthline. Posture-exercises: https://www.healthline.com/health
- Taylor, R. B. (July 10, 2011). 6 Posture-Related Exercises. Better posture exercises, WebMD. https://www.webmd.com/fitness-exercise
- D. June 10, 2021. Wrist Stretch | Exercise Guide with Illustrations. https://www.spotebi.com/exercise-guide/wrist-stretch/ SPOTEBI