16 Best Exercises for Get rid of Hip Dips
To reduce the appearance of hip dips, focus on exercises that target the glutes, hips, and thighs to build muscle and enhance curves. Key exercises include Hip Thrusts, Glute Bridges, Clamshells, Side Leg Raises, Fire Hydrants, and Squats.
Consistency with strength training and a balanced diet can help achieve smoother hip contours over time. Let me know if you’d like a detailed workout plan!
Introduction:
Although hip dips, sometimes referred to as violin hips, are a natural feature of the human body, many people look for activities that would make them look less noticeable. Although spot reduction is impossible, specific activities can help increase muscle mass and improve body composition, which may lessen the visible appearance of hip dips.
The muscles surrounding the hips and thighs can be strengthened and toned by incorporating a well-rounded training program that focuses on the lower body and includes movements like side leg lifts, squats, lunges, and side-lying leg raises.
For best effects, these workouts must be combined with a balanced diet and general fitness routine. Before starting any new fitness regimen, always get medical advice, especially if you already have any health issues.
What are Hip Dips?
Hip dips, sometimes referred to as “violin hips,” are the marks or inward curves on the sides of the body that are situated beneath the hip bone and just above the thigh. The hip bone and the top of the thigh bone (femur) connect to form these natural anatomical features. The distribution of muscle and fat, together with the shape of the pelvic bones, make these dips more obvious in certain individuals.
Hip dips are rather common and might vary in frequency depending on genetics, body fat distribution, and muscle tone. They don’t indicate any health problems, although fashion or beauty standards can occasionally make them more or less noticeable.
Although they can happen in persons of all shapes and sizes, hip dips are frequently more obvious in those with a leaner or more thin body composition.
Are Hip Dips Normal?
Hip dips are all very normal! They happen naturally in human anatomy and are caused by the structure and form of the bones, especially the pelvis. Since everybody is different, the severity of hip dips can change based on a variety of factors, including muscle composition, genetics, and fat distribution. Hip dips may be more obvious for some persons and less obvious for others.
They result from a natural depression at the junction of the upper thigh and hip bones. This characteristic has nothing to do with fitness or health, and it is not something that needs to be “fixed.” As with the form of your nose, hips, or legs, hip dips are just as common as any other physical feature.
What causes Hip Dips?
- Bone structure
Pelvic Shape: The way hip dips look is greatly affected by the form and structure of your pelvis. An indentation may form between your hip bones and the upper portion of your thigh if your pelvis is narrow. The position of these dips depends on the alignment of the bones in this region.
Bone Structure Variability: While some people may have smoother curves that don’t draw attention to the area, others may have more angular bone structures, which can result in deeper or more obvious dips.
- Genetics
Your body’s fat distribution, bone structure, and muscular growth are all significantly affected by how you are born. Since these features pass down through generations, you may have significant hip dips if your parents or grandparents do.
- Fat Distribution
Where Fat Is Stored: Genetics has a major role in the distribution of fat that your body naturally stores in various places. The thigh and pelvic spaces may be more noticeable if you have less fat around your thighs or hips. On the other hand, the dips may not look as noticeable if you have more fat in this location.
Body Type: Since fat can smooth over the curve, those with leaner body types may notice their hip dips more than individuals with a greater body fat proportion.
- Gender
Differences Between Males and Women: Women tend to experience hip dips more frequently than males because of their larger pelvis and the different distribution of fat, which tends to gather around the hips. Though they might not be as noticeable, hip dips may happen in men.
- Composition of Muscles
Hip and Glute Muscles: The severity of hip dips can also be affected by the muscles surrounding your hips and glutes. More noticeable indentations may be seen by those with less muscular mass in this region. By adding fullness and shape around the hips, strengthening and toning muscles like the glutes and hip abductors can help reduce the appearance of the dips.
Muscle Development: While weaker muscles may make the dips more obvious, stronger glute muscles can produce a more rounded and smooth appearance.
- Hormonal Changes and Age
Hormonal Shifts: The location and method of fat storage within the body can be affected by hormones. Hormonal changes during puberty or menopause, for example, may alter the distribution of fat, which may affect how hip dips appear.
Aging: Hip dips become less visible as you get older since muscle mass tends to decline and fat may shift.
Exercise advantage:
Exercises that build muscle and add bulk around the hips and glutes can help lessen the appearance of hip dips, but it’s important to realize that they are a natural feature and cannot be completely “removed” because they are primarily produced by bone structure.
The area can be straightened out and given a more toned, sculpted appearance with these activities. Here are some ways that certain hip dip exercises can help:
- Builds muscle in the glutes and hips.
Targeting the glutes, hip abductors, and thigh muscles with targeted exercises could help build muscle in the area and possibly lessen the visual impact of the dips. Muscle reduces the indentation and gives it a broader, more rounded appearance.
- Burns More Fat
Incorporating aerobic or full-body strength training with particular lower-body activities can help reduce overall body fat, even though spot reduction in the loss of fat from specific areas is not possible. As your body fat percentage drops, the dips may become less noticeable.
- Encourages a Strong, Healthy Body
Increasing hip muscle mass and strength can improve posture, stability, and functional movement. Mobility, balance, and injury prevention all depend on having strong glutes and hip muscles.
- Strengthens and Shapes Muscles
Overall, exercise can improve the tone and appearance of the hip and thigh muscles. By tightening the muscles in this area, you can help reshape the body and create a more balanced look.
- Improves the Shape of the Body Overall
You can improve the general form of your lower body by working on activities that target your hips and glutes. Your entire body can look better with stronger, more developed glutes, which will also make the hip dips less obvious.
Exercises for Get rid of Hip Dips:
The following exercises are useful for strengthening the surrounding muscles and lessening the appearance of hip dips:
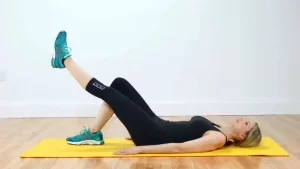
Straight leg raise
- On a comfortable surface, such as an exercise mat, lie flat on your back.
- For stability, keep your arms by your sides with the palms facing down and your legs straight and together.
- Maintain a relaxed head and neck position while gently pressing your lower back into the floor.
- One leg should be raised slowly and straight up, remaining as straight as you can the entire time.
- Your knee should stay straight and your toes should be pointing up.
- Make sure the movement is controlled and your lower back stays level on the floor while you raise the leg to a 45-degree angle, or higher if you can.
- At the top of the movement, hold this position for a few seconds.
- Return your leg to the beginning position slowly, making sure it doesn’t touch the ground.
- Throughout the workout, maintain control over your movements and make sure your core is working.
- Then return to your neutral position.
- Once one side is finished, move on to the other.
- Then relax.
- Repeat this exercise 5 to 10 times.
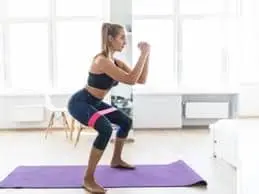
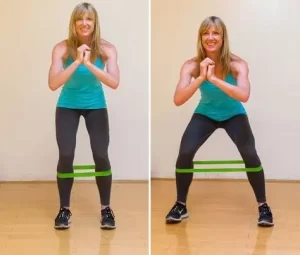
Lateral band walk
- You can wrap a loop resistance band around your ankles or just above your knees.
- The band should offer a little resistance when you stand with your feet shoulder-width apart.
- Throughout the exercise, keep your hips pushed back in a modest squat position to better encourage your glutes.
- Using your right foot to push against the band’s resistance, take a sidestep.
- Maintain a flat foot position and push your hips back to prevent your knees from sliding inward.
- To get back to the starting position, follow with your left foot and place it close to your right foot (but not too close leaving some tension in the band).
- Keep walking side to side while keeping the band taut and squatting slightly.
- Then return to your neutral position.
- Then relax.
- Repeat this exercise 5 to 10 times.
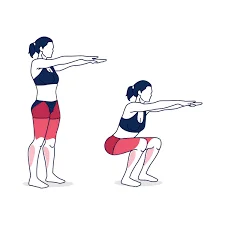
Squat
One of the best workouts for working the thighs and glutes is the squat. The muscles that help build out the area around the hips are among the lower body muscles that are strengthened by a regular squat.
- Depending on how comfortable you are, stand with your feet shoulder-width apart or a little wider.
- Maintain a forward or slightly outward (no more than 30 degrees) toe position.
- Make sure that the majority of your weight is on your heels and that it is distributed evenly across your feet.
- Maintain a straight back, shoulders back, and a raised chest by using your core.
- For balance, place your hands on your hips or extend your arms straight out in front of you.
- As though you were going to sit on a chair, start by pushing your hips back.
- Make sure your knees go over your toes and don’t go past your feet as you progressively bend them.
- As low as your flexibility allows, lower your body until your thighs are at least parallel to the floor.
- To get back to the beginning position, push through your heels. At the top, squeeze your glutes and straighten your legs.
- To keep your muscles taut, keep your knees slightly bent at the top rather than locking them.
- Then return to your neutral position.
- Then relax.
- Repeat this exercise 5 to 10 times.
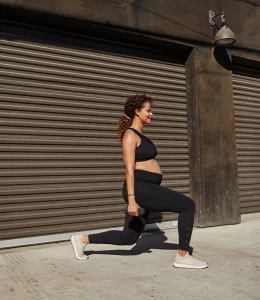
Lunges
To lessen the appearance of hip dips, lunges target the quadriceps, hamstrings, and glutes.
- Place your arms on your hips or at your sides and stand upright with your feet hip-width apart.
- Maintain proper posture with your shoulders back and chest raised by using your core.
- With your right leg, take a large step forward and plant your foot flat on the floor.
- Bend both knees to get your body down nearer the floor.
- Push your body back to the beginning position by applying pressure through the heel of your front foot.
- It ought to put both feet back together.
- Remember to use your core and glutes when you stand back up.
- Once you have finished one side, move to the other leg and do the lunge.
- Then relax.
- Repeat this exercise 5 to 10 times.
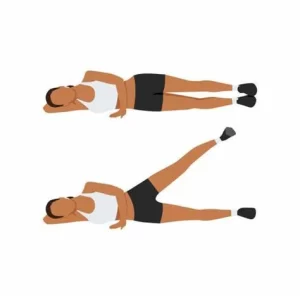
Lying Lateral Leg Raises
The gluteus medius and minimus, which shape the outside hip region, are the muscles that are primarily targeted by this exercise.
- On a comfortable surface, such as an exercise mat, lie on your side.
- Your head and neck should be supported, and your legs should be straight.
- You can rest your head on the elbow-bent arm or put your arm underneath your head. Place your top leg directly on top of your bottom leg, which should remain straight on the floor.
- For balance, you can hold your top hand in front of you or rest it on your hip.
- Maintain a neutral spine and tighten your core.
- Keep your top leg straight as you slowly raise it toward the ceiling. Instead of using your toes to lead, concentrate on using your heel.
- Without moving your body or letting your lower leg rise off the floor, raise your leg as high as you can.
- Squeeze your outer thighs and glutes while you hold the position for just a few seconds at the top of the exercise.
- Return to the starting position by lowering your leg slowly while keeping your movement under control.
- Keeping your movement under control.
- A controlled drop is equally as important as a controlled rise.
- Then return to your neutral position.
- Then relax.
- Repeat this exercise 5 to 10 times.
- Switch to the second leg and repeat the exercise after finishing the first one.
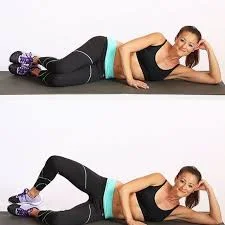
Clamshell
Clamshells target the gluteus medius, an important muscle in shaping the outer hips, as well as the hip abductors.
- Start by placing your feet one on top of the other while lying on your side on an exercise mat with your knees bent at a 90-degree angle.
- Place your head on your lower arm, or, if necessary, support your neck with a pillow.
- For stability, place your upper hand on your hip; for more support, place it on the ground in front of you.
- Maintain a straight posture and put your hips on top of one another.
- Throughout the exercise, your feet should stay in contact with one another.
- Maintaining your feet together, slowly lift your top knee upward, opening your legs like a clamshell.
- As you raise your knee, maintain a stable pelvis and avoid turning your body back.
- Only at the hip joint should there be movement.
- Without moving your hips or lower back, your upper knee should open as wide as it can.
- At the top of the exercise, take a moment to pause and squeeze your gluteal and outer hip muscles.
- Both the side of your hip and your gluteus medius should be tense.
- Make sure the action is controlled and your feet remain placed together.
- Return to the beginning posture by slowly lowering your upper knee while keeping control and not letting it fall too rapidly.
- Then return to your neutral position.
- Then relax.
- Repeat this exercise 5 to 10 times.
- After finishing an exercise on one side, move on to the other.
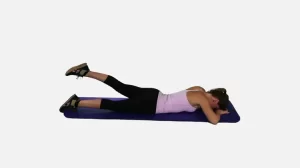
Prone leg raise
- Start by lying prone, or face down, on a comfortable surface such as an exercise mat.
- Hold your arms out in front of you with your head neutral or your forehead resting on the mat (you can use a small cushion if necessary for neck support).
- With your toes pointing down toward the floor, maintain your legs together and straight.
- Maintaining a straight leg and using your hamstrings and glutes, slowly raise one leg off the ground.
- Instead of using your lower back to raise your leg, concentrate on engaging your glutes.
- Without arching your back or moving your pelvis, raise the leg as high as you can.
- Only the leg that is raised should move; the rest of your body should stay stable.
- When your leg is at the top, tighten your glutes for a few seconds, using both your gluteal and lower back muscles.
- To keep your spine supported, keep your core active.
- With control during the exercise, slowly lower your leg back down to the beginning position.
- Don’t let the leg fall too soon.
- Then return to your neutral position.
- Then relax.
- Repeat this exercise 5 to 10 times.
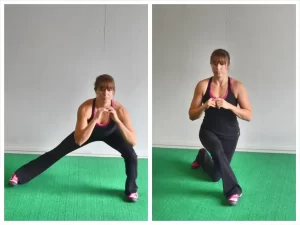
Side curtsy lunges
- Place your feet hip-width apart and stand with your shoulders back, chest high, and core tight.
- For balance, keep your hands on your hips, held in front of your chest, or outstretched.
- With your right leg, take a large horizontal step behind your body and cross it behind your left leg, as if you were curtsying.
- Maintaining a 90-degree bend in your left knee, drop your body into a lunge as you take a step back.
- Avoid leaning forward and maintain an upright body.
- Your left knee should line up with your left ankle, and your right knee should approach the ground but not contact it.
- Bend both knees to a 90-degree angle.
- The right-back knee should be angled downward toward the floor.
- Using your quadriceps and glutes, push off with your right foot and stand straight up.
- Stand upright with your feet hip-width apart while extending your right foot back to the middle.
- Repeat the movement on the other side of your body by stepping your left leg back into the curtsy lunge and crossing it behind your right.
- As you lower yourself into the lunge, take a breath, and as you come back to the starting position, take another breath.
- Then relax.
- Repeat this exercise 5 to 10 times.
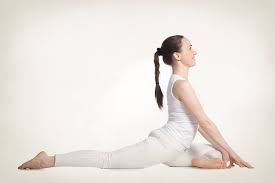
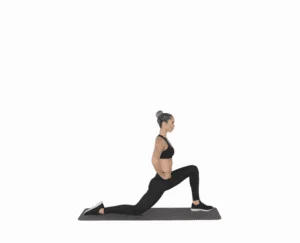
Kneeling Hip Flexor Stretch
- Start by putting your feet and knees about hip-width apart on the floor. Put a cushion or mat underneath your knees for additional support if this is difficult.
- With your left knee still on the floor, place your right foot forward, bending the knee to a nearly 90-degree angle.
- Make sure your right ankle and right knee line up.
- To keep your spine neutral during the stretch, keep the body up straight and your core active.
- Maintaining a straight back, gently push your hips forward.
- The hip flexors are placed in the front of your left hip, and you should begin to feel a stretch there.
- Make sure your right knee does not extend past your toes and remains directly above your ankle.
- Your left hip flexor will feel more stretched the deeper you lunge.
- Take deep breaths and relax into the stretch while you hold this position for a few seconds.
- There shouldn’t be any pain, just a mild to moderate stretch.
- You can gently push your hips forward while keeping your knee and ankle in alignment to further improve the stretch.
- To maintain a strong core, raise your arms high and gradually move your upper body to the other side (to the right if your left leg is back) for a more challenging stretch.
- Extending your legs and using your side body, will further stretch your hip flexors.
- As an alternative, you can support yourself by placing your hands on your right knee or hips.
- Then return to your neutral position.
- Then relax.
- Repeat this exercise 5 to 10 times.
- After switching legs, perform the stretch with the other leg.
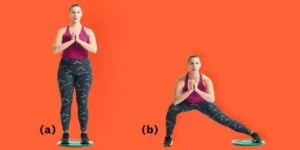
lateral lunge
- Place your hands on your hips or out in front of you for balance, and stand straight with your feet hip-width apart.
- Using your right leg, take a big step to the right (or left, depending on which side you’re starting from).
- As though you were sitting back into a squat, bend your right knee while lowering your hips down toward the floor.
- Make sure your left foot stays flat on the ground and your left leg remains straight.
- Don’t let your knee cross your toes; instead, keep your chest up straight.
- Your right ankle and right knee should line up.
- Then return to your neutral position.
- Then relax.
- Repeat this exercise 5 to 10 times.
- To the opposite side, repeat the step.
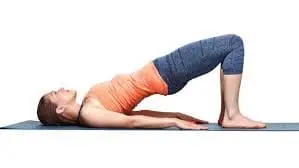
Glute Bridges
The lower back, hamstrings, and glutes are the main muscles that are activated by the glute bridge. The muscles surrounding the hips and buttocks are strengthened by this workout.
- Place your feet level on the floor, hip-width apart, and bend your knees while lying flat on your back.
- For support, keep your arms by your sides, palms down.
- Make sure your heels are approximately six to eight inches from your buttocks and that your feet are exactly beneath your knees.
- Squeeze your glutes and contract your core.
- Push your pelvis upward by pushing through your heels and raising your hips toward the ceiling.
- From your shoulders to your knees, you want to make a straight line.
- Squeeze your glutes firmly at your highest point and hold for a second.
- Control the movement as you gently move your hips back down toward the floor.
- Don’t allow your hips or lower back arch to sag as you drop.
- Then return to your neutral position.
- Then relax.
- Repeat this exercise 5 to 10 times.
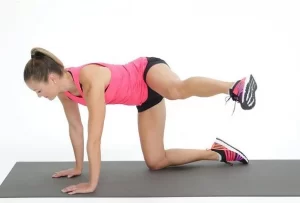
Fire hydrant
By targeting the glutes, hips, and outer thighs, this exercise helps to lessen the appearance of dips and build up the area surrounding the hips.
- Starting from a tabletop position, get down on your hands and knees.
- Your knees should be beneath your hips, and your wrists should be exactly beneath your shoulders.
- Maintain a neutral spine by keeping your back straight and using your core.
- As the term “Fire Hydrant” suggests, raise one leg out to the side while maintaining a 90-degree bend in the knee.
- Avoid bending to the other side as you raise your leg and try to keep the knee at a 90-degree angle.
- Your hips should do the motion.
- Lift your leg and concentrate on controlling your movement while tensing your glutes.
- Return to the beginning posture by slowly lowering your leg without letting your knee hit the floor.
- Then relax.
- Repeat this exercise 5 to 10 times.
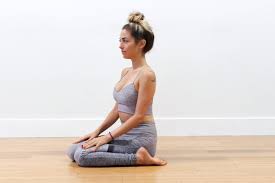
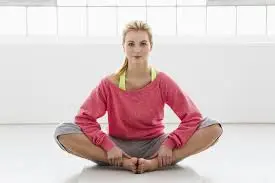
Butterfly stretch
- With your legs straight out in front of you, take a seat on the floor.
- Form a “diamond” shape with your legs by gently pressing the soles of your feet together and allowing your knees to slide out to the sides.
- Don’t push your feet too close to your body; they should be as close as feel comfortable.
- To avoid rounding your back, sit up straight and extend your spine.
- The goal of the stretch is to keep your spine neutral.
- Hold your ankles or place your hands on your feet, but avoid pulling too hard.
- As you stretch, allow your body to relax.
- Using your elbows, slowly yet gently press your knees toward the floor while sitting upright.
- To increase the depth of the stretch, slowly bend forward from your hips, maintaining your back straight, while pushing your chest toward the floor.
- Breathe deeply and relax into the stretch while you hold the pose for a few seconds.
- Hold for longer if you want a more intense stretch, but try not to feel any pain or stress.
- Then return to your neutral position.
- Then relax.
- Repeat this exercise 5 to 10 times.
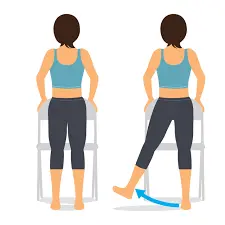
Standing Hip Abductions
The gluteus medius and other muscles surrounding the outer hips are worked with standing hip abductions.
- With your knees slightly bent and your feet hip-width apart, take an upright posture.
- To keep your balance and avoid arching your lower back, keep your core active.
- If you need support, put your hands on your hips or hold to a sturdy object, such as a wall, chair, or countertop.
- Keep one leg straight or slightly bent as you slowly raise it out to the side.
- Be sure to lead with your heel rather than your toes.
- Don’t lean to the other side of your body or overextend your leg; instead, raise it to hip height or just above.
- You should maintain a straight posture.
- To fully engage the hip abductors, take a moment to pause at the top of the exercise and tighten your glutes.
- Resuming control of the movement, slowly lower your leg back to the starting position.
- Don’t let the leg fall too soon.
- Then relax.
- Repeat this exercise 5 to 10 times.
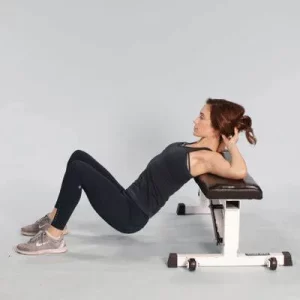
Hip Thrusts
- Place your upper back against a bench or other raised surface while sitting on the floor.
- Your feet should be flat on the floor, shoulder-width apart, and your knees bent.
- For extra resistance, you can optionally attach a weight plate over your hips or a barbell.
- As an alternative, you might begin with simply your weight.
- Place your feet flat on the ground just beneath your knees.
- Make sure your feet are pointed directly ahead and hip-width apart.
- Tighten your abs and use your glutes to brace your core.
- You’ll be more stable during the movement if you do this.
- Press your hips up toward the ceiling while pushing through your heels.
- You should push your hips as high as you can while squeezing your glutes at the highest point, keeping your upper back supported on the bench.
- Your body should make a straight line from your shoulders to your knees at the top of the movement.
- For one or two seconds, hold the highest position while concentrating on engaging your glutes as firmly as you can.
- Move your hips back to the beginning position by carefully lowering them.
- When you go down, try not to let your glutes droop or your back give out.
- Then return to your neutral position.
- Then relax.
- Repeat this exercise 5 to 10 times.
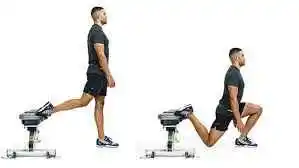
Bulgarian Split Squats
- Place yourself a few feet in front of a chair, bench, or other raised surface that is about knee height.
- With your toes securely resting on the bench behind you, place one foot on it.
- Make sure your other foot is in line with your hip and knee by keeping it flat on the ground and in front of you.
- To keep your body stable and upright during the exercise, tighten your core.
- Refrain from arching your back or bending forward.
- Start by lowering your hips toward the floor and gradually bending your front knee.
- Make sure your rear knee doesn’t touch the floor and lower straight.
- Avoid allowing your front knee to go over your toes; instead, it should track over them.
- Lower yourself as far as your strength and flexibility will let, especially till your front thigh is parallel to the floor.
- Keep your back straight and make sure your back knee is nearly touching the floor.
- Use your glutes and quadriceps to move yourself back up to the starting position after pushing through the heel of your front foot.
- With your balance intact, straighten your front leg.
- Then return to your neutral position.
- Then relax.
- Repeat this exercise 5 to 10 times.
Which safety measures should be followed when working out?
It’s important to take the right precautions when exercising, particularly when concentrating on activities that make hip dips look less noticeable, to prevent damage and maximize your workouts.
The following are important safety guidelines to remember:
- Make sure you properly warm up.
Always spend some time warming up before beginning any exercise. This improves flexibility, lowers the chance of injury, and improves blood flow to your muscles. Light cardio, such as running or walking, and dynamic stretches, such as hip circles or leg swings, can be mixed into a 5- to 10-minute warm-up.
- Make Use of the Right Equipment
Make sure the dumbbells, ankle weights, or resistance bands you use for your workout are in good shape and the right size for your body. Injuries are possible when equipment is used incorrectly or is overly heavy.
- Pay Attention to Your Body
Throughout the workout, pay attention to how your body feels. Stop the workout right away to find out what might be causing the pain if you feel it. Serious damage can result from pushing through pain.
- Pay Attention to Correct Form
To use the right muscles and avoid putting undue strain on your body, it’s important to use the proper form. When doing exercises like glute bridges, lunges, or squats, always pay attention to technique. Injuries can result from improper form, particularly to the hips, lower back, and knees.
- Increase the intensity gradually after starting slowly.
Don’t jump right into high-intensity workouts if you’re new to these exercises or strength training in general. As your muscles adjust, progressively raise the intensity of your activities from simple ones with little resistance (like bodyweight exercises). This will lessen the chance of damage or strain.
- Wear the correct shoes.
For stability and support, wearing the proper shoes is important, particularly while performing exercises like glute bridges, lunges, and squats. To guarantee correct alignment and lower the chance of joint strain or damage, choose shoes with a flat sole and strong arch support.
- Concentrate on Breathing
Maintaining regular breathing during your workout helps you stay stable and have energy. Breathe in during the lowering phase of each exercise and out during the effort period. This lessens the body’s unnecessary strain.
- Avoid training too much.
Overtraining can result in muscle exhaustion, strain, and even injury, even if regularity is important. Make sure you are giving yourself enough time to recover in between exercises that focus on the same muscle groups. Muscle healing requires either an active recovery day or a rest day.
- Don’t forget to stay hydrated.
Drinking enough water while exercising is essential because it keeps your muscles working at their best and helps avoid cramping. To stay hydrated and maintain your energy levels, hydrate yourself before, during, and following your workout.
- After the workout, relax.
As important as warming up is, cooling down is equally important. Spend five to ten minutes gently stretching and cooling down after your workout. This will lessen your chance of injury, increase your flexibility, and help relax your muscles.
- To get feedback, use a mirror.
Exercises should ideally be done in front of a mirror. This will enable you to keep an eye on your posture and form while you do the moves. The chance of injury will be decreased because you’ll be able to identify any form of problems and fix them right away.
- If required, get advice from a healthcare professional.
Before beginning another exercise program, it’s wise to speak with a healthcare provider or physical therapist about any pre-existing injuries, illnesses, or concerns. They can provide you with detailed instructions on body-safe exercises.
When should you stop working out?
To avoid injury and make sure you’re not overtraining, it’s important to know when to quit working out.
When performing exercises meant to reduce hip dips, you should be aware of the following warning signs to stop or take a break:
- Acute or Sharp Pain
Stop right away if you feel severe, stabbing, or intense pain in any of your muscles or joints, particularly in your lower back, hips, or knees. Pain indicates a problem, and ignoring it could result in severe harm. It’s important to understand the difference between pain, which is a warning sign, and muscle tiredness, which is normal.
- Lightheadedness or dizziness
Stop your workout right away if you start to feel lightheaded, faint, or dizzy. This may indicate overexertion, low blood sugar, or dehydration. Rest, hydrate, and take a break. Consider medical attention if the symptoms remain.
- Inability to breathe or Chest Pain
If you suffer chest pain or more than usual shortness of breath when exercising, stop right once. These signs might point to a more serious medical condition. Rest and, if needed, get medical help.
- Too Much Tired
Muscle tiredness is common, but when it becomes so severe that you can hardly stand or walk, your body has had enough. When you begin to feel excessively tired it’s important to pay attention to your body and take a break. Overworking or injury can result from pushing oneself past your limit.
- Numbness or tingling
Something is wrong if you experience any tingling, numbness, or a feeling that your body is “pushing itself out” when you’re exercising. Nerve compression may be indicated by this. Stop immediately and rest.
- Weakened Form
It’s time to stop if your shape starts getting worse and you are unable to maintain the correct technique or posture. The danger of injury grows if you continue to exercise poorly. Your muscles are tired, and you run the risk of straining them.
- Muscle Pain That Doesn’t Go Away
It’s common to feel sore after working out, particularly if you’re using new methods to target muscles, like workouts that lessen hip dips. However, you might need to stop and give yourself more time to recover if you have muscle soreness that doesn’t go away with rest or worsens over time.
- Symptoms of Overtraining
Overtraining may be the cause of your chronic exhaustion, irritability, or difficulty falling asleep. When you don’t give your muscles enough time to rest in between sessions, you’re overworking, which lowers performance and raises the chance of injury. Take a few days off if you think you may be overtraining so your body can rest and heal.
- Symptoms of Heat Stroke or Heat Exhaustion
You can be suffering from heat exhaustion or heat stroke if you start to feel uncomfortable sweat a lot, or feel dizzy while exercising in hot weather. As soon as possible, move to a cooler area, drink some water, and relax. Consider medical help if symptoms continue.
- Feeling mentally exhausted or lacking motivation
Mental fatigue can at times be just as revealing as physical fatigue. It might be a good idea to stop working out if you’re feeling so exhausted, uninspired, or even stressed that it becomes uninteresting. Your performance may suffer from mental exhaustion, and exercising this way may make you more likely to get hurt in a serious injury.
Summary:
Regular exercise can help improve the appearance of the hip dips by increasing strength, and flexibility, and lowering fat, but it is impossible to eliminate them because they are mostly a function of your genetics and bone structure. By using these exercises in a regular fitness program along with aerobic exercise and a nutritious diet, you may help form the hip muscles and, in the end, feel more confident about your physique.
You may lower your chance of injury, increase the beneficial effects of your workouts, and have fun as you work toward stronger, more toned hips by following safety precautions. When trying to reduce hip dips, keep in mind that the correct technique, patience, and continuity are key to achieving results and avoiding injuries.
You may stay safe while working toward your fitness goals, including exercises to lessen hip dips, by taking care of your body, resting, and recovering.
FAQ:
What are hip dips?
The term “violin hips,” or hip dips, refers to indentations or inward bends that develop naturally directly below the hip bone. They result from the way the body distributes bone, muscle, and fat as well as the shape of the pelvis. Dips in the hips are quite typical and do not indicate any health issues.
Is it possible to eliminate hip dips with exercise?
Exercise can help tone and develop the muscles surrounding the hips, but it is impossible to avoid hip dips because they are a result of your skeletal structure. This can give them a more defined and sculpted appearance by increasing muscle in the surrounding area.
What are the best workouts for hip dips?
Squats
Lunges
Side-lying leg lifts
Glute bridges
Fire hydrants
Clamshells
How frequently ought I to perform these exercises?
Try to include hip dip-targeting workouts in your routine three to four times a week for the best results. Between workouts, be careful to give your muscles enough time to heal. The key to success is regularity!
Can hip dips benefit from cardio?
Running, cycling, swimming, and walking are examples of aerobic exercises that can help lower total body fat. Although spot reduction is impossible, your hip dips may appear less obvious if you lose fat across your body, especially the hips.
When might we expect to see results?
Your body type, genetics, food, and the regularity of the exercise you do all affect how long it takes to see benefits. Although it could take longer to notice a noticeable change in the way hip dips look, you should generally begin to notice some gains in muscle tone and strength in 4 to 6 weeks.
Is it possible to eliminate hip dips with exercise?
No, it is impossible to get rid of hip dips because they are a normal part of your body and are frequently connected to your bone structure. But by toning the surrounding muscles, you may make them less noticeable and give your body a more defined appearance.
Does a particular diet have to be followed to achieve results?
Exercise is the primary strategy for lessening the appearance of hip dips, although eating a balanced diet can also help with body composition. Put your attention on consuming nutrient-dense foods that promote muscle growth (such as lean proteins and healthy fats) and help you lose body fat. Consuming enough protein and maintaining proper hydration can also help with muscle growth and repair.
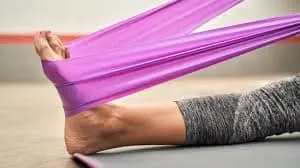
Do hip dip workouts benefit from the usage of resistance bands?
Indeed! You may make your workouts more intense by using resistance bands in exercises like side-lying leg lifts, glute bridges, and clamshells. The additional stress from resistance bands promotes better muscle activation and encourages muscle growth.
Are there any particular stretches that are beneficial for hip dips?
Stretches can improve flexibility and mobility, which are essential for the general health of muscles, even though they won’t directly lessen the look of hip dips. You may increase your range of motion and open your hips by performing stretches like butterfly stretches, and hip flexor stretches.
Do hip dips indicate underweight or overweight condition?
No, having hip dips does not mean that you are underweight or overweight. People of all body types can have them; they are a perfectly normal anatomical feature. The main factors affecting the appearance of hip dips are genetics, bone form, and fat distribution.
Do I need to worry about my hip dips?
For many people, hip dips are an entirely normal and natural component of their bodies. They are safe and do not present any health risks. Exercise can help tone the muscles surrounding the hips, which can improve their appearance if you’re worried about how they look.
Are these exercises safe to perform on an everyday basis?
As long as you give your muscles time to rest and recover, doing hip-focused exercises every other day is usually safe. Muscle tiredness or damage can result from overtraining. For improvement, a well-rounded exercise program that includes rest days is necessary.
Can males get hip dips too?
Yes, both men and women are capable of hip dips. Men can also have hip dips depending on their bone form and muscle composition, though they might be more obvious in women because of their different body fat distribution.
What should you keep in mind above everything else when trying to minimize hip dips?
Above all, keep in mind that hip dips are a normal part of your body and that you shouldn’t worry about them. The healthiest course of action is to accept your body and concentrate on your general strength and fitness, even though activities may help tone your muscles while improving your appearance. Self-love and confidence are powerful!
References:
- Prajapati, D. October 27, 2023b. Exercises for Hip Dip Reduction Archives: Samarpan Physiotherapy Clinic. Samarpan Clinic for Physiotherapy. Hip-dip-reduction exercises: https://samarpanphysioclinic.com/tag/
- Jain, M. (2022, August 5). Six exercises to help sculpt your hip dips. Health shots. https://www.healthshots.com/fitness/muscle-gain/know-what-are-hip-dips-and-6-exercises-to-reduce-them/
- Brick, S. August 6, 2024. Hip dip workout that works: Strengthening and toning exercises. Greatist. Hip-dip workout: https://greatist.com/health
- Cronkleton, E. September 8, 2023. Ten hip dip exercises that will tone your hips and build muscle. Healthline. Hip-dip exercises: https://www.healthline.com/health/how-to-get-rid-of-hip-dips
- Ocs, T. P. D. August 26, 2024. Causes, body types, and solutions for hip dips. Verywell Health. Hip-dips-8404562: https://www.verywellhealth.com
- Gillam, R., Pritchard, E., and Fargo, M. (2024, June 6). Why do you get hip dips and why they’re not that unpleasant? The health of women. a26141012/hip-dips https://www.womenshealthmag.com/uk/fitness/strength-training
- Jey, T. March 2, 2023. What are hip dips and how can one minimize their appearance? | Toronto Physiotherapists | Yorkville Sports Medicine Clinic. Yorkville Sports Medicine Clinic offers physiotherapy services in Toronto. https://www.yorkvillesportsmed.com/blog/hip-dips-reduce-their-appearance-exercises-and-what-are-they
- Image 7, Single-leg prone lifts. Skimble.com, n.d. How to perform prone single-leg lifts: https://www.skimble.com/exercises/48723.
- Image 8, Lefkowith, C. (October 4, 2019). Twelve different lunge variants to strengthen your legs and glutes. Strength is being redefined. To develop strong legs and glutes, try these variations of the lunge: https://redefiningstrength.com/12