15 Best Exercises For Hip Dislocation
Introduction:
Hip dislocation exercises are essential for restoring mobility, strengthening muscles, and preventing future dislocations. After proper medical management and initial healing, physiotherapy focuses on gentle range-of-motion, strengthening, and balance exercises to support the hip joint and promote safe recovery.
Strength and flexibility Exercises For Hip Dislocation are important for easing hip pain. While there is a chance of experiencing short-term pain, these exercises shouldn’t worsen the pain. If exercise causes pain, stop; alternatively, try moving more slowly.
Hip dislocation classifications:
The anterior hip dislocation
- The femoral head moving forward is a rare problem.
- It usually results from external rotation of the hip and strong hyperextension (straightening).
The posterior hip dislocation
- When the femoral head dislocates backward out of the socket, this happens.
- It often comes on by high-impact incidents such as auto accidents (any traumatic injury affecting the hips) or falls that produce internal rotation and hip flexion.
Central hip dislocation
- A serious injury resulting from the femoral head separating into the middle of the hip joint frequently results in an acetabulum (socket) fracture.
Causes:
Trauma
- Young adults are most frequently affected by traumatic hip dislocations, particularly those who engage in physically demanding sports or other physical activities.
The condition of arthritis
- Pain and inflammation are symptoms of arthritis, a disease that damages the joints.
- One typical type of arthritis that can affect the hip joint is osteoarthritis, which can be caused by the joint’s gradual wear and tear.
Congenital Disorders
- Hip dysplasia is one congenital condition that might increase the risk of hip dislocation.
- A doctor can diagnose this disorder, which is frequently present from birth.
Dislocation of the Prosthetic Hip
- Particularly in the initial postoperative phase following complete hip replacement surgery.
- Incorrect implant placement, weak surrounding muscles, and certain motions (such as excessive hip bending).
Joint Replacement
- The ball is removed from its socket during surgery, which opens the hip joint.
- The joint may be more at risk for dislocation while it is being fixed.
- To lower the risk of dislocation, patients undergoing joint surgery ought to pay close attention to their healthcare provider’s post-operative instructions.
Signs and symptoms:
Extreme, Unexpected Pain
- Thigh, hip, groin, or even the knee.
- Pain usually starts as soon as trauma happens.
- Sharp, severe pain that gets worse with contact or movement.
- The patient is often not just distressed but also unable to stand or sit.
A deformity that is palpable and visible
- The hip could appear flattened or incorrect.
- In comparison to the healthy side, the limb appears to be out of balance.
Bruising and Swelling
- Sudden appearance of hematoma, bruising, or edema around
- Buttocks, groin, and hip
Unmovable Leg and Inability to Support Weight
- Extreme pain occurs whenever the affected leg is moved.
- There may be muscle spasms, which would make the stiffness and pain worse.
Related Injuries
Hip dislocations usually happen alongside other injuries, such as:
- Fractures of the pelvis
- Fractures of the femur head or neck
- Knee ligament damage
- Bone fragments inside the joint (seen on imaging)
Benefits of Exercise:
Restores Joint Mobility
- Range of motion (ROM) in the hip joint is enhanced by controlled movement and mild stretching.
- Helps lessen stiffness caused by inactivity after an accident or surgery.
Strengthens Muscles That Support
- The surrounding muscles (hamstrings, quadriceps, gluteals, and hip flexors) frequently become weaker following dislocation.
- By stabilising the joint, strengthening activities help to avoid re-dislocation.
- Helps make up for any damage to the nerves or soft tissues.
Restoring Neuromuscular Coordination
- Both rigidity and dislocation disturb the connection between the brain, muscles, and nerves.
- Walking, standing, and sitting are all improved by rehabilitation activities that retrain natural movement patterns.
Makes joints more stable and balanced.
- Strengthening the gluteus medius and other deep hip stabilizers improves balance and control.
- Enhances proprioception, or the awareness of joint position that may be diminished following an injury.
- Lowers the chance of falls or recurrent injuries, particularly in older patients.
Enhances Gait and Posture Mechanics
- After a dislocation, many people start to walk abnormally or with a limp.
- Specific rehabilitation activities lessen chronic joint tension by restoring posture and balance.
Lessens Inflammation and Pain
- Low-impact exercise reduces swelling by promoting lymphatic drainage and blood flow.
- Exercise elevates happiness and comfort by releasing endorphins, which are natural painkillers.
Encourages a Safe Return to Activity
- The hip is gradually strengthened to meet the demands of daily life, sports, or the workplace.
- Guarantees that the patient regains their sense of confidence when moving.
Stop Muscle Atrophy
- Muscle atrophy develops when the leg is not used because of pain or immobility.
- Muscle mass and function are preserved by early range-of-motion and isometric training.
Take into account the following safety measures before beginning an exercise program:
Before starting any exercise program, a few safety precautions should be taken to get the most benefits. For guidance on the most suitable exercises for your particular issue, speak with your doctor or physical therapist.
Instead of resisting pain, you should listen to your body. Exercise-related pain is normal, but if it continues or worsens, it might indicate that you’re pushing yourself too hard. Start with low-impact exercises and work your way up to tougher ones until you can handle greater pain.
Recurrent injuries can be avoided by maintaining proper form and technique. Consult a doctor if you have doubts about your capacity to remain committed to an exercise program. Before beginning any activity, warm up to make sure your muscles and joints are ready.
Exercises For Hip Dislocation:
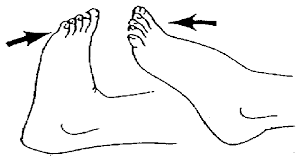
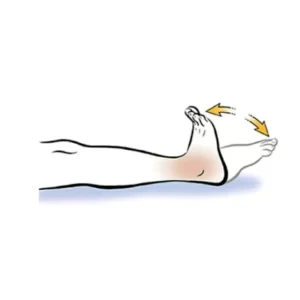
Ankle pump
- Start by placing your feet out in front of you while sitting or reclining on an upright bed.
- You may perform these on the ground as well.
- Try your hardest to pull them away from you after that.
- That’s all there is to it.
- You only need to alternately point and bend your feet as far in each direction as possible.
- Continue for around two to three minutes.
- Then return to your neutral position.
- Then relax.
- Repeat these exercises 5 to 10 times.
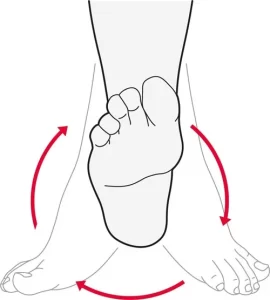
Ankle rotation
- Initially, put yourself comfortably in the chair.
- Use a chair that supports you so that you may comfortably rest on both feet.
- Keep your hands by your sides on the chair’s edge for further stability and support during this exercise.
- Do this around your ankle 10 times in one direction and 10 times in the opposite direction.
- Then return to your neutral position.
- Then relax.
- Repeat these exercises 5 to 10 times.
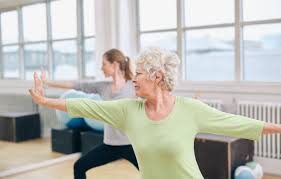
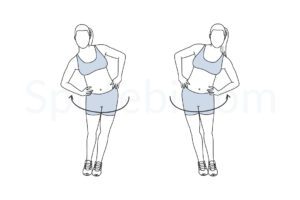
Hip circle
- Stand upright with your feet shoulder-width apart.
- Knees should be slightly bent.
- Your hands should then rest on your hips.
- With your hips, carefully rotate them in big circles.
- After finishing a set in one direction, change to the other.
- Then return to your neutral position.
- Then relax.
- Repeat these exercises 5 to 10 times.
Gluteal set
- To begin, rest on your back on the floor.
- Next, continue to bend your knees.
- Put your buttocks under as much pressure as you can, then compress them.
- For a few seconds, maintain this posture.
- Your knees should remain apart, and your hips should not rise off the floor or bed.
- Then return to your neutral position.
- Then relax.
- Repeat these exercises 5 to 10 times.
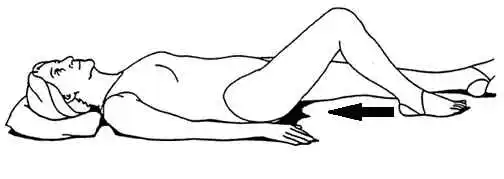
Heel slide
- Place yourself on the floor in a comfortable posture to begin.
- Keep your feet a little apart.
- As close to your buttocks as you can, move onto the affected leg.
- Hold this position for a few seconds.
- Then return to your neutral position.
- Then relax.
- Repeat these exercises 5 to 10 times.
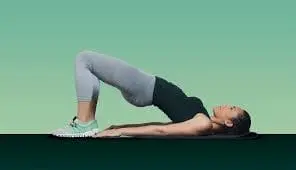
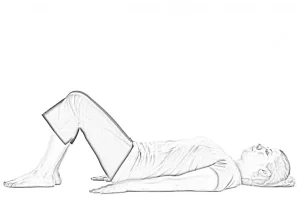
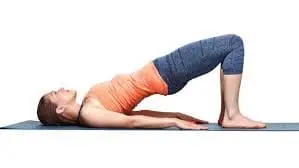
Bridges
- Place your back flat on the ground.
- Then bend your knees.
- If assistance is needed, place a small pillow beneath the head and neck.
- Slowly elevate your pelvis, then your back.
- Make sure your shoulders and upper body remain grounded.
- Hold this position for a few seconds.
- Start at the top of the spine and work your way down the pelvis and back down towards the floor.
- Then return to your neutral position.
- Then relax.
- Repeat these exercises 5 to 10 times.
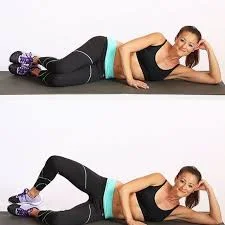
Clamshells
Clamshell steps:
- To begin, have a comfortable supine position on one side of the table.
- Make the abdomen feel squeezed.
- Now bend your knees.
- Then you elevate your upper knee.
- Hold this position for a few seconds.
- Then return to your neutral position.
- Then relax.
- Repeat these exercises 5 to 10 times.
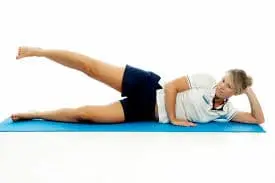
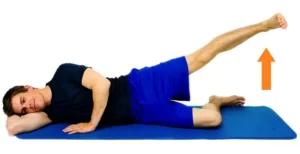
Side Lying Hip Abduction
- Start by lying on one side on the ground.
- For support, place your lower arm bent and behind your head, and maintain a neutral foot posture.
- Next, bend your lower leg.
- After that, release your breath and carefully raise your upper leg off your lower leg.
- The elevated leg’s knee should point directly away from you, and the hips should stay parallel to the floor.
- Keep lifting the leg until your low back muscles begin to tense or your hips begin to tilt forward.
- Hold this position for a few seconds.
- Breathe deeply, then slowly return your raised leg to the beginning position.
- Then return to your neutral position.
- Then relax.
- Repeat these exercises 5 to 10 times.
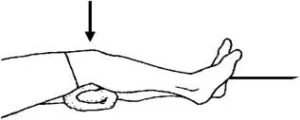
Quadriceps set
- Begin by resting on the ground.
- Keep your leg straight out.
- You can bend the foot of your straight leg by putting your toes in the opposite direction.
- Place a little piece of cloth beneath your knee.
- Following that, push strongly against the cloth at the back of your knee.
- Hold this position for a few seconds.
- Then return to your neutral position.
- Then relax.
- Repeat these exercises 5 to 10 times.
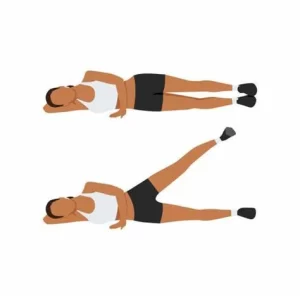
Lying Lateral Leg Raises
- Place yourself in the right side line posture on a yoga mat.
- To support your head and neck, use a little towel or your right hand underneath it.
- Put your left hand in front of your waist or on the side of your left hip to help stabilize your upper body.
- Get your core active.
- Without locking your knees, put your legs on top of one another with your legs completely extended.
- Lift your left leg a few inches from your right leg to begin the upward movement while keeping your feet in line.
- Hold this position for a few seconds.
- Drop your leg.
- Then return to your neutral position.
- Then relax.
- Repeat these exercises 5 to 10 times.
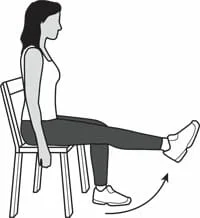
Knee extension
- First, take a seat in a chair.
- Then straighten one leg.
- Hold this position for a few seconds.
- Lower your leg slowly.
- Then return to your neutral position.
- Then relax.
- Repeat these exercises 5 to 10 times.
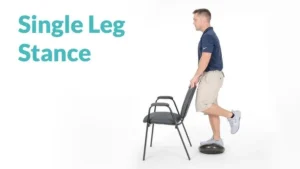
Single Leg Stand (Supported)
- Place yourself next to a chair.
- One leg should be raised off the ground and bent behind you.
- If you have trouble standing, grip onto the chair with one hand.
- Your standing leg should have a straight knee.
- Hold this position for a few seconds.
- Lower your leg.
- Then return to your neutral position.
- Then relax.
- Repeat these exercises 5 to 10 times.
Standing heel raise
- Take a position behind a chair.
- After that, place your hands on the chair’s back for support.
- Your feet should be hip-width apart.
- You must raise your heels off the ground to place your weight on your toes.
- Hold this position for a few seconds.
- Then return to your neutral position.
- Then relax.
- Repeat these exercises 5 to 10 times.
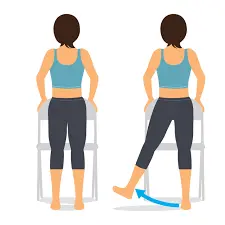
Standing hip abduction
- To start, place your feet shoulder-width out.
- Gripping a solid object, such as a chair, table, or wall, extend the left arm out to the side.
- The right leg should then be extended to the right side.
- Don’t twist your hips; instead, have your left leg straight.
- Hold this position for a few seconds.
- Then return to your neutral position.
- Then relax.
- Repeat these exercises 5 to 10 times.
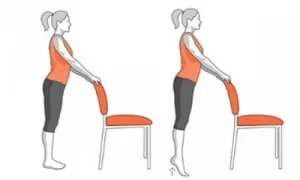
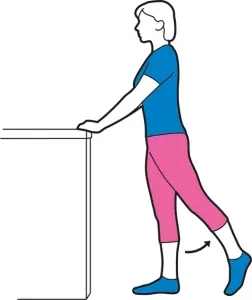
Standing hip extension
- Maintain a shoulder-width distance between your feet.
- Hold onto a chair, table, or wall for support while spreading both arms wide in front of you.
- Next, extend the left leg.
- Squeeze the buttocks lightly after raising the leg as much as you can without hurting it.
- Hold this position for a few seconds.
- Then return to your neutral position.
- Then relax.
- Repeat these exercises 5 to 10 times.
Exercise safety precautions:
Get the medical clearance first.
- Exercise should only be started with permission from your physician or physical therapist.
- There is frequently a period of limited movement following reduction or surgery (typically the first 6–8 weeks).
Begin with controlled, low-impact movements.
- Do not rush, jump, twist, or change direction quickly.
- Start with range-of-motion and isometric exercises.
- Gradually progress to weight-bearing and resistance training.
Make progress gradually.
- Gradually increase the difficulty, resistance, and repetitions.
- Don’t skip any steps in your recovery plan.
- For instance, if you haven’t mastered bodyweight exercises, don’t jump right into resistance band training.
Keep an eye on pain and tiredness.
- Mild pain in the muscles is usual.
- Avoid pushing through severe pain, as this may indicate re-injury.
When necessary, use assistive devices.
- If you have poor balance, use canes, crutches, or walkers.
- You can only transition to full weight-bearing after getting medical permission.
- Do not stand unsupported if your balance is affected.
Keep Your Posture Correct
- Throughout every exercise, maintain a neutral posture of the hips, knees, and feet.
- To guarantee form, use mirrors, wall support, or supervision.
- An incorrect posture could put stress on the surrounding muscles or joints.
Wear suitable footwear.
- When performing walking or standing workouts, wear supportive, non-slip shoes.
- During rehabilitation, refrain from wearing high heels, sandals, or going barefoot.
After working out, apply ice.
- After working out, icing for ten to fifteen minutes might help relieve pain or inflammation.
If at all possible, remain under physical therapist supervision.
A certified physical therapist guarantees:
- Choosing the right exercises
- Safe progress
- Correcting poor patterns of motion right away
When did you stop performing this exercise?
Pain
- Deep, intense hip pain during activity could be an indication of pressure, joint tension, or poor form.
- Pain could be a sign of re-injury, muscle strain, or inflammation.
Inflammation or Swelling
- Excessive exercise, particularly in the early stages, can cause joint swelling.
- It may also be caused by underlying illnesses like arthritis.
Weakness or Fatigue in the Muscles
- Hip and core muscles are deconditioned in the early stages of rehabilitation.
- Muscle tiredness can occur rapidly, particularly while performing resistance or weight-bearing exercises.
Not the Right Form or Method
- Patients could perform exercises incorrectly if they are not properly supervised.
- Other joints may experience tension and compensatory movement as a result of poor posture.
Instability or Poor Balance
- A hip dislocation may affect balance.
- Exercises involving standing or single legs may make patients feel insecure.
Lack of Encouragement or Support
- Rehab can be prolonged and repetitive.
- Patients could become unmotivated or receive poor direction.
- People are less likely to stick with an exercise program if they don’t have a physical therapist.
Medical Guidance
A doctor or therapist may occasionally advise you to stop a workout because of:
- Unstable joints
- Indications of complications
- Imaging or reassessment is required.
If you have hip dislocation, which exercises should you avoid?
To avoid re-dislocation, additional joint damage, or problems like nerve impingement or avascular necrosis, you should thoroughly avoid specific activities and movements if you have a hip dislocation, especially in the early to mid stages of recovery.
Movements with a High Impact
- Put strain on the recovering joint, which could lead to re-injury.
- Jumping, such as jump squats
- Running
- Plyometric workouts
- Step-ups with high intensity
Hip Flexion Deep (>90°)
Can force the femoral head out of its socket, which is particularly risky following a posterior dislocation.
- Deep squats
- Knee-to-chest exercises
- Cross-legged or seated on low stools
Hip Adduction (Midline Leg Crossing)
- Crosses the body by oppositely moving the leg.
- The capsule is under tension from this motion, which raises the possibility of posterior dislocation.
- Crossover stretches for the legs.
External Rotation and Hip Extension
- Particularly risky following anterior dislocation.
- Happens during backward motions such as back kicks or lunges.
Internal Rotation of the Hip
- Standing with your foot or knee turned inward
- One-legged turning, particularly in sports
- Yoga positions such as eagle or pigeon pose.
Balance-Challenging Activities Without Assistance
- Positions that are unstable increase the danger of falls and joint stress. Single-leg deadlifts
- Standing on one foot with eyes closed
Precautions for preventing hip dislocation:
Hip dislocation can be avoided, and there are several steps you may take to lower your chance of becoming hurt.
Maintain Proper Posture
- An increased risk of instability and dislocation can result from incorrect positioning, which places excessive load on the hip joint.
- To practice good posture, keep your back straight and your shoulders relaxed.
- Don’t stand with your weight improperly distributed on your feet or collapse.
- You can also develop a strategy to correct your posture with the assistance of a physical therapist.
Be sure to sit and sleep safely.
Sitting
- Knees should be lower than hips when seated.
- To raise yourself, use armrest-equipped chairs.
- Avoid low chairs and soft couches.
Resting
- Use cushions between your knees and sleep on the side that hasn’t been operated on.
- Do not sleep on your stomach.
Keep Your Weight in Check
- The hip joint may experience additional stress from carrying too much weight, which raises the possibility of dislocation.
- You can lower your risk of hip dislocation and other joint disorders by maintaining an ideal weight.
- To create a weight-loss plan that suits you, speak with a healthcare provider if you are overweight.
Build Up Your Hip Muscles
- The hip joint is maintained, and the danger of dislocation is decreased by having strong hip muscles.
- Include hip-focused exercises in your training regimen, such as hip extensions and abductions.
- Building hip strength can be facilitated by resistance training and bodyweight exercises, but it’s ideal to consult a qualified professional to create an exercise program.
Stay away from High-Impact Activities.
- High-impact workouts like running and jumping can put additional pressure on the hip joint and increase the chance of dislocation.
- If you have a history of hip injuries or other joint-related issues, stay away from these sports.
- Instead, think about low-impact exercises like yoga, swimming, and cycling.
Take Caution in Your Daily Tasks
- Avoid sudden turns or twisting on the injured leg.
- Avoid leaning forward when standing to get to anything on the floor.
- Turn your complete body, not just your hips.
When participating in sports, wear safety equipment.
- The risk of hip dislocation can be reduced by wearing protective equipment, such as hip padding, if you practice sports like football or soccer that require sudden shifts in direction or physical contact.
- Because they minimize the force of a fall or an accident, hip cushions may help protect the hip joint.
Summary:
High-impact trauma, such as major falls, sports injuries, or auto accidents, is typically the cause of this excruciating injury.
Hip dislocation recovery requires patience, time, and a well-planned workout regimen. Personalized workouts are essential to your path to full mobility, whether you’re recovering from fundamental movement or getting ready to resume sports. Before beginning or altering your rehabilitation regimen, always get medical advice.
FAQ:
Which workouts are beneficial for hip dislocation?
Clamshells.
Ankle pump
Bridging.
Hip Abduction.
Side Plank.
Lateral Mini-Band Walking.
After a hip dislocation, what should one not do?
Don’t do anything that needs careful attention to detail for a whole day. This involves completing any legal documents, going to work, and making significant decisions. The effects of the medication take time to fully disappear. Do not drive or operate any potentially dangerous apparatus for your safety.
What period does it usually take to heal from a hip dislocation?
It usually takes two to three months for a dislocated hip to heal once the joint has been reduced (re-aligned). The length of recovery, however, may vary based on the dislocation’s severity, any related injuries (such as fractures), and each person’s rate of healing. To assist in regaining strength and mobility during recovery, physical therapy is frequently advised.
How can hip pain be relieved quickly?
A mix of techniques, such as rest, ice, over-the-counter painkillers, and mild stretching exercises, is frequently the quickest approach to cure hip pain.
After a hip dislocation, when can I resume my exercise routine?
After your physician or physical therapist confirms that the joint is stable, you can usually start exercising. Depending on how severe the dislocation was and whether there was any related damage (such as fractures or labral tears), this could take anywhere from a few days to several weeks. Never ignore your medical provider’s advice.
What goals do the workouts aim to achieve when a hip dislocation happens?
Restore your range of motion.
Build up your core and hip muscles.
Increase the stability of your joints.
Avoid getting hurt again.
Restore your regular movement and function.
Which exercises are best avoided following a hip dislocation?
Deep squats
Crossing your legs
High-impact jumping
Pivoting or twisting
Heavy lifting
What causes to dislocation of the hip?
The most frequent cause is auto accidents.
Sports injuries or falls
Congenital disorders (such as hip dysplasia)
Previous hip replacement or surgery
How do you diagnose a hip dislocation?
Physical evaluation
Look for fractures and confirm dislocation using X-rays
If there is a suspicion of soft tissue or nerve injury, CT or MRI scans
Is dislocation of the hip a medical emergency?
Yes. To avoid impacts like nerve damage, avascular necrosis, or chronic joint issues, it needs to be treated by a doctor right away.
Following a hip dislocation, can I walk?
Not right away. You may probably need to use a walker or crutches throughout your initial recovery. Walking will be gradually resumed in keeping with medical guidance.
How can hip dislocation be avoided?
Prevent high-impact injuries by wearing seat belts, for example.
After hip replacement surgery, take certain precautions.
Exercise to build stronger hip muscles.
References:
- Dpt, M. J. P. (January 13, 2022). Integrative Spine & Sports: 5 Exercises To Help With An Unstable Hip. Sports & Integrative Spine. Hip instability: https://integrativespineandsports.com/
- Team for Orthopaedic Therapy (2014). Dislocated hip replacement patients with preferences for therapy services, second edition Dislocated hip booklet.pdf https://www.uhd.nhs.uk/uploads/about/docs/our_publications/patient_information_leaflets/orthopaedics
- NHS Inform. February 7, 2025a. Hip-related exercises | NHS Inform. Exercises for hip difficulties, NHS Inform. https://www.nhsinform.scot/illnesses-and-conditions/muscle-bone-and-joints/leg-and-foot-problems-and-conditions
- Dislocation of the hip. June 2, 2025. Cleveland Medical Centre. 22222-hip-dislocation https://my.clevelandclinic.org/health/diseases
- Hip dislocation prevention: a comprehensive guide. The Hospital of King Edward VII. March 11, 2025. The Hospital of King Edward VII. This is the link: https://www.kingedwardvii.co.uk/health-hub/health-hub-how-to-prevent-hip-dislocation
- B. N. Chua (n.d.). Singaporean hip dislocation physiotherapy. Hip-dislocation-physiotherapy: https://phoenixrehabgroup.com/articles/physiotherapy/
- Shri Guru Ram Rai School, Paramedical & Allied Medicine, n.d. Hip dislocation. SlideShare. Hip-dislocation presentation: https://www.slideshare.net/slideshow/233963187/233963187
- Admin, & Admin. July 3, 2024. Safe hip recovery exercises for displaced hips. ACIBADEM Medical centers, Acibadem Health Company, and Acibadem Health Station. The safe activities listed below can help you heal from a dislocated hip: The website https://www.acibademhealthpoint.com.
- Image 11, Health Vive. March 19, 2020. Exercises using wobble cushions to increase ankle balance and support [Video]. YouTube. Visit this link to view it: https://www.youtube.com/watch?v=e39qPKB1Ysw.